The Sony A7 III sports excellent video capabilities, as do many other A7 models. Thanks to the quality of their full frame sensors, the great high ISO performance and the advanced settings to control the image, the A7 series has become a popular choice amongst filmmakers.
When we pit cameras against one another on Mirrorless Comparison, we don’t do it just for stills but also to analyse the video performance. Here is what we have learned so far about shooting video with the Sony A7 III and other E-mount models, including a few video tips that we hope you find useful.
A7/A9 series compatibility
The content of this article is based on the A7 mark III, mark IV and A9 generations, but it can also be considered valid for older products. Any difference between the various models is mentioned throughout the article.
Note: all the settings highlighted in this post include information about their location in the camera’s menu system. Please note that the location of some settings might differ slightly from one product to another. Some of these settings might also be assigned to custom buttons, the Fn Menu or My Menu.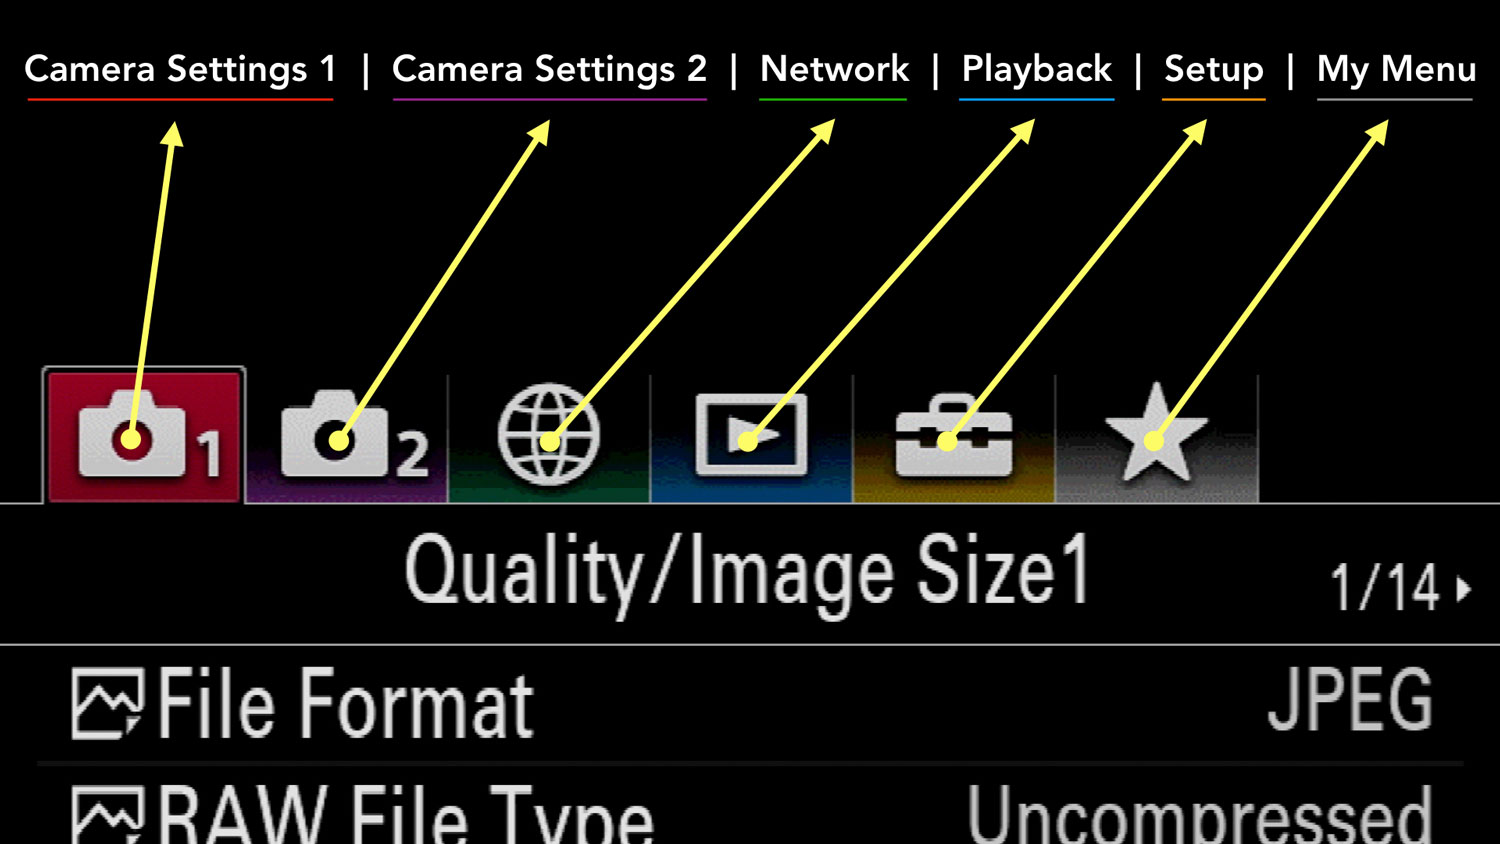
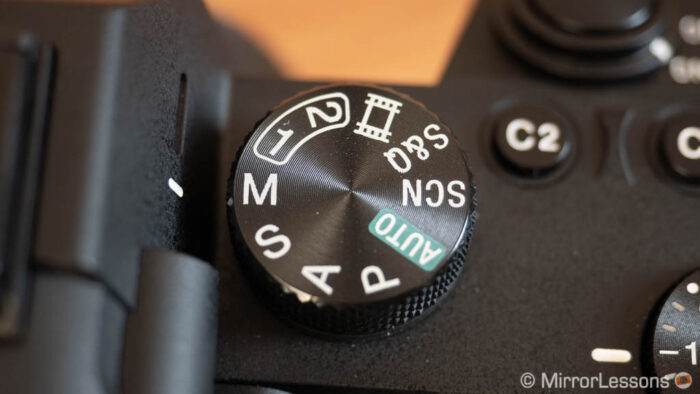
All the settings related to video are marked with a film icon in Sony’s menu. ![]()
![]()
Older cameras (A7 II series and below) have an older menu system and there can be more differences concerning the location, or the availability of some settings.![]()
![]()
TABLE OF CONTENTS
1. Video Quality Settings
2. 4K Video Settings
3. Slow Motion Settings
4. Exposure Settings for Video
5. Zebra Setting for Video
6. Video Profiles
7. Audio Settings
8. Autofocus Settings for Video
9. Video Stabilization
10. Display Settings for Video
11. Setup for Video
12. Other Settings for Video
13. Additional Resources
Ethics statement: the following is based on our time with many A7 and A9 models, and more specifically with the A7 III and A7R III which we own. We were not asked to write anything about these products, nor were we provided with any sort of compensation. Within the article, there are affiliate links. If you buy something after clicking the link, we will receive a small commission. To know more about our ethics, you can visit our full disclosure page. Thank you!
Reminder: the links below are affiliate links. If you decided to buy something after clicking the link, we will receive a small commission.
Check price of the Sony A7 III on:
Amazon | Amazon UK | B&H Photo | eBay
Check the price of the Sony A7R III on:
Amazon | Amazon UK | B&H Photo | eBay
Check price of the Sony A7R IV on
Amazon | Amazon UK | B&H Photo | eBay
Check price of the Sony A9 on
Amazon | Amazon UK | B&H Photo | eBay
Check price of the Sony A7 II on:
Amazon | Amazon UK | B&H Photo | eBay
Check price of the Sony A7R II on:
Amazon | Amazon UK | B&H Photo | eBay
Second-hand Sony gear on
MPB US | MPB UK
Sony A7 III, A7R III, A9 Video Quality Settings
There are several settings that can influence the quality of your video footage including resolution and bitrate.
Sony A7 III, A7R III, A9 Video Resolution
Most Sony cameras can record in Ultra HD or Full HD.
Ultra HD, also known as 4K, has an image size of 3840×2160 pixels. 4K has become widely popular and is found on consumer products, smartphones, TVs and streaming services. Recording more pixels means recording a larger image with more details.
4K is not available on the A7 I series or the A7 II.
Full HD, also known as 1080p, has an image size of 1920×1080 pixels. Introduced in 2003, the format remains popular nowadays for many applications that don’t require a higher resolution. It is also less demanding when it comes to video editing.

Older models such as the A7S and A7R II can also record in HD Ready (1280×720) with select frame rates.
Sony A7 III, A7R III, A9 Video File Format
Camera Settings 2 / Movie 1 (page 1/9) / File Format
Your A7 III features three video recording formats: XAVC S 4K, XAVC S HD and AVCHD.
Choose XAVC S if you want the best video quality. It offers a higher bitrate than AVCHD, and is the setting to choose if you want to record 4K video with your camera.
What is XAVC S?
It is a lighter version of Sony’s professional XAVC recording format. It uses the H.264 codec (video compression standard), the MP4 container format (or “wrapper”) and the lossless audio codec LPCM.
XAVC S is not available on the A7 and A7R (1st series).
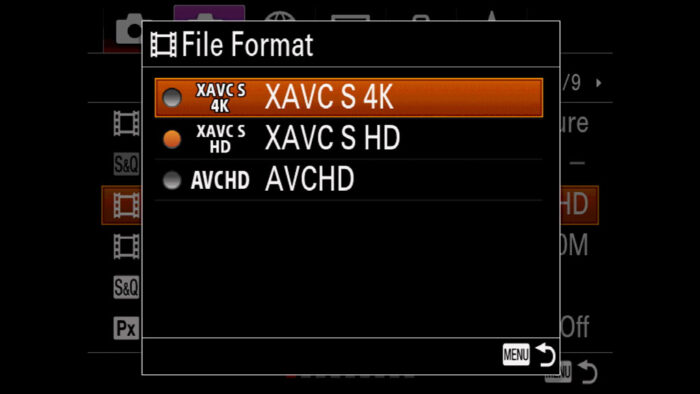
Choose AVCHD if you want smaller video files in Full HD for family, academic or archive purposes where the maximum quality is not the main priority.
What is AVCHD?
AVCHD (Advanced Video Coding High Definition) is a file-based format develop by Sony and Panasonic. It was introduced in 2006. It works with H.264 and Dolby AC-3 audio.
Sony A7 III, A7R III, A9 Video Frame Rate and Bitrate
Camera Settings 2 / Movie 1 (page 1/9) / Record Setting
The Record Setting allows you to choose the frame rate and the bitrate of the video.
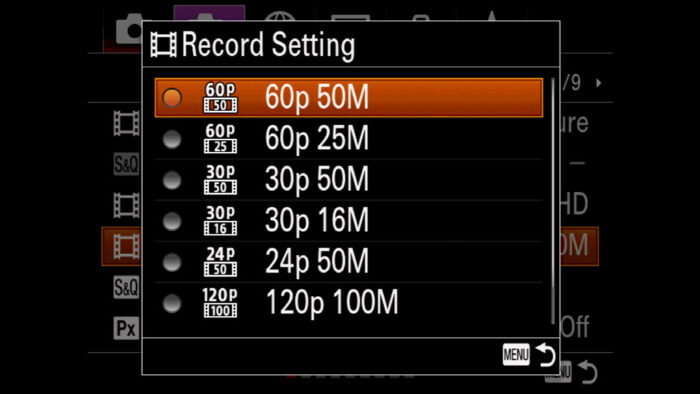
Frame Rate
Frame rate means the number of individual images that are recorded every second. To give you an example, the cinema standard is 24fps (frame per second). The higher the frame rate, the smoother and sharper your video will appear, especially when movement is involved. Recording at high frame rates also helps you create better slow motion videos.
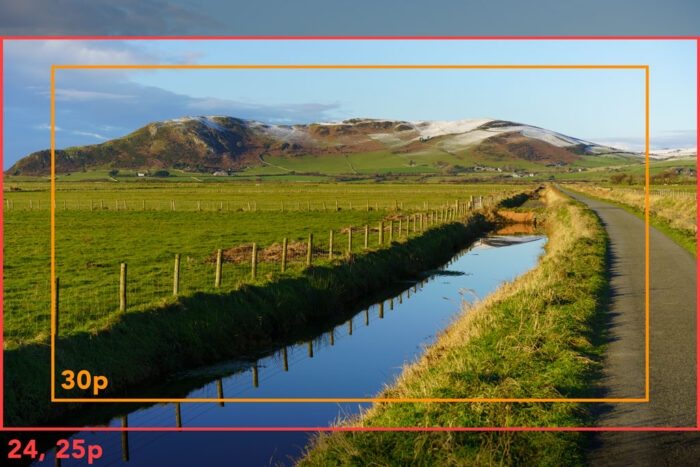
Below are the frame rates available for each format.
| File Format | Frame Rate |
|---|---|
| 4K (XAVC S 4K) | 24, 25 and 30p |
| Full HD (XAVC S HD) | 24, 25, 30, 50, 60p, 100p, 120p |
| Full HD (XAVC S) | 24, 25, 30, 50 and 60p |
| HD Ready (XAVC S) | 100 and 120p |
| Full HD (AVCHD) | 50i, 60i, 24p,25p,30p,50p and 60p |
100p and 120p in Full HD is not available on the A7 I series, the A7 II and A7R II. HD Ready at 100/120p is available on the A7R II only.
Note: with AVCHD on some cameras, you have the option to record with interlaced scan (i) where an alternate sets of lines are displayed for each frame, meaning that only half the image is captured at a time. It differs from progressive scan (p) that captures the entire image per frame each time instead. Interlaced can be more prone to motion artefacts. Most of the media we consume today is progressive.


Bitrate
Bitrate is the number of bits per second used to create the video file. The higher the bitrate, the larger the file and the better the quality is because there is less compression.
Here is the bitrate for each file format and frame rate, as well as the recording time available on a 32GB card:
| File Format | Bitrate | Rec. time on a 32GB card |
|---|---|---|
| 4K (XAVC S 4K) at 24, 25, 30p | 100Mbps 60Mbps | 35 min 1 hour |
| Full HD (XAVC S HD) at 24, 25, 30p | 50Mbps 16Mbps | 1h 15min 3h 50min |
| Full HD (XAVC S HD) at 50, 60p | 50Mbps 25Mbps | 1h 15min 2h 25min |
| Full HD (XAVC S HD) at 100, 120p | 100Mbps 60Mbps | 35 min 1 hour |
| Full HD (AVCHD) at 50i, 60i, 24p, 25p, 30p | 24Mbps 17Mbps | 2h 55min 4h 5min |
| Full HD (AVCHD) at 50p, 60p | 28Mbps | 2h 30min |
Sony A7 III, A7R III, A9 NTSC / PAL Selector
Setup 2 / NTSC/PAL Selector (page 2/7)
The frame rates available on your A7 largely depend on the broadcast television system set on your camera. By default, it will be configured to the setting related to the location where you bought it:
- NTSC for North America, western South America, Liberia, Myanmar, South Korea, Taiwan, Philippines, Japan and some Pacific island nations and territories
- PAL for Europe, African countries that were once a French colony, Argentina, Brazil, Paraguay, Uruguay, Oceania and parts of Asia.
For PAL users, the camera can record in 25p, 50p or 100p.
NTSC users can record in 24p, 30p, 60p and 120p.
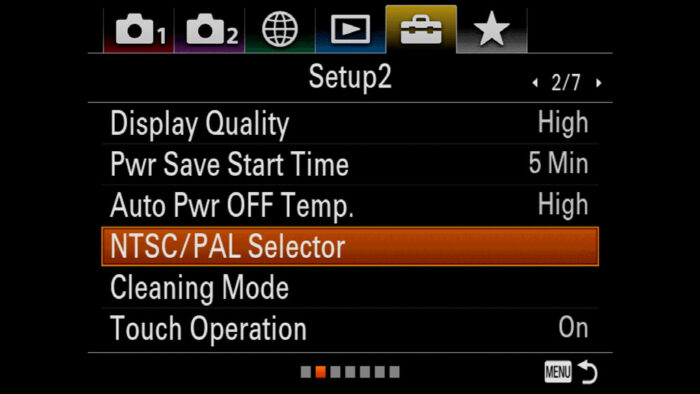
If you want to record to a specific frame rate and you can’t find it (for example a European user wanting to record at 24p), you need to change the TV system on your camera.
- Go to Menu Setup 2 (page 2/7)
- Scroll down to NTSC/PAL Selector
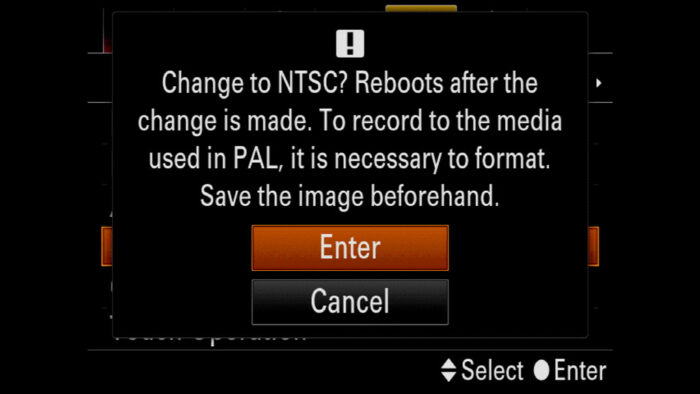
- Read the notice and click ENTER
Important: each time, the camera will give you a warning saying it has to reboot. If your SD card contains videos filmed with the other system, you can’t play them back. Furthermore, if you switch back to the previous setting, you will need to format the memory card, so make sure to be prepared in advanced and back up your files.
Limitations: be aware that NTSC and PAL are also linked to the frequency of the alternate current in your country. For example, the European current works at 50Hz, and this is why PAL is calibrated at 50Hz. If you switch to NTSC, you’re switching to a 60Hz mode which can cause banding or flickering in your image. In this case, changing the shutter speed may help but make sure to do some tests beforehand.
Sony A7 III, A7R III, A9 Video Time Limit
For a long time, digital cameras were limited to a maximum of 30 minutes of recording time per clip. The reason was to avoid overheating problems, and the extra tax that would label the camera as a camcorder (notably in Europe).
Recently, manufactures have started to lift the 30 minute limit on their products. Sony has done it with recent APS-C models and the A7R IV.
| Camera Model | Max. Duration / Clip |
|---|---|
| A7, A7R, A7 II, A7R II, A7 III, A7R III, A9 | 30 min |
| A7R IV | unlimited |
Sony A7 III, A7R III, A9 4K Video Settings
When it comes to video quality, and particularly the quality of 4K video, it is important to understand how the camera works to ensure the best result.
As explained above, the dimension of 4K is 3840×2160 pixels. An easy calculation tells us that it corresponds to a resolution of 8 megapixels. In other words, to produce 4K footage, you need a sensor with at least 8MP.
The sensors on Sony E-mount cameras offer a higher resolution, from 12MP to 60MP depending on the specific model. These sensors (with the exception of the A7S series) are designed for still photography first, where a high resolution matters more. So how exactly does your Sony camera cope with the extra pixels on the sensor when recording video?
Sony A7 III, A9 Video Crop Factor
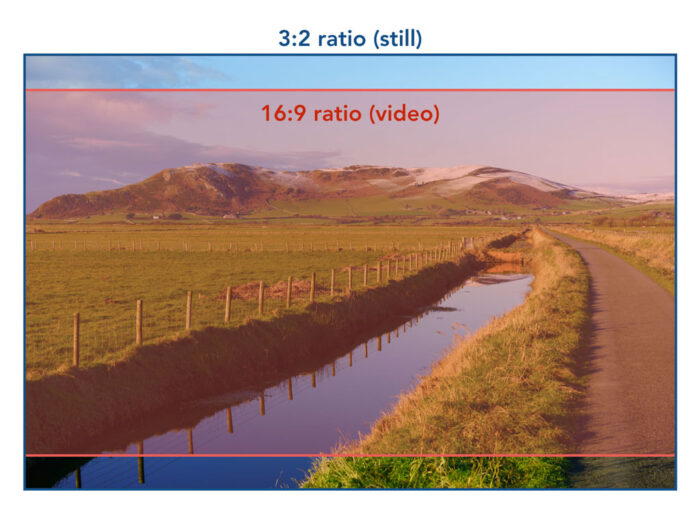
First of all, the sensor on your A7 has a 3:2 aspect ratio, but video works with a 16:9 aspect ratio. So when you record movies, the camera doesn’t use the upper and lower parts of the sensor.
With 12MP and 24MP sensors, your Sony does what we call a full pixel readout (or oversampling). It uses all the pixels available on the 16:9 surface and then downscales (or downsamples) the data to match the 4K dimension.
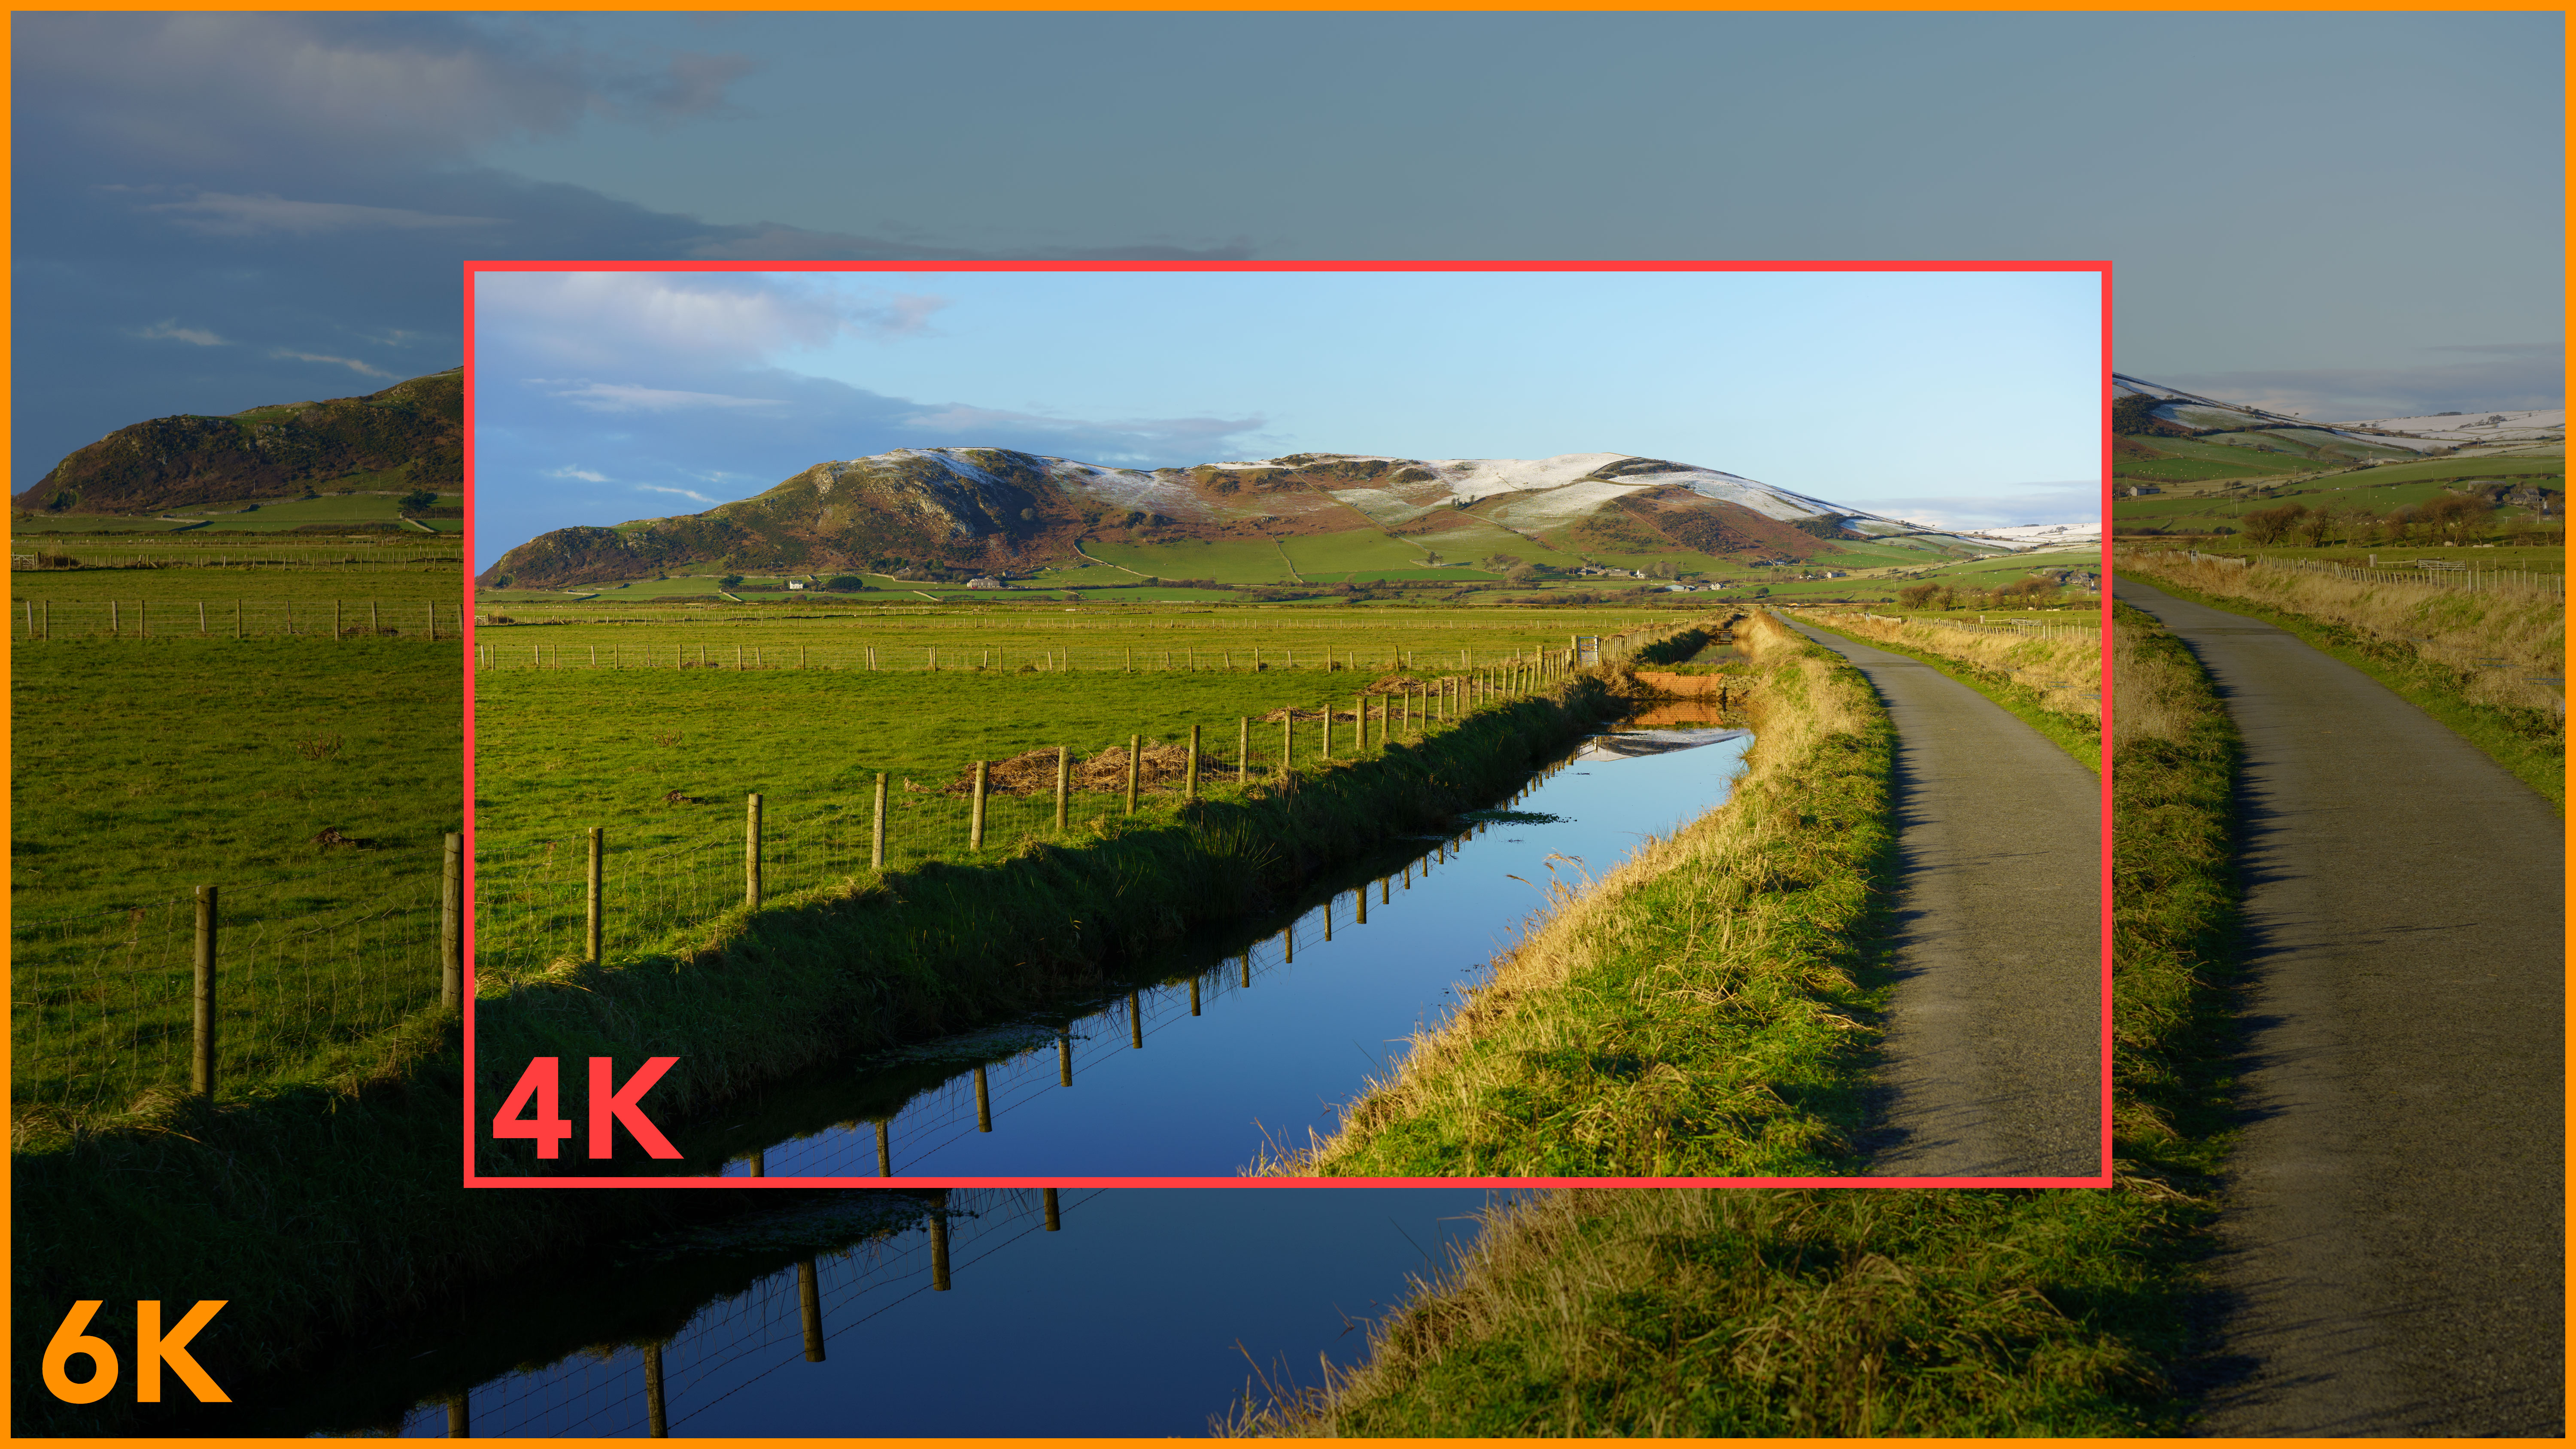
For example, the A7 III has a sensor with 24MP. When recording video, it uses approximately 20MP, which corresponds to 6K, and then downscales to 8MP (4K). Using more pixels to create the 4K video results in crisper details.
The ability of a camera to perform full pixel readout is linked to its processor speed, which means the capability to read all the pixels while also handling resolution, frame rate, recording time, autofocus, and image processing. For example the Sony A7S II has a 12MP sensor, and the camera is powerful enough to process all the data on the 16:9 surface at any frame rate.
If the camera can’t handle all the data, it has to reduce the amount of information to process and there are different ways to do that. One method is to use a smaller portion of the sensor. This results in a sensor crop, which makes your field of view narrower.
In the case of the Sony A7 III and A9, the full width of the sensor is used when recording 4K at 24p or 25p, whereas a 1.2x crop is applied when recording at 30p.
Note: with Full HD, there is no crop on the sensor regardless of the frame rate used.
Sony A7R III, A7R IV APS-C Mode for Video
With cameras that feature a higher resolution such as the A7R III (42MP) or A7R IV (64MP), full pixel readout across the entire width of the sensor isn’t manageable because there is too much information to process.
To avoid cropping (and change the field of view), they do what we call line skipping. As the name suggests, they ignore lines of pixels so that there is less data to process. This results in a loss of sharpness, and some aliasing appearing in the footage


Note that this image is a simplified simulation, the algorithm and pattern can be more complex.
If you want to record with the best quality on the A7R II, A7R III or A7R IV, you need to activate the APS-C mode. That way, the camera uses the central portion of the frame (1.5x crop) and can read all the pixels (approximately 18MP) when recording 4K video at 24, 25 or 30p. Full pixel readout also reduces noise at high ISOs.
Cameras like the A7 III and A9 can also record with an APS-C crop and full pixel readout. The reasons you may want to do this are a) if you want to use an APS-C lens, or b) if you want a narrower field of view with your full frame lens.
In the video below, you can see an example with the A7 III and A7R III where we compare sharpness in full frame mode (oversampling for the A7, line skipping for the A7R) and APS-C mode (oversampling for both).
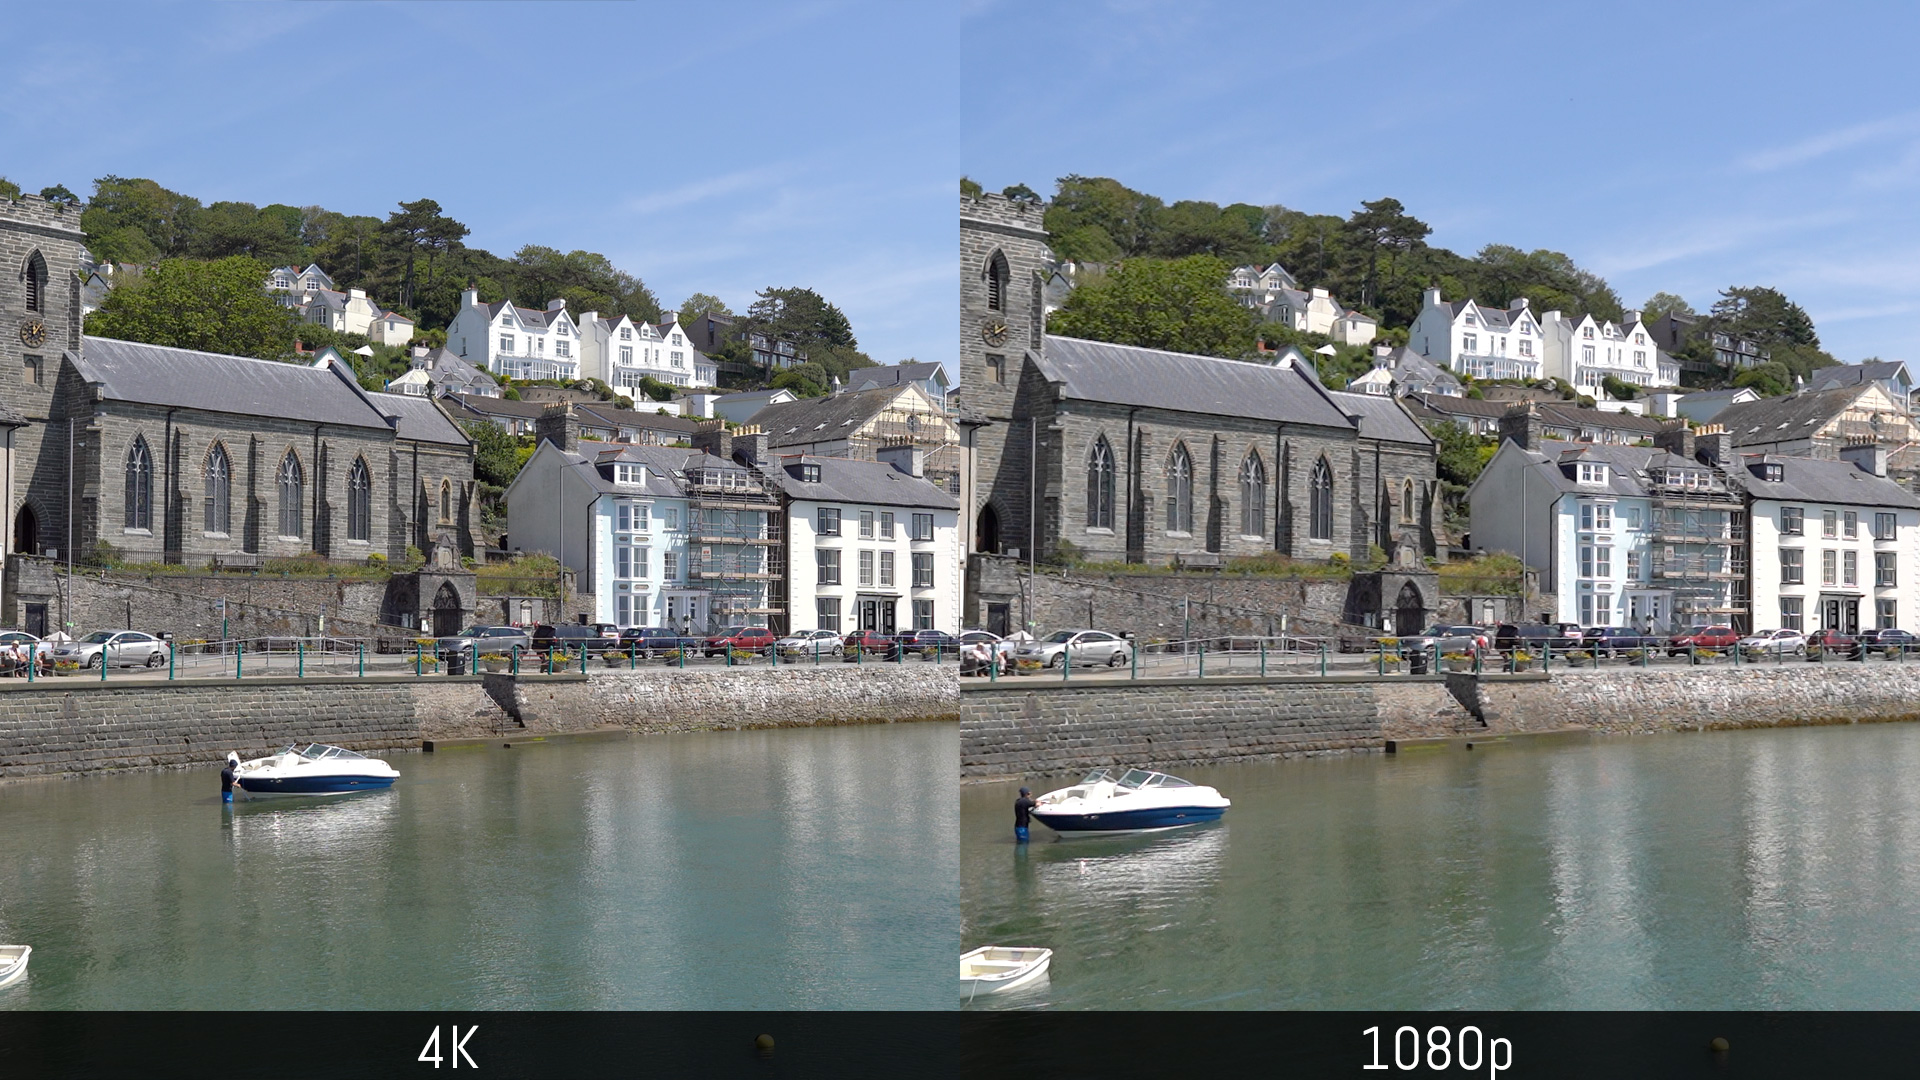
What about the quality in Full HD?
When recording in 1080p, I consistently find the quality to be below average. There is a big loss in detail and often visible aliasing. I’m not exactly sure which method is used to create the footage, but since there is no crop on the sensor (regardless of the frame rate used), I suspect it is line-skipping. I believe the only cameras that suffers less from this are the A7S and A7S II.
Sony A7 III, A7R III Slow Motion Settings
Recent Sony cameras have a dedicated setting to create Full HD slow motion video in camera. To find out more about this, please visit our article below.
Sony A7 III, A7R III, A9 Exposure Settings for Video
Just as with still photography, you can work in manual or semi-automatic exposure mode when recording video. The four options available are the same:
- Program Auto (P): aperture and shutter speed are chosen by the camera automatically, ISO is manual
- Aperture Priority (A): shutter speed is automatic, aperture and ISO are manual
- Shutter Priority (S): shutter speed and ISO are manual, aperture is automatic
- Manual Exposure (M): shutter speed, aperture and ISO must be set manually
When it comes to video, there are two ways to set this.
The first is to work in still mode with any of the P, S, A and M modes selectable from the main dial on top. When you press the record button, the camera will instantly go to video mode, start to record and apply the exposure settings you selected. This is useful if you need to capture a mix of stills and videos and you don’t need to separate exposure settings and other things such as custom buttons.
The second method is to set the camera to Movie mode with the same dial on top (film icon). This gives you the advantage of using custom buttons that you have configured separately for video, or use different exposure modes for stills and video. To check which exposure mode is enabled however, you need to look in the menu.
- Go to Camera Settings 2 / Movie 1 (page 1/9)
- Enter Exposure Mode and select one of the four options available.
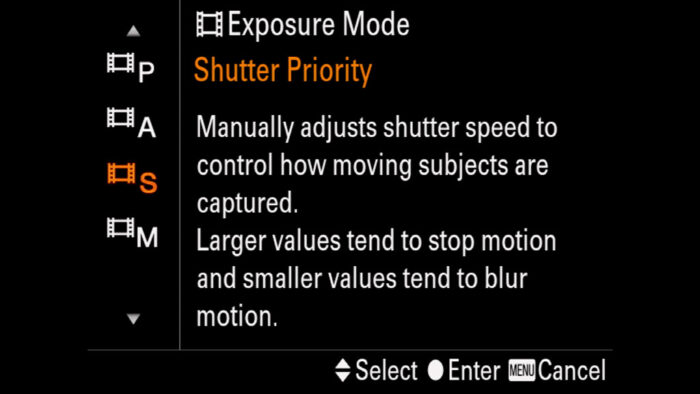
On the A7 I and A7 II series, this setting is called Movie.
The exposure triangle (aperture, shutter speed and ISO) is based on the same principle as for stills so I’m not going to delve into this (the web is full of articles and tutorials).
One thing you need to keep in mind however is the shutter speed is different than for stills.
Ideally, you want to set a shutter speed value that is inversely proportional to your frame rate. For example:
- if you record at 25fps, use 1/50s
- if you record at 50fps, select 1/100s
These settings will ensure that the motion blur of your video appears normal.
If you decrease the shutter speed (1/10s for example), the blur on each frame will be more severe and the movement in your video will appear blurry. If you increase the shutter speed (for example 1/500s), each frame will be sharper but as a result, the playback of your video will look choppy and less natural.
This is why, when recording video, I advise you to work in Manual mode, or Shutter Speed priority at the very least, so that you can control your settings more precisely.
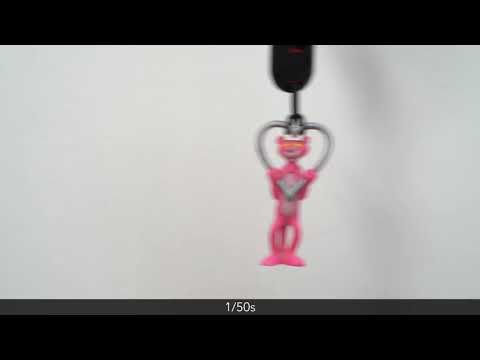
The problem with using a shutter speed such as 1/50s is that if you’re working in daylight outside, you’re going to need ND filters to reduce the amount of light going through the lens. To be honest with you, I’ve used faster shutter speeds when I didn’t have any other choice, and if there isn’t too much movement in the frame, the result isn’t terrible. Still, it is definitely an important rule to keep in mind.
Sony A7 III, A7R III, A9 Low Light Video Settings
Dealing with low light situations when recording video is similar to still photography with one difference concerning shutter speed once again.
You can use a fast aperture lens but you can’t decrease the shutter speed below 1/25s or you’ll end up with too much motion blur.
A good alternative is to raise the ISO level to brighten your image by pressing the right button of the rear control wheel.
The A7S II has the best signal to noise performance at high ISOs thanks to the lower megapixel count of its sensor. You can use it up to 25600 ISO without losing too much quality, and even 51200 ISO can be usable.

The A7 III does very well too and I can confidently push it up to 6400 or 12800 ISO. The A7R III and A7R IV are a bit below in terms of performance and ideally, you want to stick around 3200 ISO. You will also get better results by switching to the APS-C mode.
Here is a recap of Sony’s camera sensitivity for video:
| Min. ISO | Max. ISO | Extended ISO | |
|---|---|---|---|
| A7S, A7S II | 100 | 102400 | 409600 |
| A7 III, A9, A9 II | 100 | 51200 | 102400 |
| A7R III, A7R IV | 100 | 32000 | – |
| A7R II | 100 | 25600 | – |
| A7, A7R, A7 II | 200 | 25600 | – |
When recording at high ISOs, the picture profile you select can either intensify or minimise noise in the shadows. Generally, a profile with more contrast and darker black levels will look better, whereas a flat profile like S-Log2 can show a lot of noise in the dark zones if the exposure is not bright enough. Read more about video profiles further down.
Sony A7 III, A7R III Zebra Setting for Video
There are various modes to monitor the exposure on your A7 camera when recording video.
The first method, and the most natural, is to simply observe the LCD monitor. The camera previews the exposure in real time so you can see if the scene is too dark or too bright.
The second method is to use metering. The camera indicates if the scene is over or underexposed according to the metering mode selected. You can also over or underexpose your scene with the exposure compensation dial.
The third method is to display the histogram by pressing the DISP button twice.
Since metering and the histogram are no different to still photography, please refer to the article below to find out more about metering.
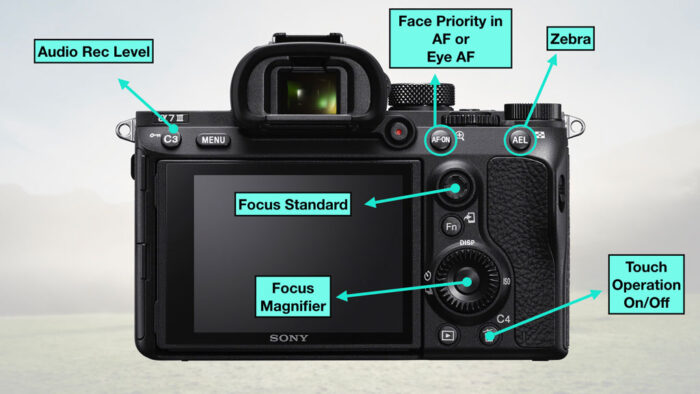
The third method is one that is very popular among filmmakers. In fact, it is a setting that was designed for camcorders, and it is only recently that digital cameras have started to include it as well. I’m talking about the Zebra Pattern. You can find it in Camera Settings 2 / Display Auto Review 1.
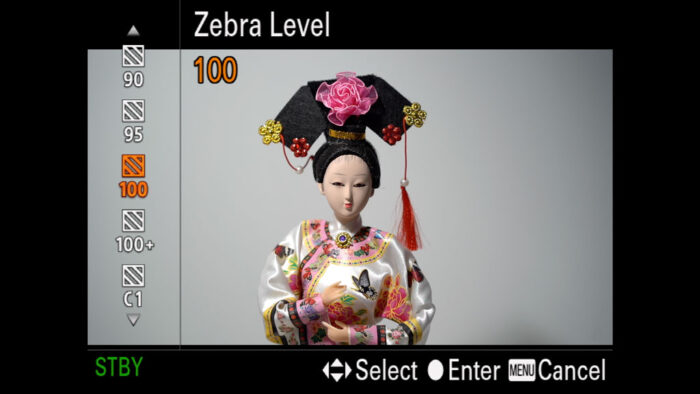
Zebra displays a series of diagonal lines on the parts of your image that are correctly exposed, overexposed or close to overexposure depending on the level you have selected.
For example for portrait photography, if I set the Zebra Level between 70 and 80, the pattern appearing on the person’s face indicates that the exposure on the face is correct. You can read more about this in our Portrait Settings article.
For video, it is useful to activate Zebra to see which parts of the image are overexposed. Unlike with stills, you don’t have the possibility to record RAW footage, meaning that there isn’t much room to recover blow-out highlights. Therefore it is important that your scene is properly exposed.
- Go to Camera Settings 2 / Display Auto Review1 (page 6/9)
- Scroll down to Zebra Setting
- Turn On Zebra Display
- Select a Zebra Level of 100 and 100+.
Another use of Zebra is when you have a lot of white in your scene, or a person wearing white clothes. To make sure that the white is properly exposed and not too dark (or too bright), you can set the Zebra Level between 90 and 95. The pattern appearing on the white elements will indicate a good exposure.
In the Zebra level setting, you also have the option of two custom settings that allow you to raise the level to 109+, or fine tune the range for a given level from 1 to 10.
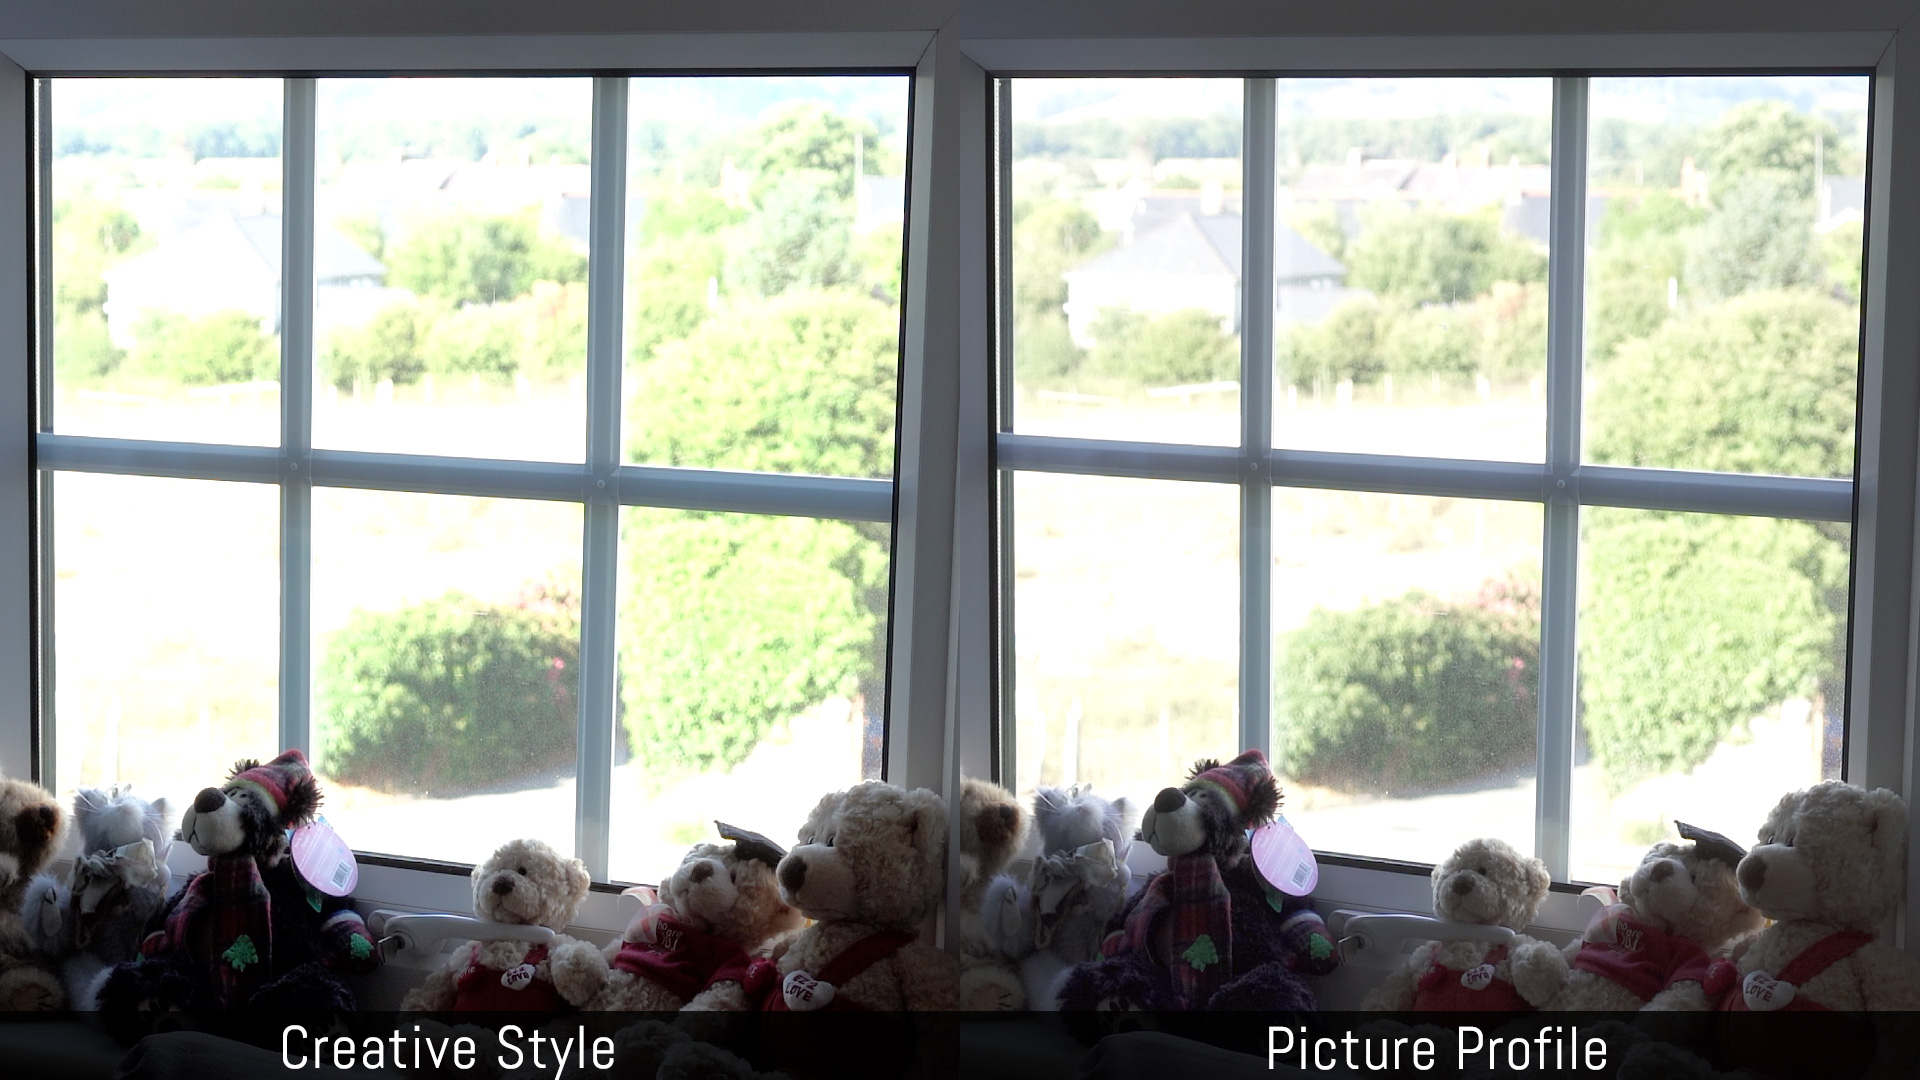
Sony A7 III, A7R III, A9 Video Profiles
In addition to the White Balance, you can control the colour of your image with two distinctive profile settings: Creative Styles and Picture Profiles.
Sony A7 III, A7R III, A9 Creative Styles for Video
Creative Styles are designed for still photography and more specifically for the out-of-camera JPGs. They work for video too but on most cameras, they have less dynamic range and highlights get clipped more easily.
Note for the A7R IV
Sony has tweaked the curve for the Creative Styles on the A7R IV, and highlights are more difficult to blow out in comparison to previous models. They don’t offer the same dynamic range as the Picture Profiles, but they perform better than before.
Generally, the Standard or Neutral profile can provide the best results in terms of colour balance and contrast. If you want a bit more colour pop, the Landscape or Autumn Leaves styles are also interesting.
Of course there might be other styles that suit your taste but make sure to test them beforehand. Deep is somewhat darker but also protects the highlights a little bit better than the other settings.
Sony A7 III, A7R III Picture Profiles
The A9 and A9 II don’t have the Picture Profiles.
Picture Profiles are a set of in-depth parameters designed for video. They come from Sony’s professional camcorders and cinema cameras. They offer more dynamic range and a more precise toolset to control contrast and colours. Because they are complex, we decided to explain the Picture Profiles in a separate article that you can read below.
Sony A7 III, A7R III, A9 Audio Settings
All the A7 and A9 models feature a built-in stereo microphone, but as with most features of this kind, don’t expect fantastic sound from it. It is mostly useful as a reference.
Tip: make sure that Audio Recording is set to On in Camera Settings 2 / Movie2 (page 2/9), or no sound will be recorded.
For better audio quality, you need an external microphone. All the A7/A9 cameras have a microphone input and a headphone output. They use the popular 3.5mm socket, which is known as a mini Jack. They also feature a multi-interface shoe on top that is compatible with select Sony microphones.
A7R and A9 II digital audio recording
The Multi Interface Shoe of the A7R IV and A9 II has a new digital audio interface that allows the camera to record digital audio signal from the ECM-B1M Shotgun Microphone or XLR-K3M XLR Adapter Kit.
Then we have a selection of audio settings to help you control the quality and volume of your sound.
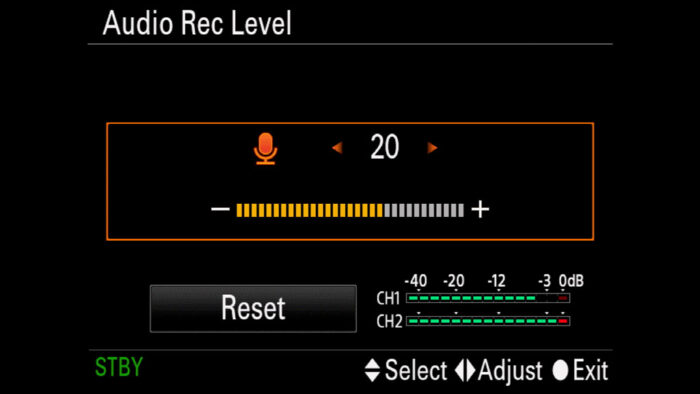
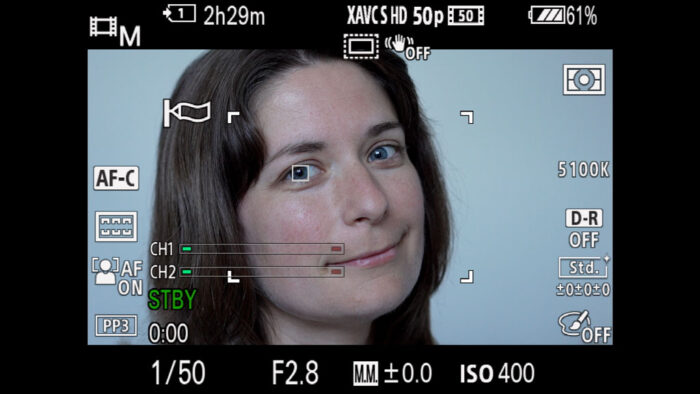
Audio Recording Level
Camera Settings 2 / Movie2 (page 2/9)
You can increase or decrease the recording level for the built-in microphone or the one connected to the 3.5mm input. It works in 30 steps from 0 to 30. Adjust according to your environment and main audio source. The optimal setting can change from microphone to microphone.
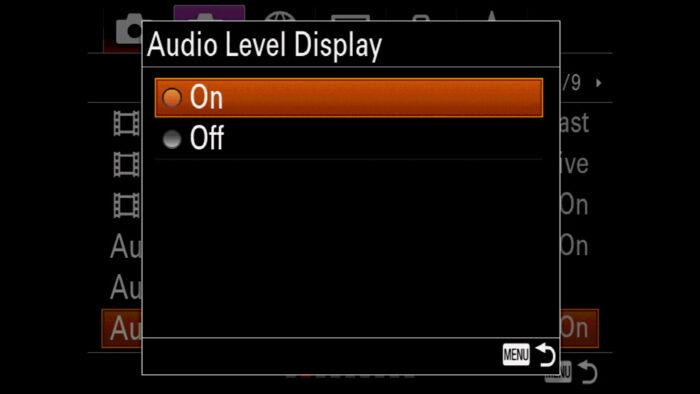
Audio Level Display
Camera Settings 2 / Movie2 (page 2/9)
You can display the audio level on the LCD screen to monitor your audio recording while shooting. It shows the level from -40dB to 0dB. If you see that is too close to 0 and displays as red, this means that audio risks to be clipped which will result in a loss of quality. In that case, lower the recording level.
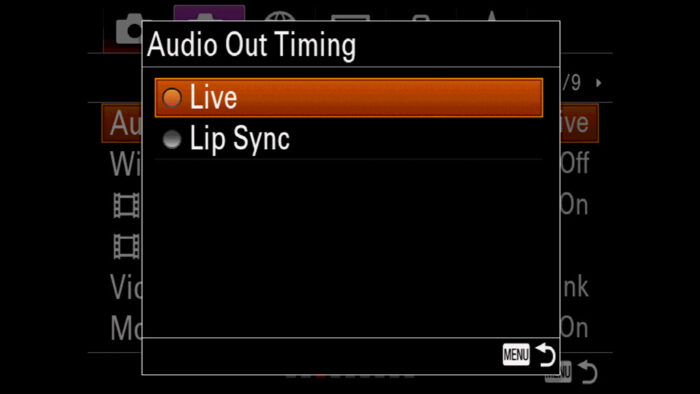
Audio Out Timing
Camera Settings 2 / Movie2 (page 3/9)
This setting is related to the HDMI output. Choose Live to monitor the audio from the headphone port of your camera without any delay, or Lip Sync to make sure video and audio are perfectly synced via the HDMI output. The latter is important if you’re using an external recorder.
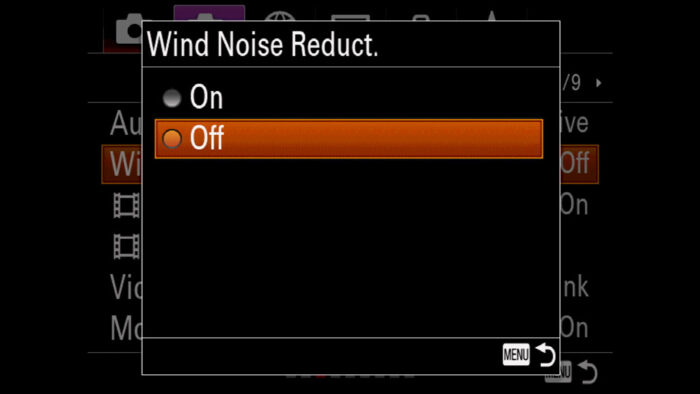
Wind Noise Reduction
Camera Settings 2 / Movie2 (page 3/9)
If set to On, the camera will cut low range frequencies to reduce wind noise. It is only valid for the built-in mic and can reduce the quality of the recording if there is not enough wind. Only activate it when needed.
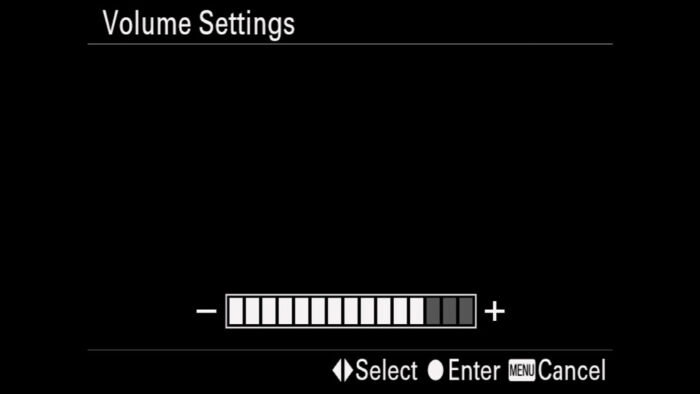
Volume Settings
Setup 1 (page 1/7)
You can control the volume of the headphone output (or built-in speaker) in 15 steps.
Limitation: unfortunately, there isn’t a quick way to access the volume control. You can’t assign it to a function button or the Fn Menu, so the only option is to save it to My Menu.
Sony A7 III, A7R III, A9 Autofocus Settings for Video
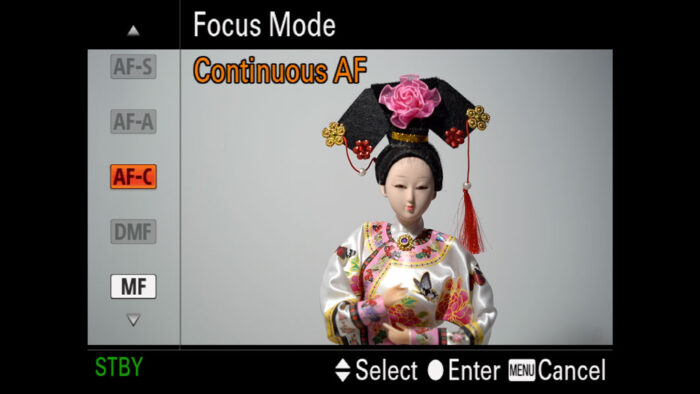
In Movie Mode, there are only two Focus Modes available: MF (Manual Focus) and AF-C (Continuous).
When AF-C is selected, the camera focuses automatically. If you find it a bit slow, you can force it to focus quicker by half-pressing the shutter release button, or any custom button with the AF-On setting assigned.
Having only AF-C as the autofocus option can be a bit annoying because sometimes you just want to focus once without the camera constantly changing focus as you move. Even in a static scene, the camera might be tempted to refocus without warning.
Recent cameras with phase detection points are pretty reliable and stable, but there will still be moments where you want to be able to stop the camera from focusing automatically. For example if you’re panning from one person to another, the camera may momentarily focus on the background while searching for the new face.
Sony A7 III, A7R III, A9 Focus Hold for Video
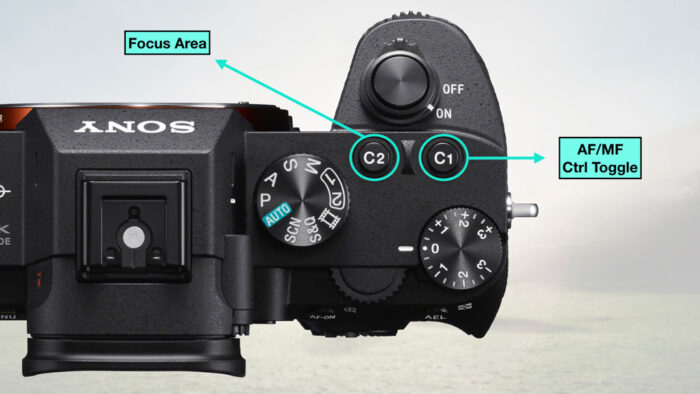
There are two ways to stop the camera from autofocusing: Focus Hold or AF/MF Control setting.
Focus Hold, as the name suggests, stops the camera from focusing. By default, it is assigned to the custom button of select E-mount lenses, but you can re-assign it to a custom button on the camera body. Once the camera has acquired focus, press and hold the button to lock the AF. When you release the button, the camera will resume focusing.
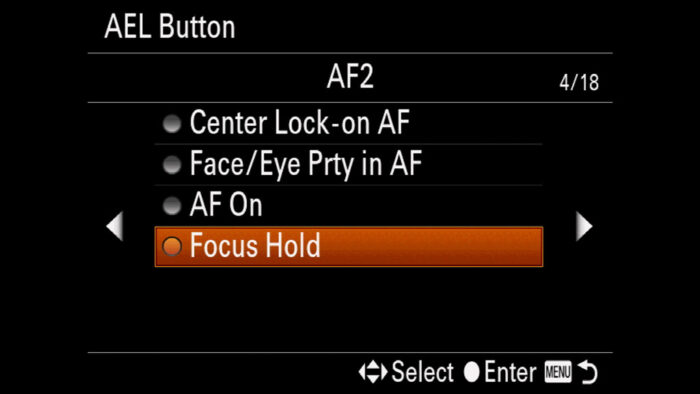
The AF/MF Control setting also works with a custom button. As the name suggests, it allows you to immediately switch to MF, then back to AF-C when needed. You can choose between hold and toggle to either press and hold the button, or press once to change and press a second time to revert.

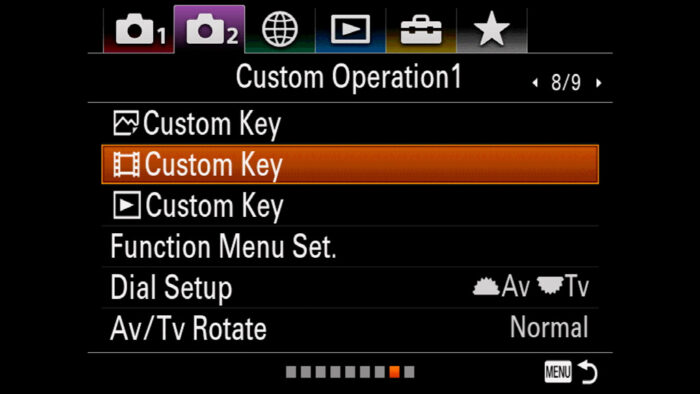
- Go to Camera Settings 2 / Custom Operation1 (page 8/9)
- Select the second Custom Key (film icon)
- Choose a custom button
- Select either AF/MF Control Hold or Toggle (AF1, page 3/18), or Focus Hold (AF2 page 4/18).
On older models (A7 I and A7 II generation), you can switch between AF and MF with the dedicated lever at the rear. Some lenses also have an AF/MF switch.
Sony A7 III, A7R III, A9 Focus Speed for Video
Custom Settings 2 / Movie2 (page 2/9)
Not available on the A7 I and A7 II series.
There are two settings in the menu to control the speed and responsiveness of the autofocus when recording video. They are called:
- AF Drive Speed
- AF Track Sens
AF Drive speed can be set in three levels: Fast, Normal and Slow. As the name suggest, it makes focusing faster or slower. If you follow someone running for example, you want it to set it to Fast. If you want a slow transition between two focus points, you want to choose Slow.
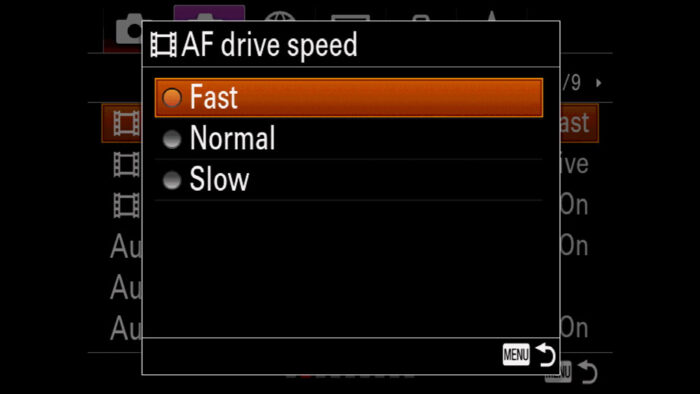
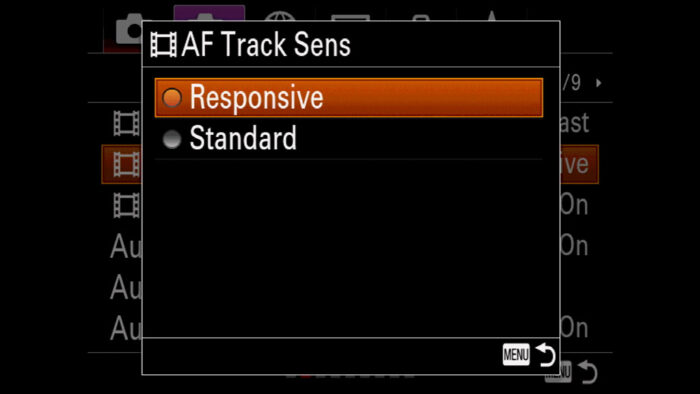
AF Track Sens has two options: Standard and Responsive. Choose Responsive for fast moving subjects. Choose Standard if you don’t want the camera to refocus right away when a momentary obstacle covers your subject.
Tip: if your camera has a touch screen, you can use it to make smooth transition between two focus points. Set the AF Drive Speed to Slow and touch anywhere on the LCD: the camera will start a slow and smooth change of focus, which can be quite pleasant and more precise than doing it manually if you don’t have a lot of experience.
Sony A7R IV, A9 II Eye AF in Video Mode
Not available on the A7 I, A7 II, A7 III series, and the A9 I.
Sony has started to include the excellent Eye AF feature for Movie recording too. So far, only the A7R IV and A9 II have it but hopefully, more models will get it in the future. To activate Eye AF:
- Make sure that you are in Video mode and that AF-C is selected
- Go to Camera Settings 1 / AF2 (page 6/14)
- Enter Face/Eye AF Set.
- Turn On Face/Eye Prty in AF
- Make sure Human is selected for Subject Detection
- Exit the menu
You should see a small white square on the eye of your subject. Note that if the person is not close enough, the camera might automatically track the face instead.
You can also choose to prioritise the left or right eye, and this option can be assigned to a function button for easier access.
I found Eye AF on the A7R IV really helpful when using a fast aperture and when I was close to the subject. The camera is more precise than when using face detection alone. See an example below.
Sony A7 III, A7R III Video Focus Tracking
Custom Settings 1 / AF2 (page 6/14)
Tracking AF is available when recording video but it is a bit more limited than when shooting stills. The function you’re looking for is called Centre Lock-On AF.
Once activated, a small square appears at the centre of the screen: move the composition so that the square overlays the element you want to track, then press the Centre button. A white rectangle with a double line will appear on the zone you’re tracking and the camera will focus continuously on that zone.
To cancel tracking, press the Centre button again. If you want to track another area, the quickest way to activate tracking again is to touch the zone with your finger on the screen (make sure Touch Operation is enabled).
Sony A7R IV, A9, A9 II Video Focus Tracking
The most recent Sony cameras have an updated AF algorithm that can track subjects in real time with the help of machine learning technology (the camera analyses colour, brightness, face, eye and depth). This results in more accurate and faster tracking capabilities.
To activate tracking on the A7R IV and A9 series:
- Make sure AF-C is selected
- Make sure Touch Operation is On in Setup2 (page 2/7)
- Go to Camera Settings 2 / Func. of Touch Operation
- Select Touch Tracking
- Touch anywhere on the screen to start tracking your subject. A small grey rectangle will appear indicating which zone is being tracked.
To cancel tracking, simply press the Centre button or the small icon on the top right side of the touch screen.
Note: tracking is not available when recording Full HD at 100/120p.
Other Autofocus Settings
The other AF setting you should be looking at is the Focus Area. Since it has more or less the same options as for stills, you can learn more about those in our Autofocus article.
Note: Tracking/Lock-On under Focus Area is not available in video mode.
Sony A7 III, A7R III, A9 Video Stabilization
Not available on the A7 I series.
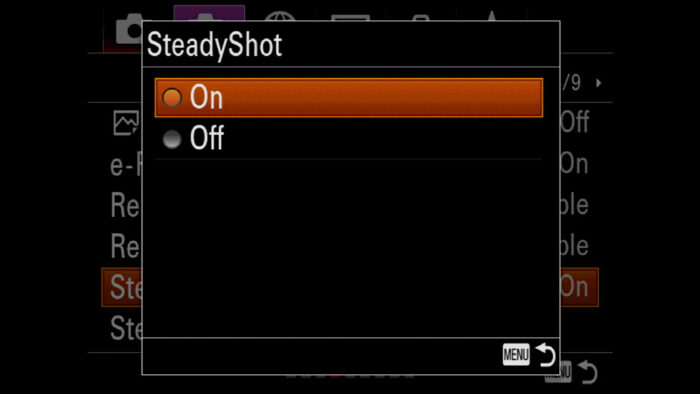
Just as for stills, most Sony cameras equipped with five axis in-body stabilisation can use the technology for movie recording too. Sony calls this SteadyShot.
There are no particular settings for video. SteadyShot works in the same way as it does for stills. To activate it:
- Go to Camera Settings 2 / Shutter SteadyShot (page 4/9)
- Scroll down to SteadyShot and select On
If the camera is paired with a lens that has optical stabilisation, it will combine sensor and optical stabilisation.
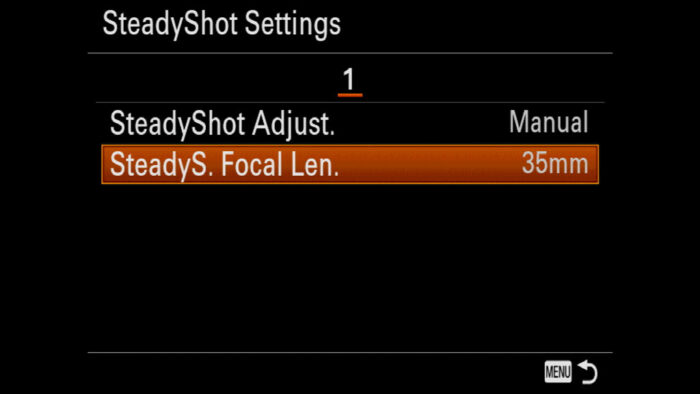
If you adapt a lens that doesn’t have electronic contacts, you can still use three axes on the sensor but you must insert the focal length manually in the menu. To do so:
- Go to Camera Settings 2 / Shutter SteadyShot (page 4/9)
- Scroll down to SteadyShot Settings
- Select Manual for SteadyShot Adjust.
- Choose a focal length in SteadyS. Focal Len.
My experience with image stabilisation for video so far is that the performance is not that great. You can experience jittering and micro movements with static shots, and the footage can be quite shaky when moving with the camera. It is certainly better than not having anything at all, but for serious work, I would recommend a third party gimbal support.
See an example below with the A7 III and A7R III.
Sony A7 III, A7R III, A9 Display Settings for Video
Not available on the A7 and A7R models (first series)
The only display setting that is specific for video is related to markers. You can find it in Custom Settings 2 / Movie3 (page 3/9).
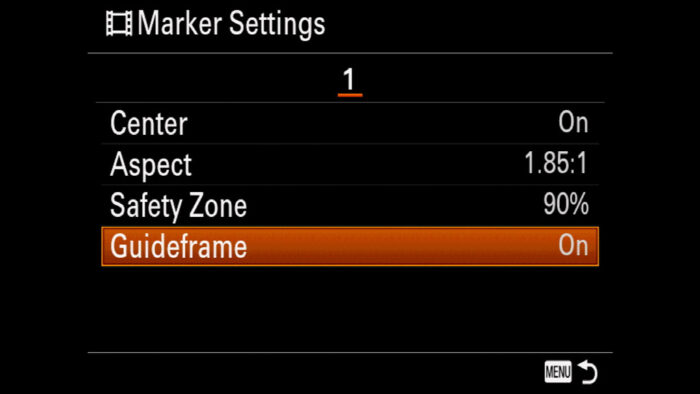
This setting allows you to display a variety of markers on the screen such as:
- Center: a cross at the centre of your frame
- Aspect: different aspect ratios including cinematic formats such as 1.66:1, 1.85:1 and 2.35:1.
- Safety Zone: when a final product is shown on TV, the extreme borders of your frame can be cut off. The Safety Zone shows you exactly what might be excluded (80% or 90% options)
- Guideframe: a 3×3 grid to help you with your composition.
Sony A7 III, A7R III, A9 Manual Focus Assist
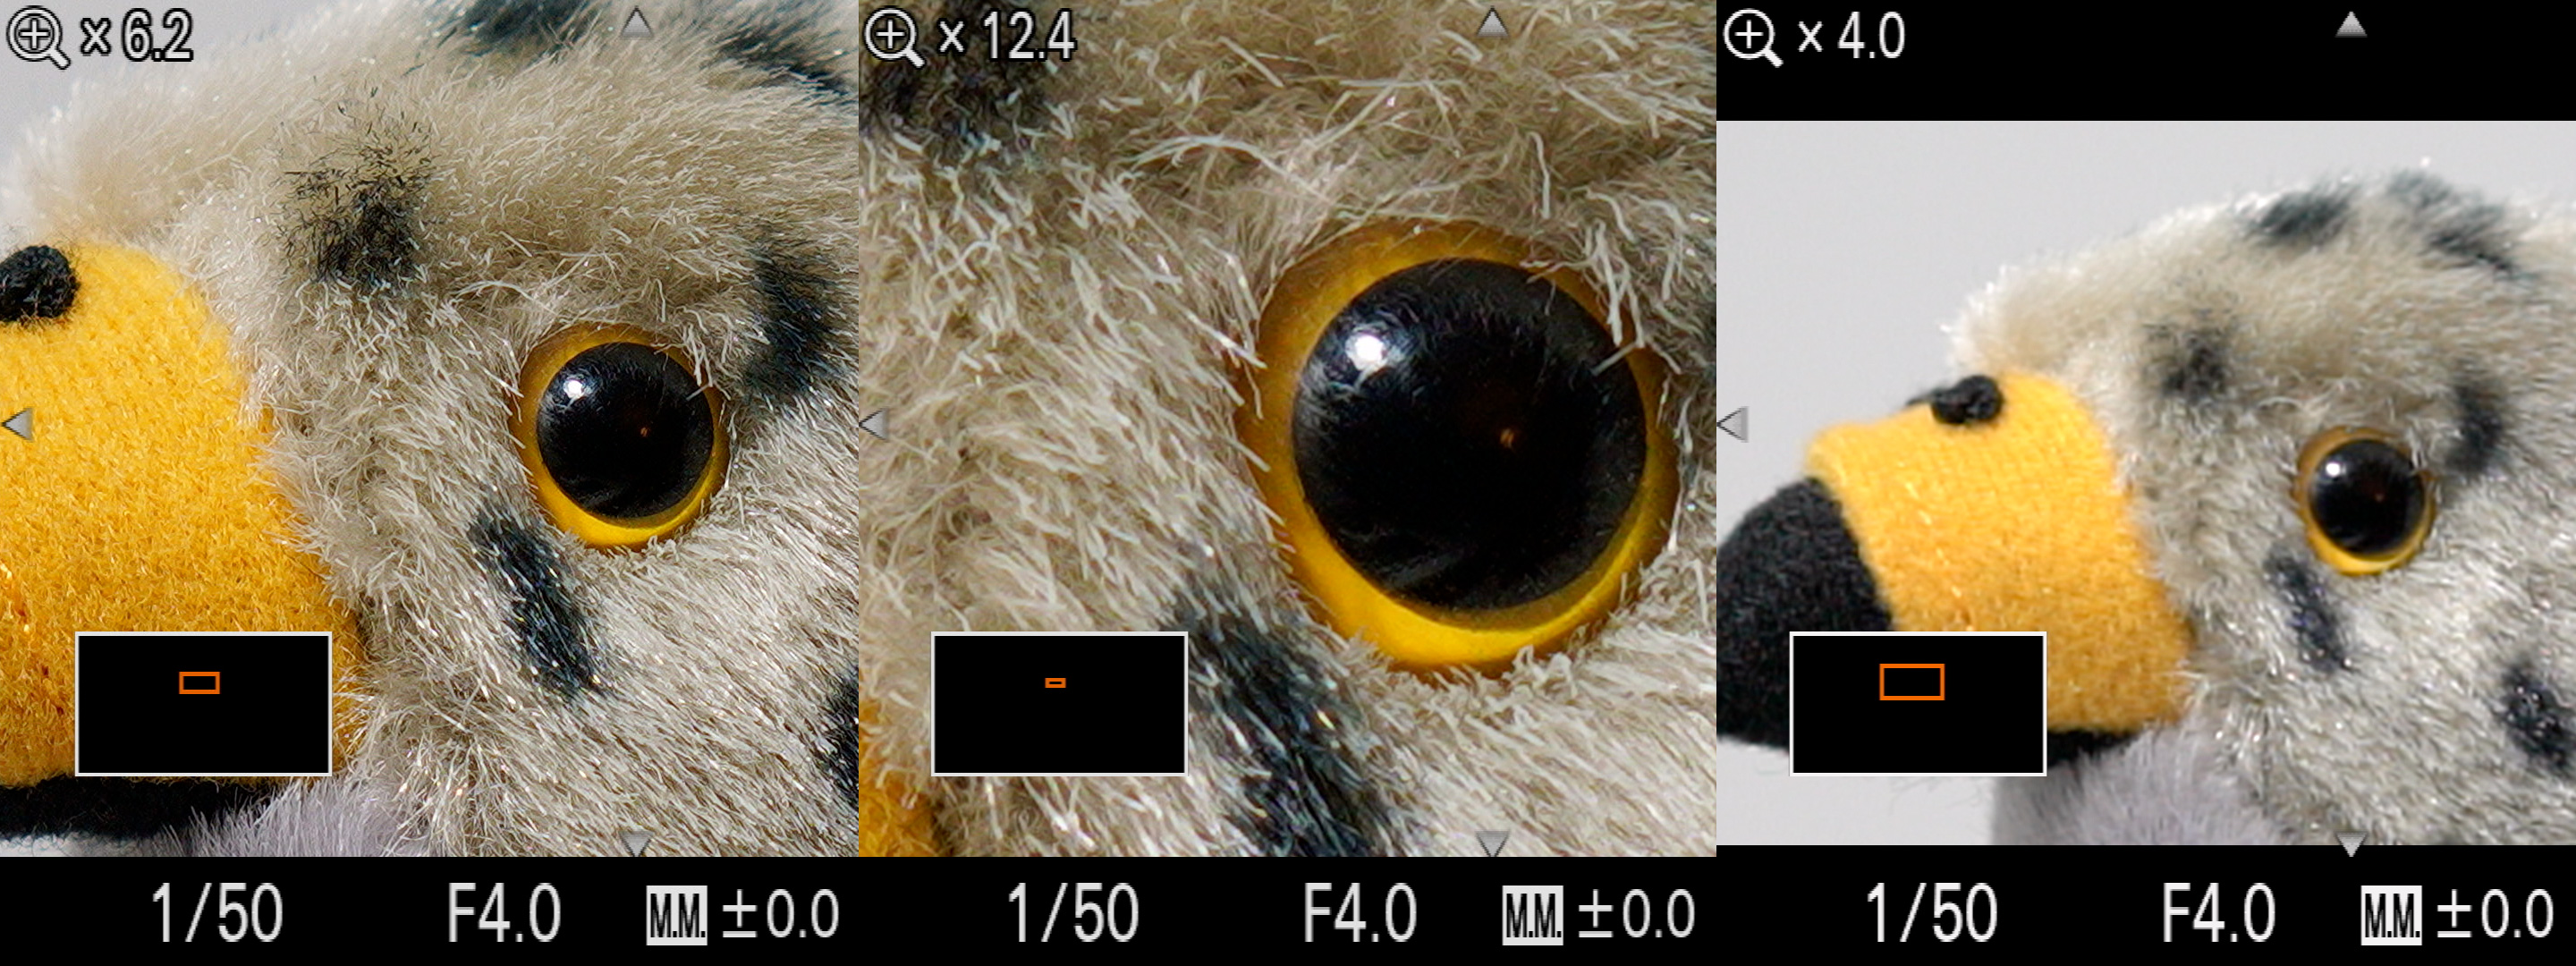
If you prefer manual focus over AF, your A7 camera offers a series of tools to help you: namely, peaking and magnification. Generally, peaking is good to get the focus point close to where it needs to be, but I find magnification more accurate to fine-tune and double-check focus.
To activate Peaking:
- Go to Camera Settings 1 / Focus Assist (page 13/14)
- Scroll down to Peaking Setting
- Select On for Peaking Display
- Choose Mid for Peaking Level (you can vary this according to the scene and your preference)
- Choose a Peaking colour that is appropriate for the scene (for example yellow or white if there is a lot of red in your composition).
Tip: assign Peaking Setting to the Fn Menu or My Menu to access it quickly.
The best way to use magnification is to assign it to a function button:
- Go to Camera Settings 2 / Custom Operation 1 (page 8/9)
- Select the second Custom Key entry (film icon)
- Choose a button
- Scroll left to page 8/17 and choose Focus Magnifier
Note: the MF Assist (magnification activates automatically when you turn the focus ring) and AF in Focus Magnification are not available in video mode.
The main problem is that when you work in Movie mode, the resolution of the live view drops (both on the LCD and EVF), and fine tuning focus manually becomes more of a challenge.
There are a couple of solutions to fight this:
- use an external monitor (more on this below)
- set focus in still mode and then switch to video mode (make sure that MF is already set in video mode to prevent the camera from focusing automatically when you switch).
- set focus in still mode, remain in still mode and press the video recording button. If you adopt this method, make sure to be in the exposure mode you want (P, S, A or M) and select the 16:9 aspect ratio in Camera Settings 1 (page 1/14) to frame correctly. Also keep in mind that the custom buttons will reflect the configuration made for still and not video.
Sony A7 III, A7R III, A9 HDMI Output
The HDMI port of your Sony camera can send a clean 4:2:2 8-bit signal to an external recorder or monitor. You can also have all the information you normally see on the rear LCD of the camera transferred to the external monitor.
To learn more about this, please visit our dedicated article below.
Sony A7 III, A7R III, A9 Setup for Video
Your A7 III offers a lot of customisation and some of it can be configured separately for video.
On the A7 I and A7 II series, there isn’t a separate Custom Key setting for video.
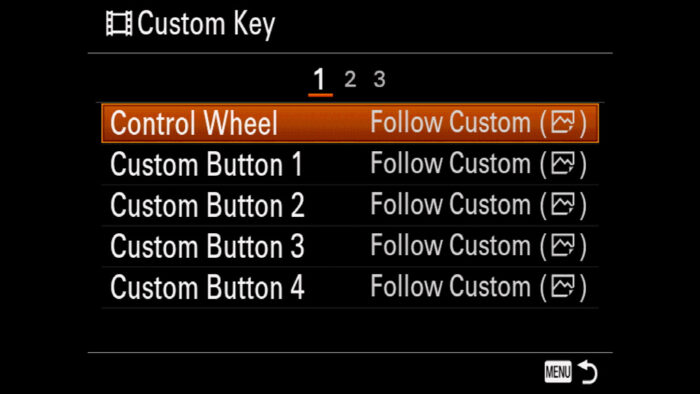
By default the Custom Keys, or Custom Buttons, work in the same way as the configuration you’ve set in photography mode. However if you wish to change some of them for when you work in video mode, you can do so by selecting the Custom Key entry with the film icon.
By default, you’ll see the Follow Custom (image icon) setting for all of them, but you can go ahead and change as many as you like. In fact you can have a completely different set of buttons for stills and video if you wish.
Function Menu on A7R IV and A9 II
On the A7R IV and A9 II, the Function Menu (quick menu) can also be configured separately for the movie mode.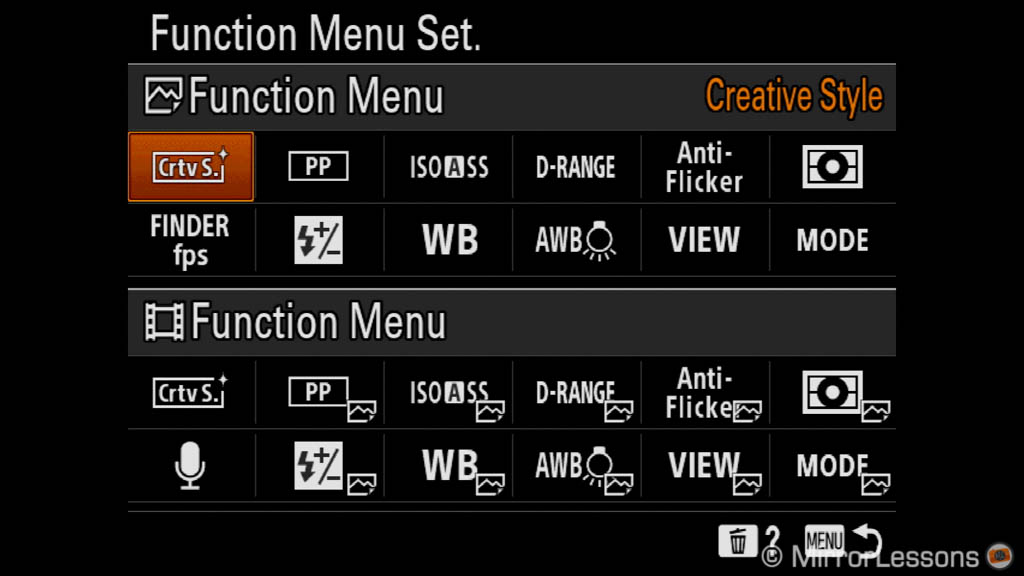
Another thing you can configure is how to trigger the video recording:
- MOVIE Button: choose whether the movie button triggers video recording at all times (regardless on the shooting mode selected) or only when in video mode.
- Movie w/shutter: in movie mode, you can start the recording by pressing the shutter button, which is very useful when working hand held.
Here is a suggestion on how to configure the custom buttons for video recording. See it as a starting point.
Other useful settings to include in My Menu or the FN Menu are:
- File Format
- Record Setting
- AF Drive Speed
- AF Track Sens
- Marker Settings
- Picture Profiles
- Peaking Display / Level
- Metering
- White Balance
- Volume Settings
To know more about customisation, check our our dedicated article below.
Sony A7 III, A7R III, A9: which SD card for Video?
The maximum bitrate of any Sony camera is 100Mbps, so you don’t need the fastest SD card on earth to record your footage. The amount of storage is much more important.
To find out more about which SD card to choose, check out our dedicated article below.
Other Settings for Video
There are other settings related to video. Let’s have a quick look at what they are.
Proxy Recording
Camera Settings 2 / Movie1 (page 1/9)
Not available on the A7 I an A7 II series
If you turn it on, the camera will create a second low bit rate file (1280×720 at 9 Mbps) for each video clip you record. It can be useful for a quick transfer to a phone, or to upload on a website on the fly. Proxys are also used by editing software to speed up the editing and effects.
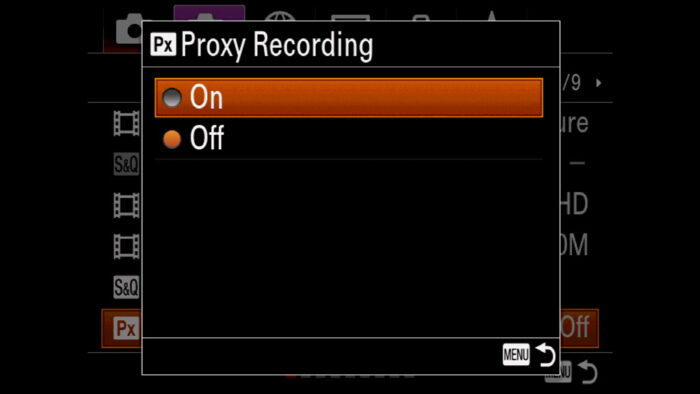
Note: Proxy Recording doesn’t work with AVCHD or when recording Full HD at 100/120fps.
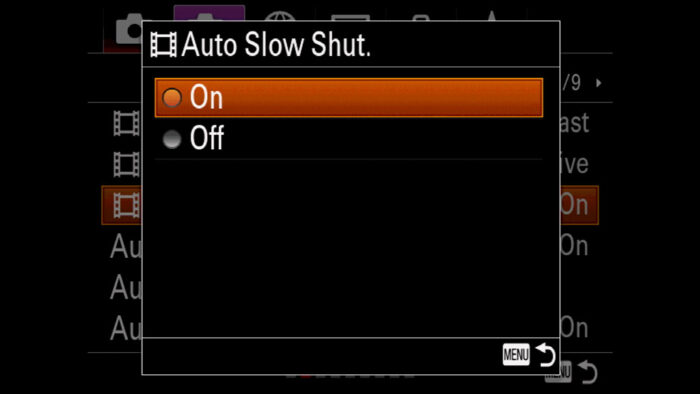
Auto Slow Shutter
Camera Settings 2 / Movie2 (page 2/9)
When recording in Program or Aperture priority, it allows the camera to use a slow shutter speed in order to make the image brighter in low light situations. Movements might look blurry as a result.
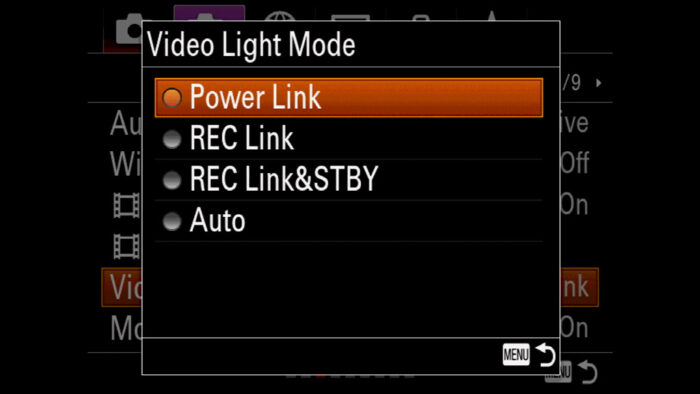
Video Light Mode
Camera Settings 3 / Movie3 (page 3/9)
Not available on the A7 and A7R (first models)
With the optional Sony HVL-LBPC LED, you can set how the light behaves with the camera. For example it can turn on automatically when the camera is powered on, or you can have it activate when you press the record button.
Auto Power OFF Temperature
Setup 2 (page 2/7)
Not available on the A7 I series and A7 II
If the internal temperature of the camera increases, it may start to show a yellow warning icon, indicating that the camera could overheat.
If you select High, the camera will continue to record even if the temperature increases. However be aware that if the temperature is too high, the camera might ignore the setting and shut down.

Timecode Setting
Setup 3 (page 3/7)
Not available on the A7 and A7R (first models)
There are three different formats you can choose:
- Counter: the timecode is not displayed and a simple minute / second counter is shown instead
- TC (Timecode): displays the timecode to mark every frame
- U-Bit (User Bit): displays a timecode that can be configured by the user and is not related to the single frame.
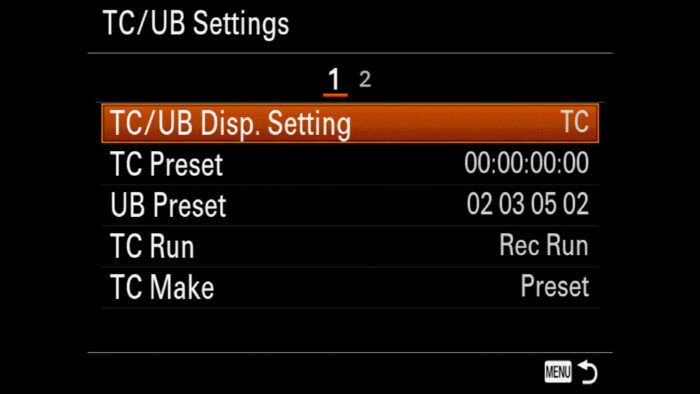
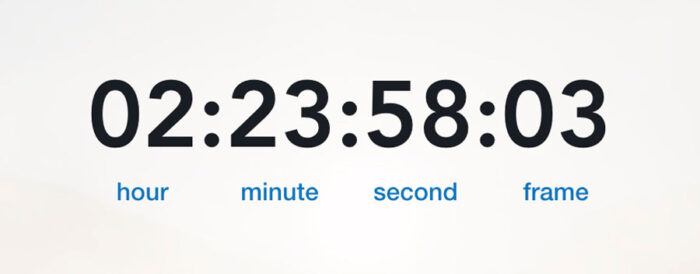
Timecode or TC is a time stamp on every frame of your video. This is useful in post production to edit with precision, synchronise or align footage. It is composed of 8 numbers divided by hour, minute, second and frame.
You can start the timecode from zero, or start it from a specific preset. You can make it run when you start the recording (Rec Run) or have it running continuously regardless of the camera operation. A Free Run timecode will continue even when the camera is powered off. Free Run is useful when recording a live event with multiple cameras.
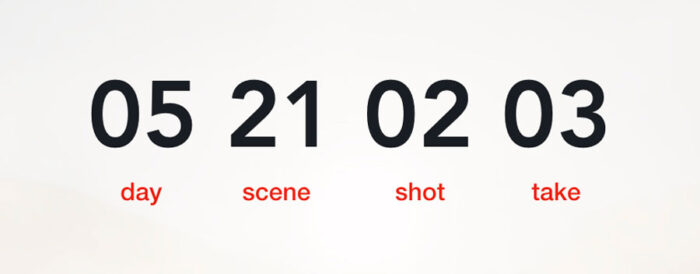
User Bits is another time stamp but it is not as precise as timecode, and requires manual intervention by the user. It can be used to identify a scene for example. It also works with 8 numerals and you can set it to mark the day, scene, shot and take. The user bit doesn’t change when you start recording, you have to change it manually yourself each time.
Reminder: the links below are affiliate links. If you decided to buy something after clicking the link, we will receive a small commission.
Check price of the Sony A7 III on:
Amazon | Amazon UK | B&H Photo | eBay
Check the price of the Sony A7R III on:
Amazon | Amazon UK | B&H Photo | eBay
Check price of the Sony A7R IV on
Amazon | Amazon UK | B&H Photo | eBay
Check price of the Sony A9 on
Amazon | Amazon UK | B&H Photo | eBay
Check price of the Sony A7 II on:
Amazon | Amazon UK | B&H Photo | eBay
Check price of the Sony A7R II on:
Amazon | Amazon UK | B&H Photo | eBay
Second-hand Sony gear on
MPB US | MPB UK
Sony A7 / A9 Mirrorless Cameras Resources on Mirrorless Comparison
We have a lot more content about the A7 and A9 series that you can check out below!
Real World Comparisons
- Sony A7 III vs A7R III
- Sony A7R III vs A7R IV
- Sony A7R II vs A7R III
- Sony A7R III vs A9
- Sony A7 III vs Nikon Z6
- Sony A7R III vs Nikon Z7
- Sony A7R III vs Fujifilm GFX 50s
- Sony A7R III vs Panasonic S1R
- Sony A7 III vs Canon EOS R
- Sony A7 III vs Fujifilm X-T3
- Sony A7 II vs Canon EOS RP
Sample Photos
- Sony A7 III sample images
- Sony A7R III sample images
- Sony A7R IV sample images
- Sony A7 II sample images
- Sony A7R II sample images
- Sony A7S sample images