The A7 mark III has become the most popular full frame camera since its release in 2018. Blending excellent quality and performance at a competitive price, it made an important contribution to the rise in popularity of Sony mirrorless cameras.
Three years later, the A7 IV arrives with some very big shoes to fill. Is it the successor we’ve all been waiting for? Let’s find out!
Editor’s note: this article has been upgraded to a full comparison and includes our first-hand tests and experience with the two cameras.
Ethics statement: the following is based on our personal experience with the A7 III and A7 IV, that we purchased for personal and review purpose. We were not asked to write anything about these products, nor were we provided with any sort of compensation. Within the article, there are affiliate links. If you buy something after clicking the link, we will receive a small commission. To know more about our ethics, you can visit our full disclosure page. Thank you!

TABLE OF CONTENTS
– The 10 Main Differences in a Nutshell
– Main Specs
1. Sensor
2. Autofocus
3. Drive Speed and Buffer
4. Video
5. Image Stabilisation
6. Design and Ease of Use
7. Viewfinder and LCD Screen
8. Memory Cards
9. Extra Features
10. Price
– Video Review
– Conclusion
The 10 Main Differences in a Nutshell
- Image quality: the A7 IV has more resolution, a bit more dynamic range and updated colour profiles with better skin tones
- Autofocus: the addition of real-time tracking and Eye AF for Birds is the major improvement. Eye AF also works in video mode, unlike the A7 III.
- Continuous shooting: the two cameras have the same 10fps burst speed, but that decreases to 6fps with uncompressed or lossless compressed RAW on the A7 IV. The latter has a better buffer when using the expensive CFexpress Type A card.
- Video: there are a lot of improvements on the new model including 10-bit 4:2:2, no recording limit, 4K 60p (crop mode), a bit more dynamic range and better skin tones. The A7 III has less noise at high ISOs.
- Image stabilisation: there is a minor improvement for still photos, and the Active mode for video on the A7 IV is useful when walking with the camera.
- Design: subtle changes make the new camera more comfortable to hold, while also giving it more customisation and a better menu system
- Viewfinder / Monitor: more resolution and frame rates in the viewfinder, multi-angle LCD screen and more touch capabilities for the new model
- Memory cards: dual SD card slots on both cameras. The A7 IV can also use one CFexpress card (type A), but it is only worth it for specific needs.
- Extra features: the mark IV has extra settings and options, like using it as a webcam with a simple USB connection (no plugin required).
- Price: the A7 III is less expensive.

Main Specs
A7 III
- Sensor: 24.2MP 35mm format BSI Exmor R CMOS
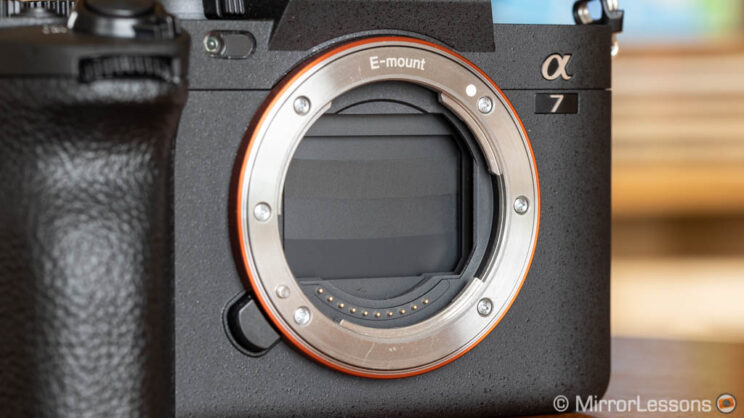
- Lens system: E-mount
- Weatherproof: Yes
- Internal Stabilisation: Yes (5-axis)
- Autofocus: Hybrid with 693 phase and 425 contrast detection points
- Continuous shooting: 3fps to 10fps with AE/AF Tracking
- ISO Sensitivity: 100 – 51200 ISO (pull 50, push 204800)
- Shutter Speeds: 1/8000 to 30s, Bulb
- Viewfinder: 0.5in OLED with 2.36M dots, 23mm eye point, 0.78x magnification and 60fps refresh rate
- Rear monitor: Tilting 3″ LCD (0.92M dots) with touch sensitivity
- Movie recording: 4K up to 30fps, Full HD up to 120fps, S-Log and HLG gamma
- Built-in Flash: No
- Extra Features: WiFi, Bluetooth, Bracketing, Intervalometer, Tethering, Dual SD slots
- Dimensions: 126.9 x 95.6 x 73.7mm
- Weight: 650g (including battery and memory card)
- Firmware version: 4.01
A7 IV
- Sensor: 33.0MP 35mm format BSI Exmor R CMOS
- Lens system: E-mount
- Weatherproof: Yes
- Internal Stabilisation: Yes (5-axis)
- Autofocus: Hybrid with 759 phase and 425 contrast detection points
- Continuous shooting: 3fps to 10fps with AE/AF Tracking
- ISO Sensitivity: 100 – 51200 ISO (pull 50, push up to 204800)
- Shutter Speeds: 1/8000 to 30s, Bulb
- Viewfinder: 0.5in OLED with 3.69M dots, 23mm eye point, 0.78x magnification and 120fps refresh rate
- Rear monitor: Multi-angle 3″ LCD (1.04M dots) with touch sensitivity
- Movie recording: 4K up to 60fps, Full HD up to 120fps, 10-bit 4:2:2 internal, S-Log, Cinetone and HLG gamma
- Built-in Flash: No
- Extra Features: WiFi, Bluetooth, Bracketing, Intervalometer, Wifi Tethering, USB streaming, Dual SD slots
- Dimensions: 131.3 x 96.4 x 79.8 mm
- Weight: 658g (including battery and memory card)
- Firmware version: 1.00
1. Sensor and Image Quality
The A7 III features a 24.2MP sensor. Despite sharing the same resolution as the previous models (mark I and mark II), the sensor was new and conceived specifically for the mark III model with a faster readout and a back-illuminated structure (BSI).
The A7 IV comes with a brand new chip that increases the resolution to 33MP (27% increase) and uses a BSI design as well.
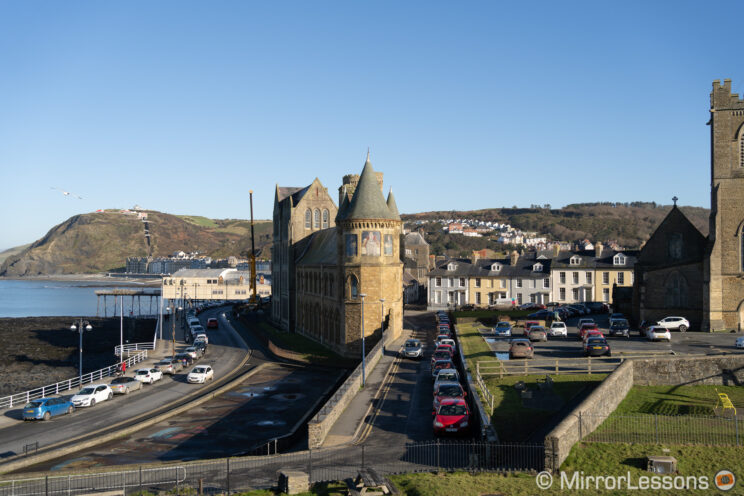
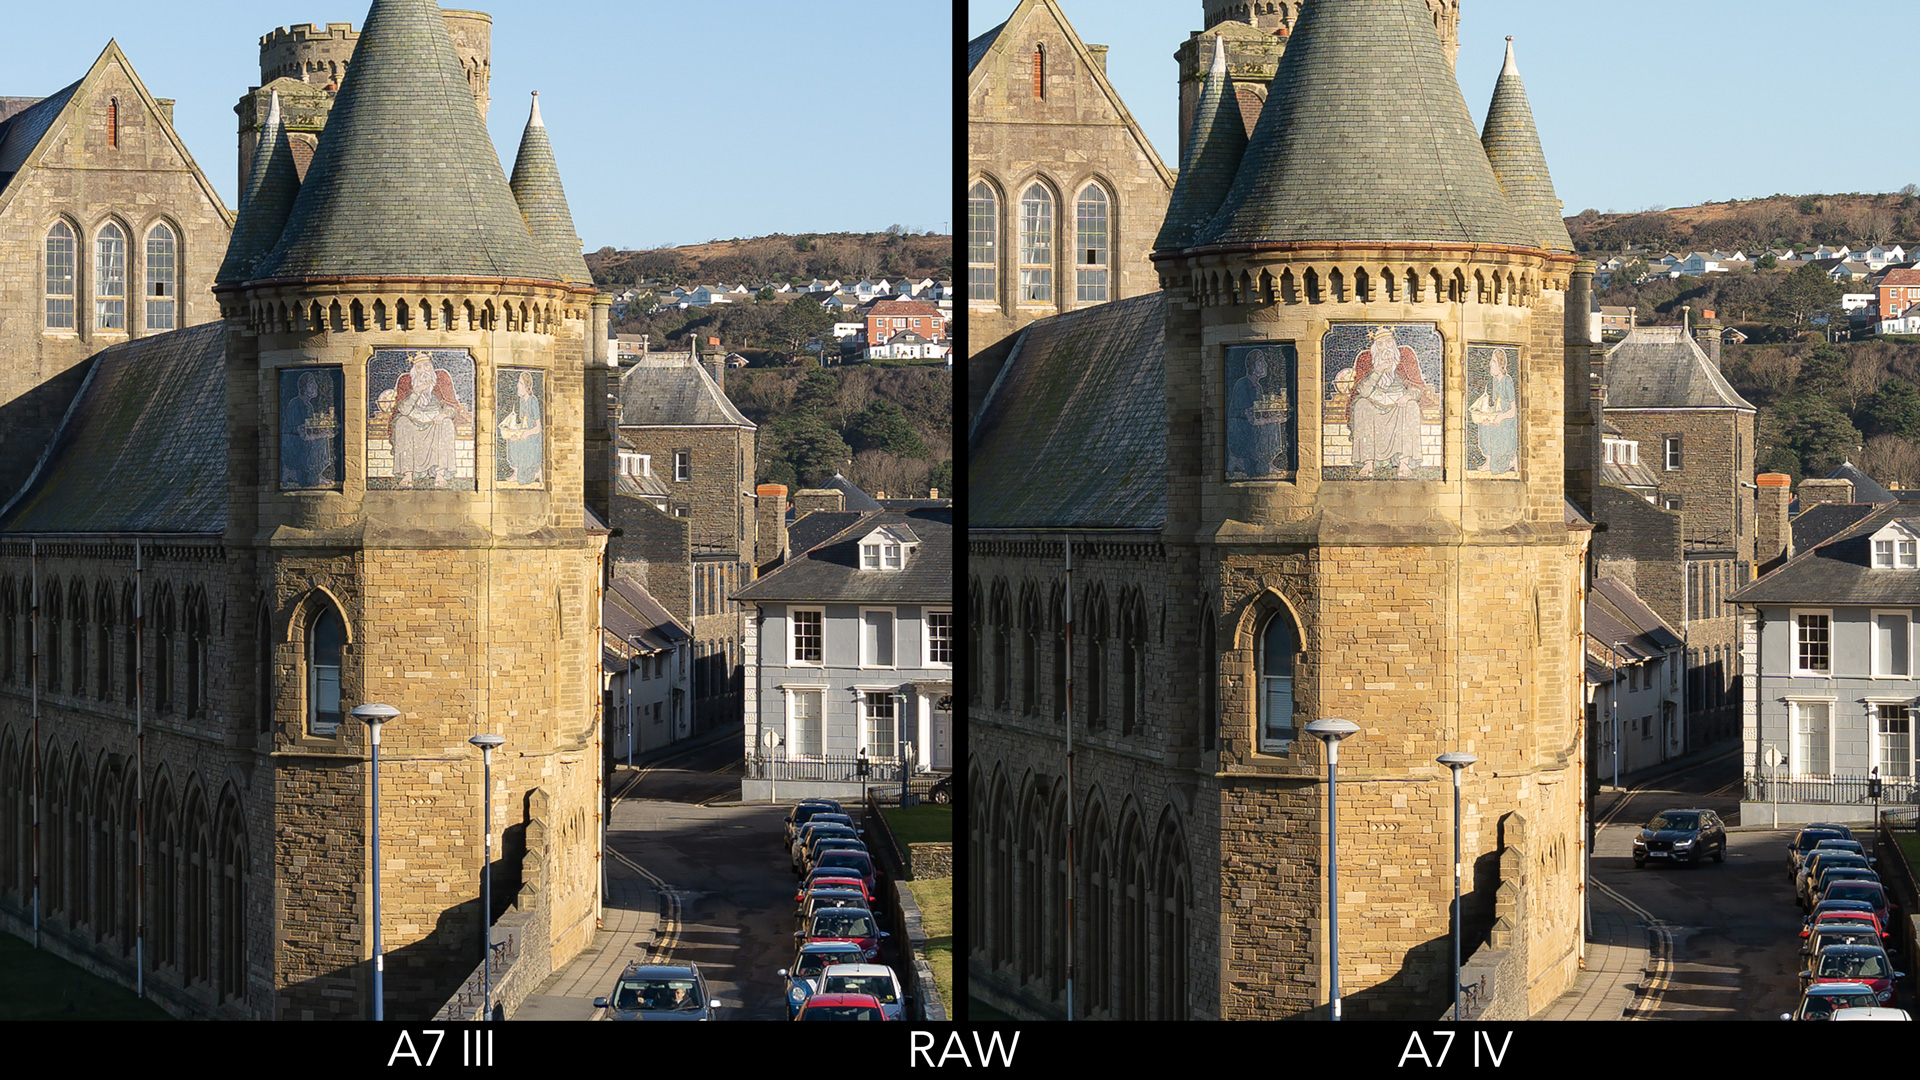
Resolution
The extra megapixels on the A7 IV are far from game changing, but they remain a welcome addition nonetheless. As you can see below, when both images are enlarged at 100%, details appear a bit larger and crisper on the A7 IV.

A similar conclusion can be drawn after looking at the same shot but with the Straight-Out-Of-Camera JPG.
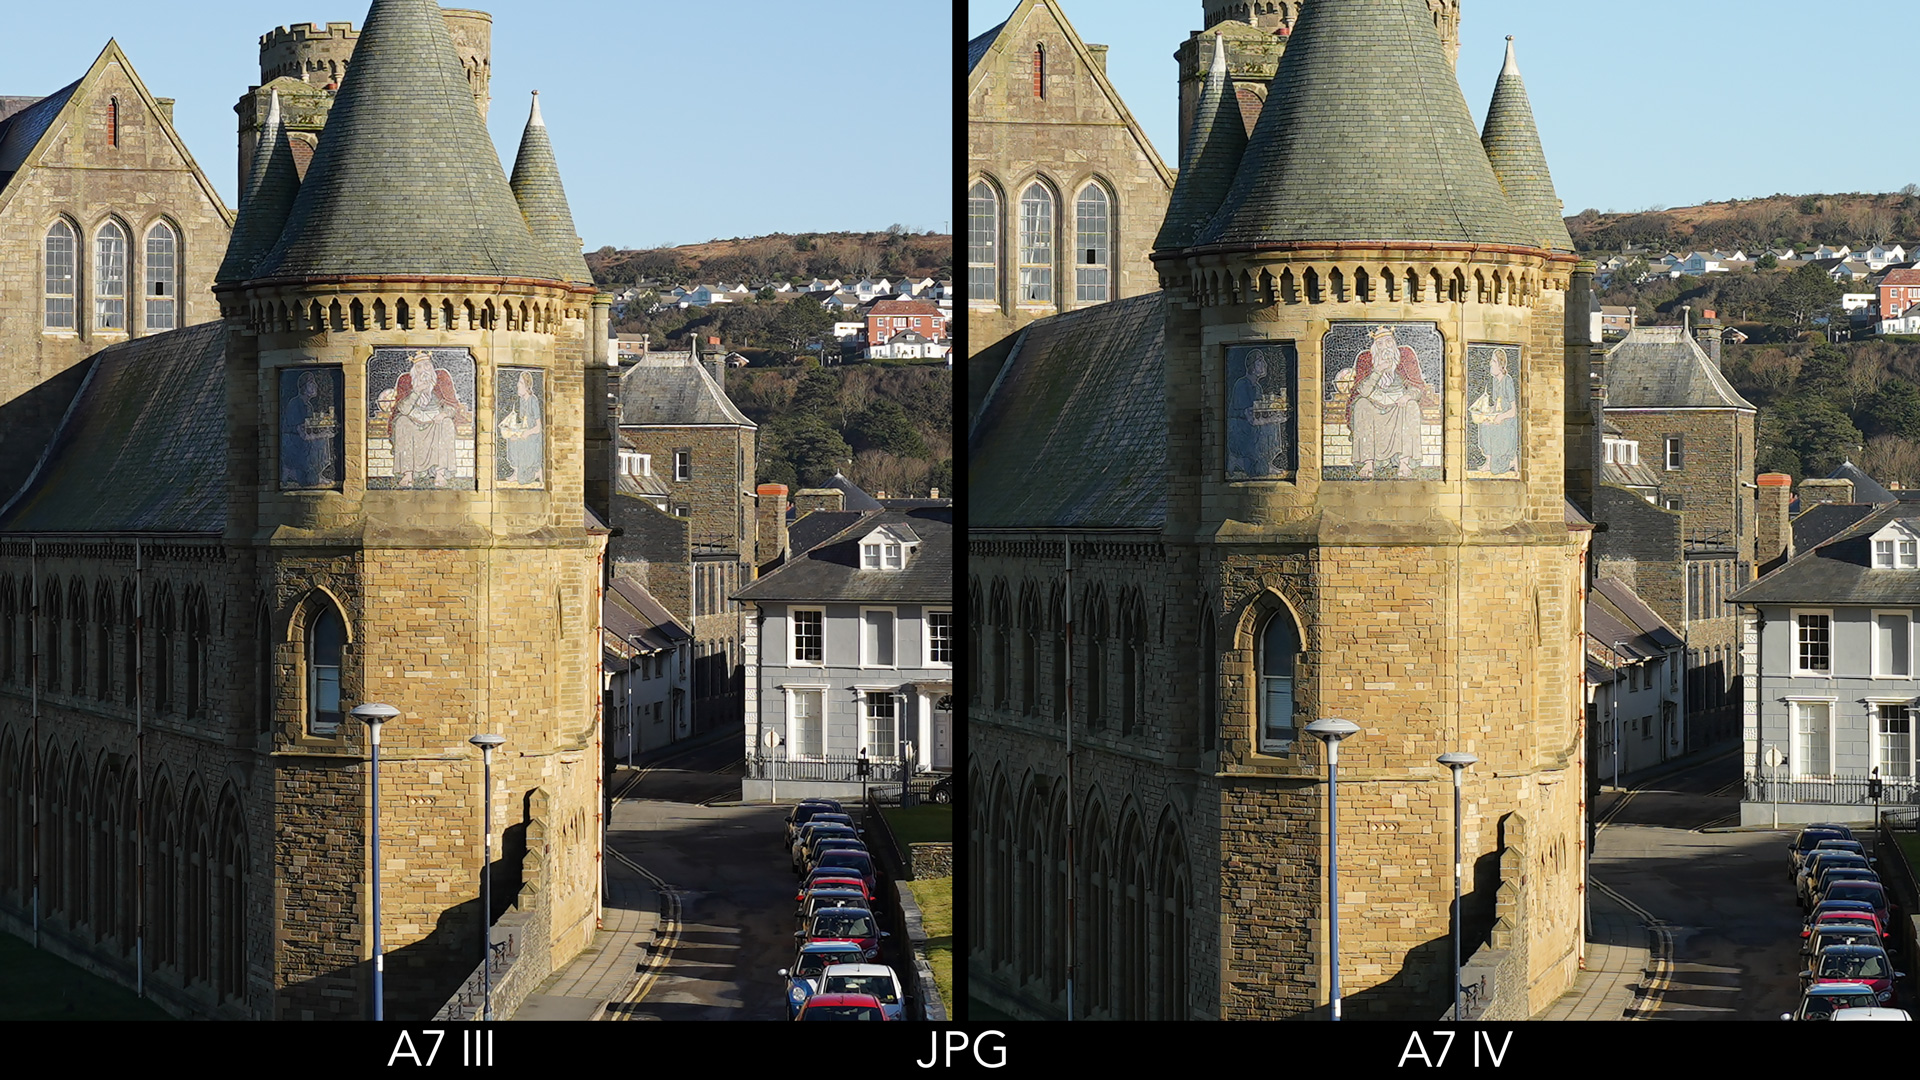
Note that sharpness of the JPG files, as well as other parameters such as saturation and contrast, can be edited in camera. (More on this further down.)
More megapixels can also give you a bit of extra room for cropping your photos when required. For example, the APS-C mode on the A7 IV outputs a 14MP file versus 10MP on the A7 III.
The mark III model has a low-pass filter, but this has not yet been confirmed for the new camera. Websites like Imaging Resource say there isn’t one, whereas DPreview concluded there is a weak AA filter after doing their studio test. I also found a comment on the DPreview forum where a user received an answer from Sony Support saying there is no Anti-Aliasing filter.
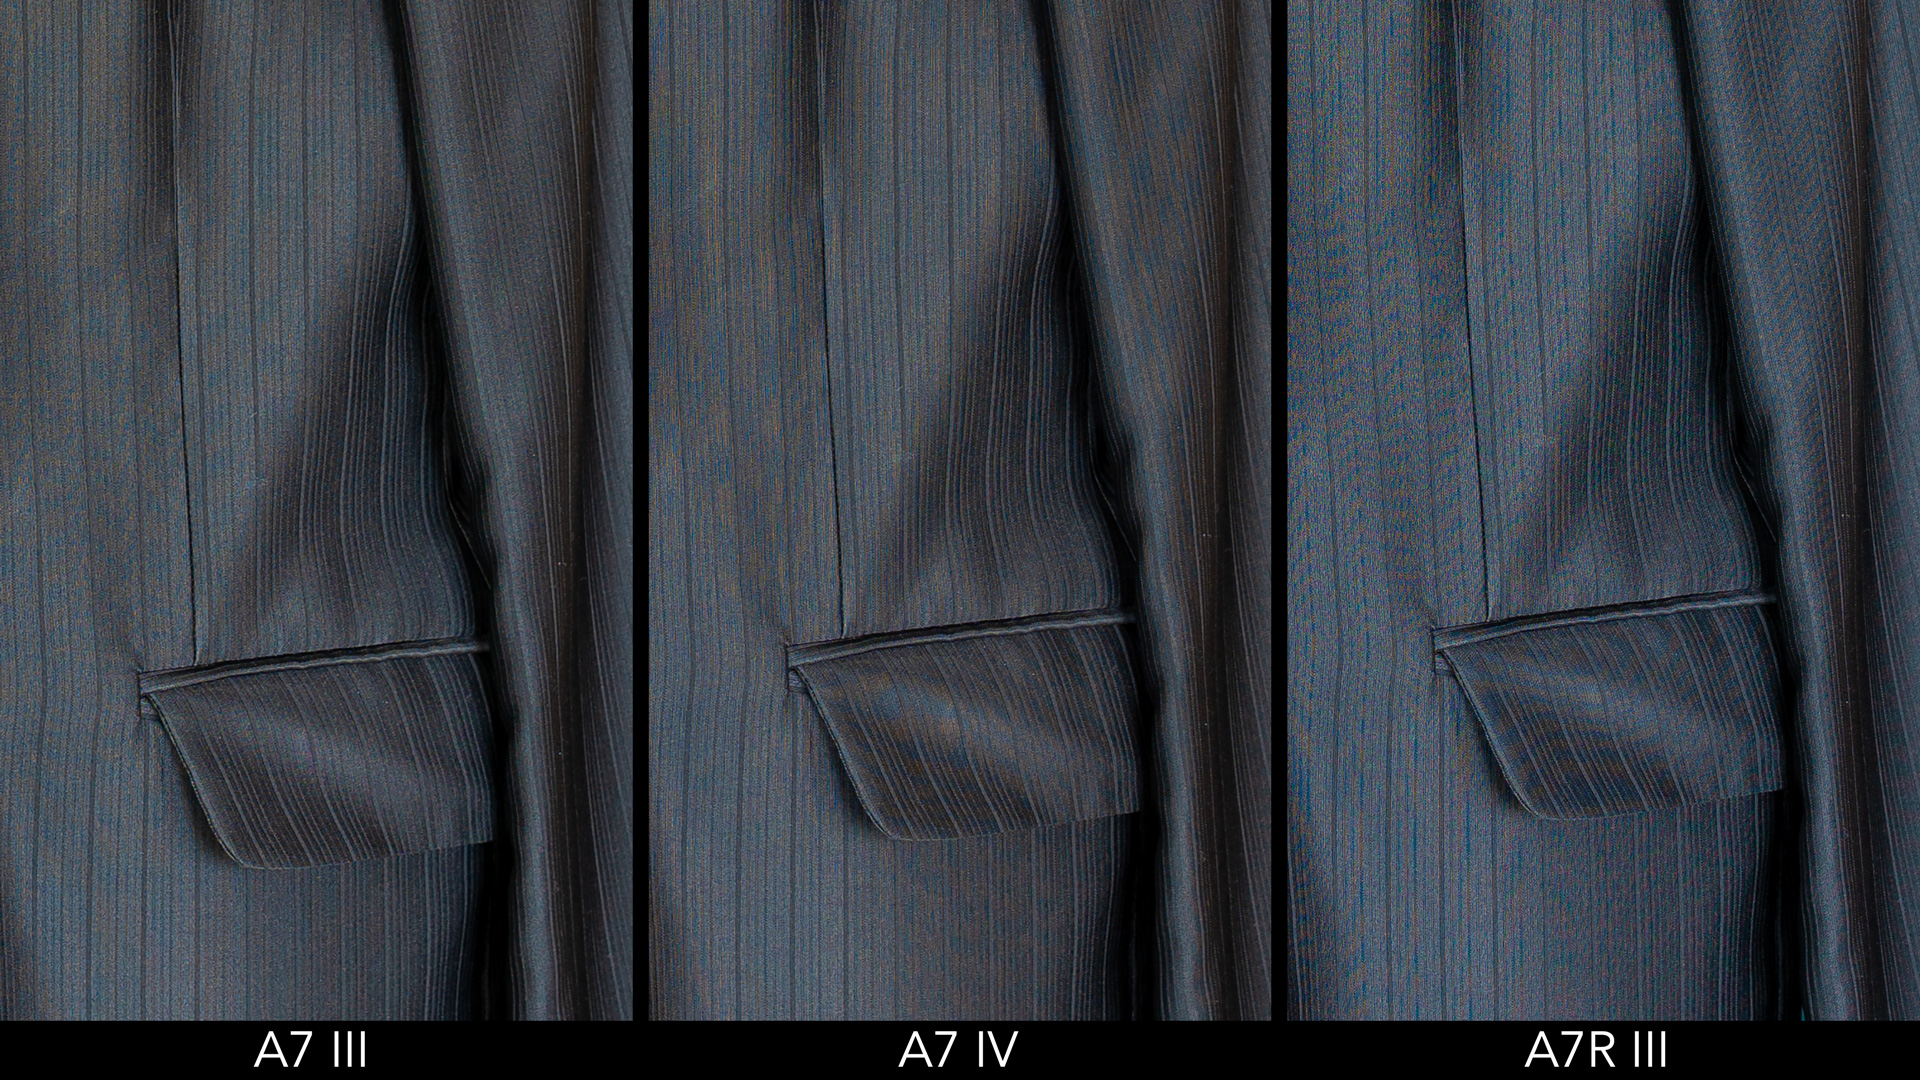
I added an additional test in my to-do list and took a picture of a dark striped jacket that caused moiré to appear on previous cameras I tested. I added a generous amount of saturation to the RAW files to make the difference more visible, for the sake of the test. I also included the A7R III, which doesn’t have an AA filter. As you can see, there are more traces of moiré on the A7 IV than the A7 III, although it is not as bad as the A7R III. If there is a low-pass filter on the new camera, it is a very weak one.
ISO Sensitivity
Despite the higher pixel count, the A7 IV retains the same ISO range as the A7 III: 100 to 51,200 ISO (normal range), or 50 to 204,800 ISO with the extended values.
The new camera features a faster image processor, the BionZ XR (8x time faster than the BionZ X on the A7 III, according to Sony) and it should, among other things, keep noise at high ISOs more contained.


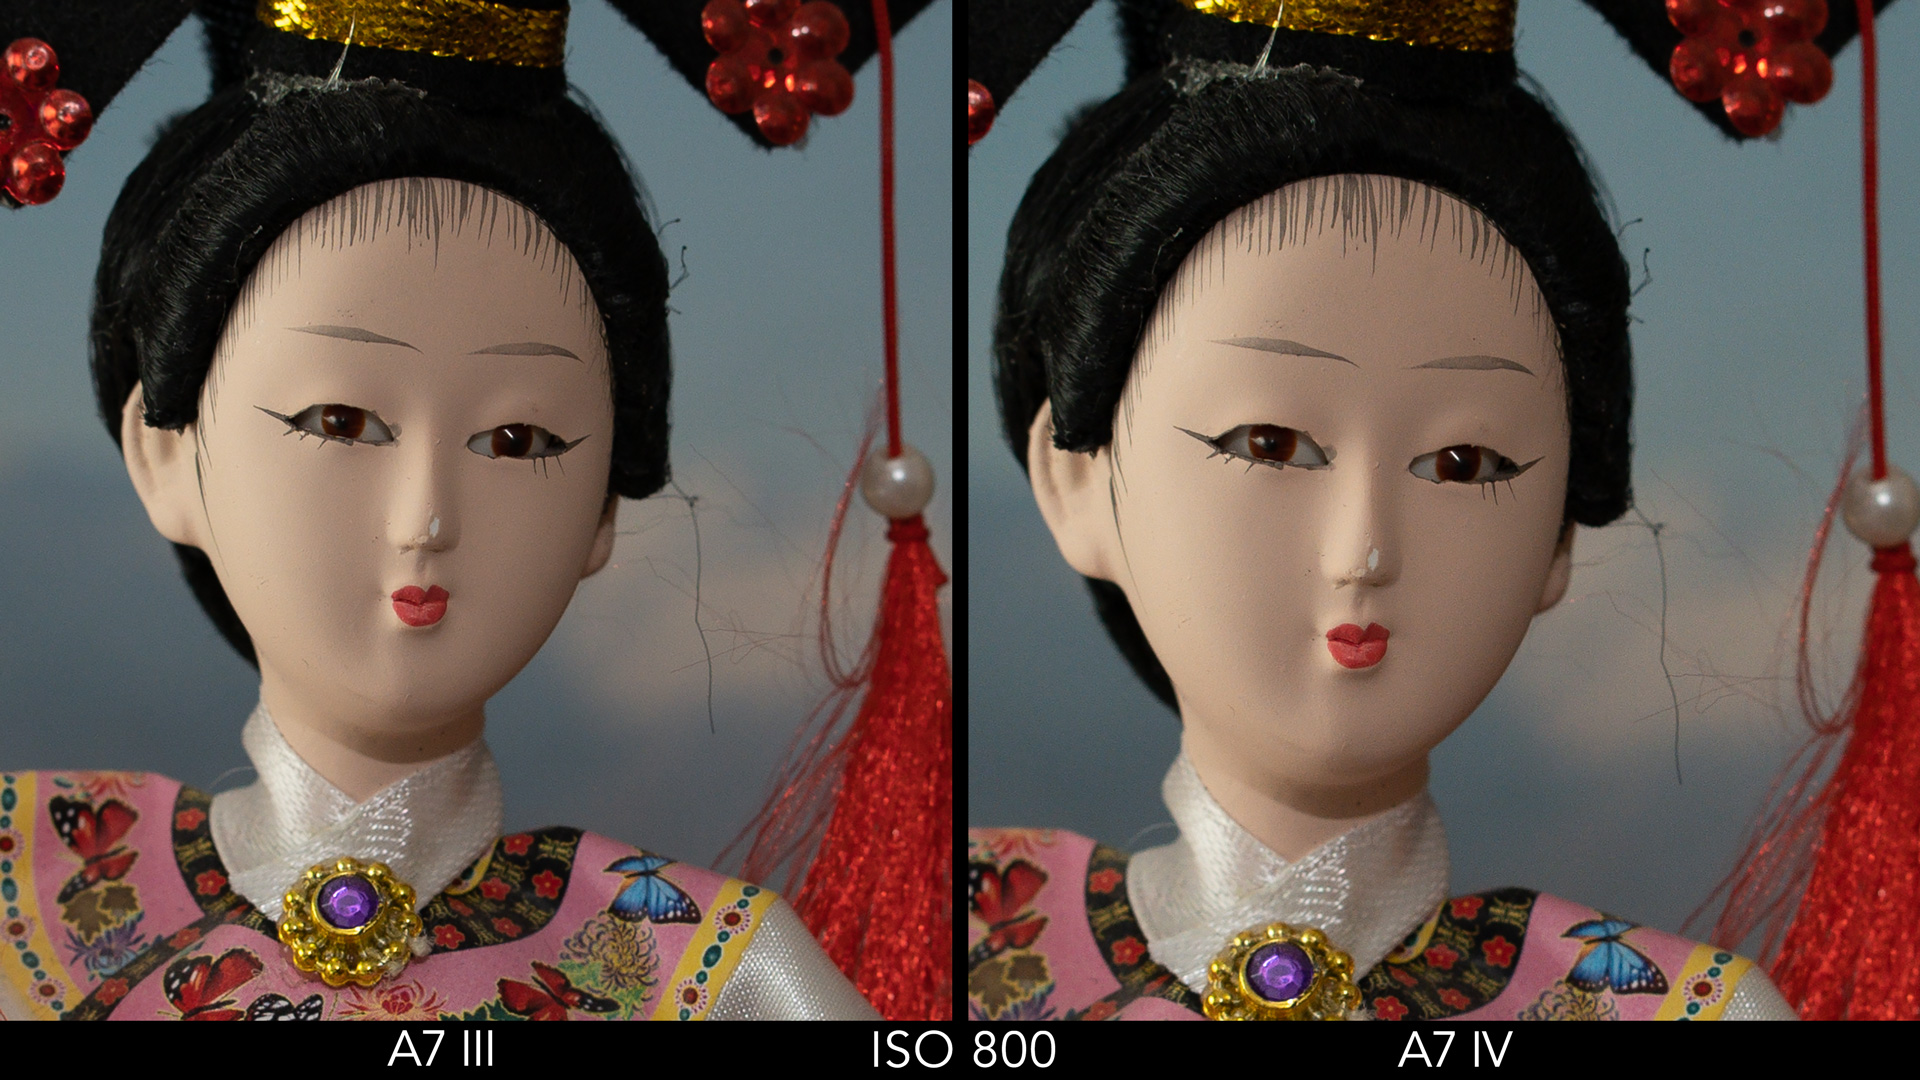
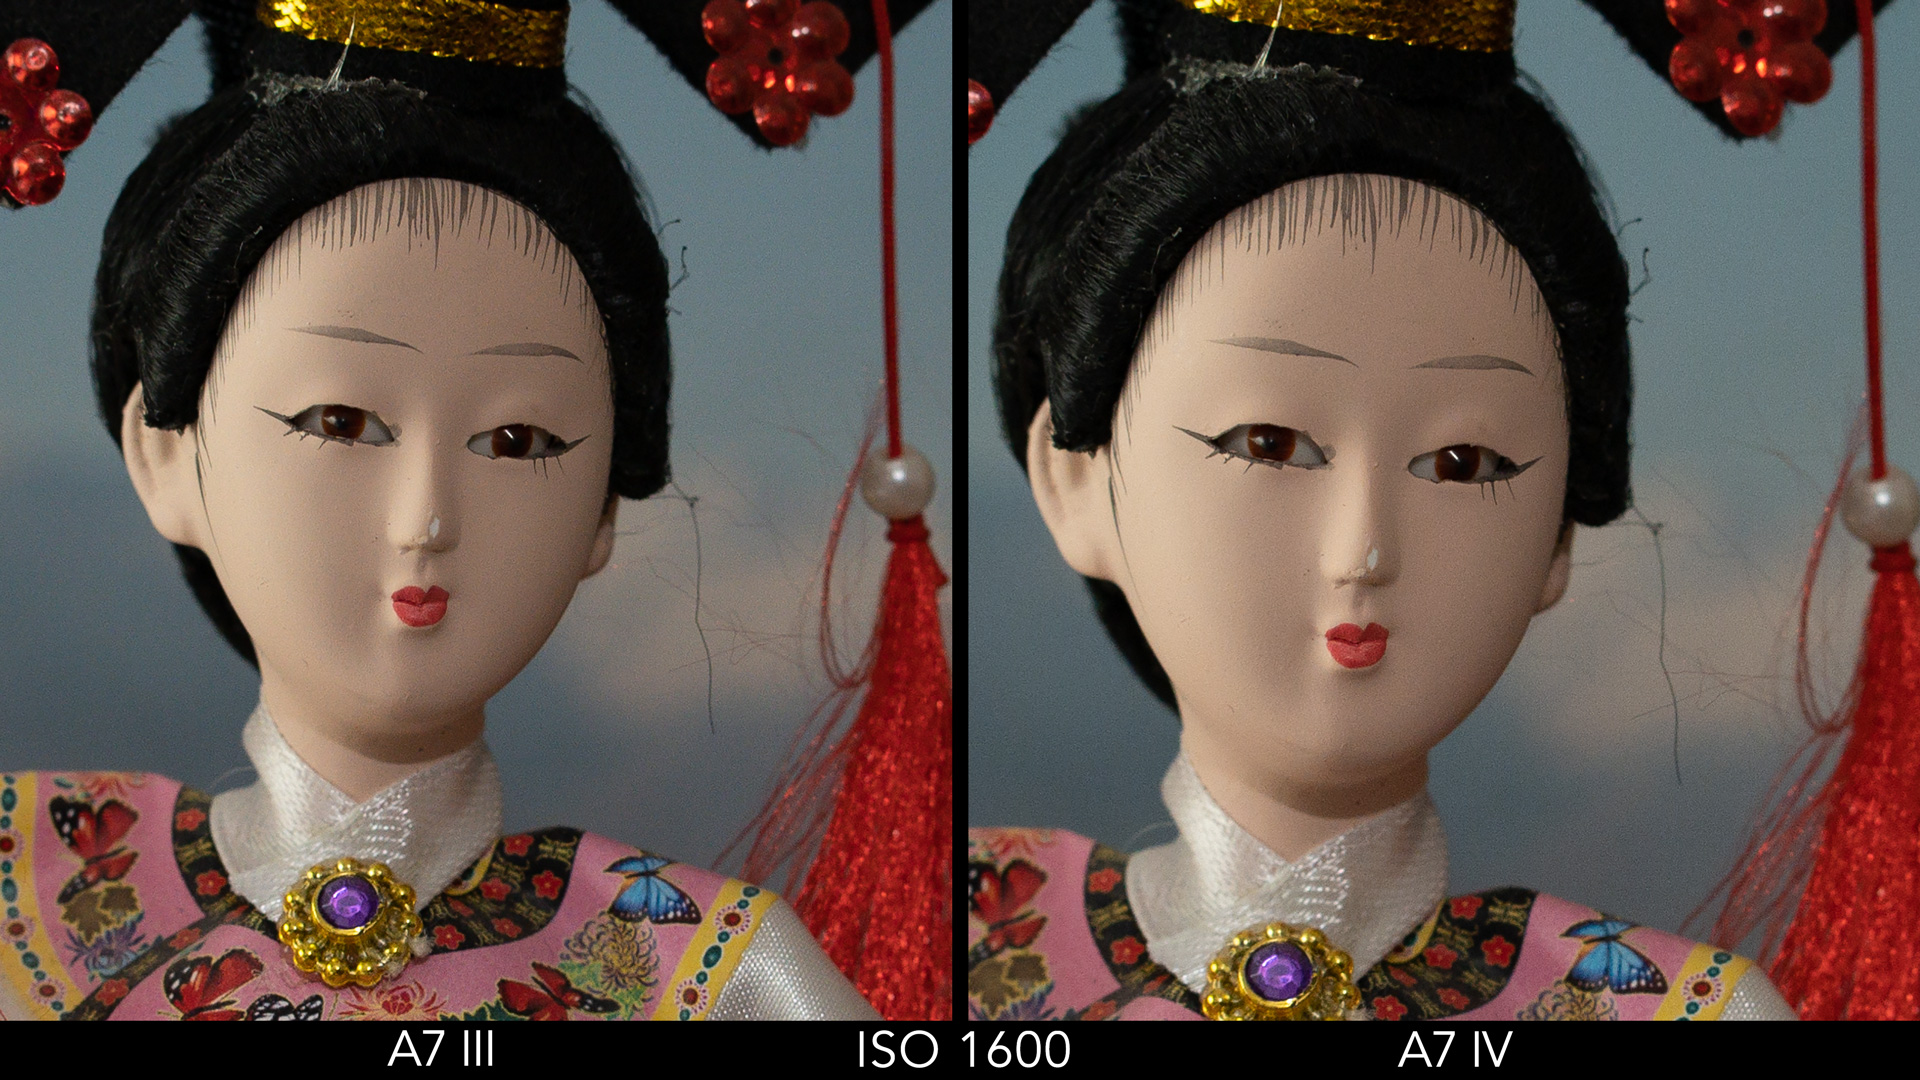
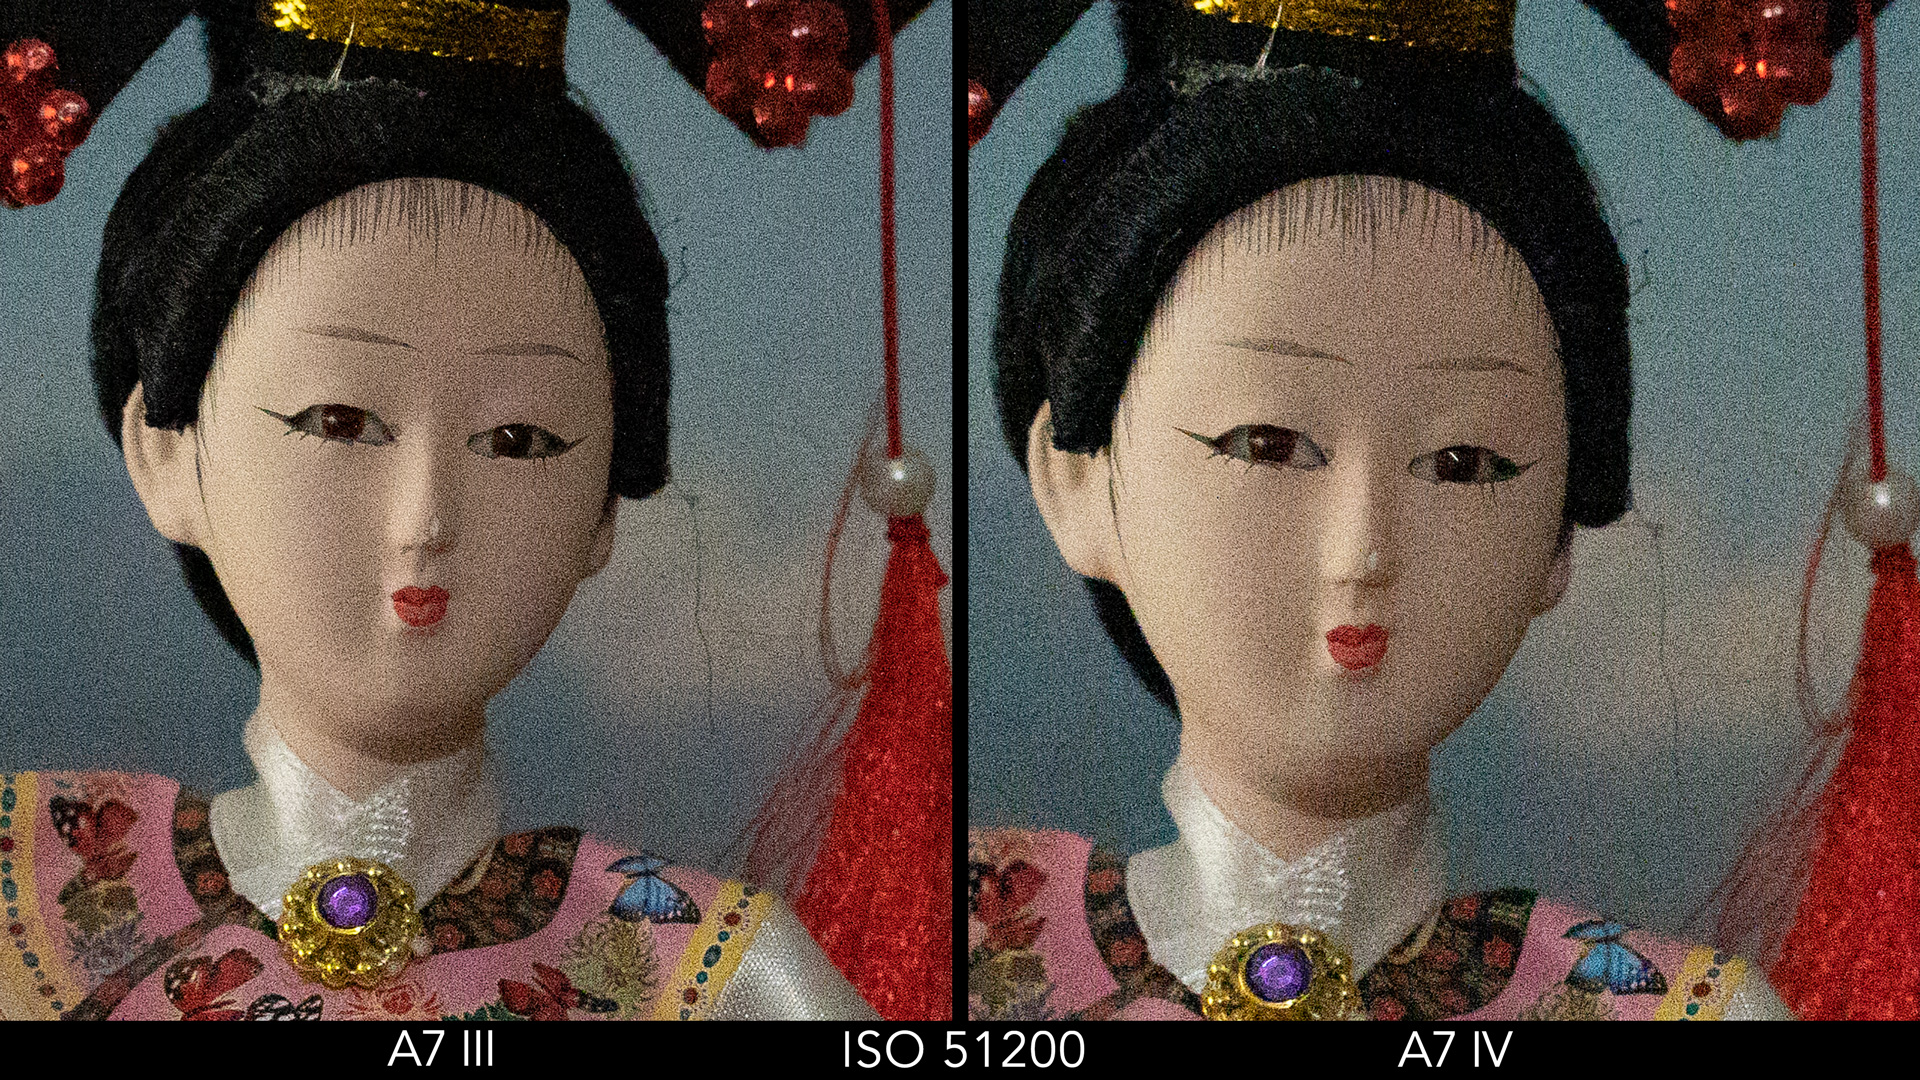
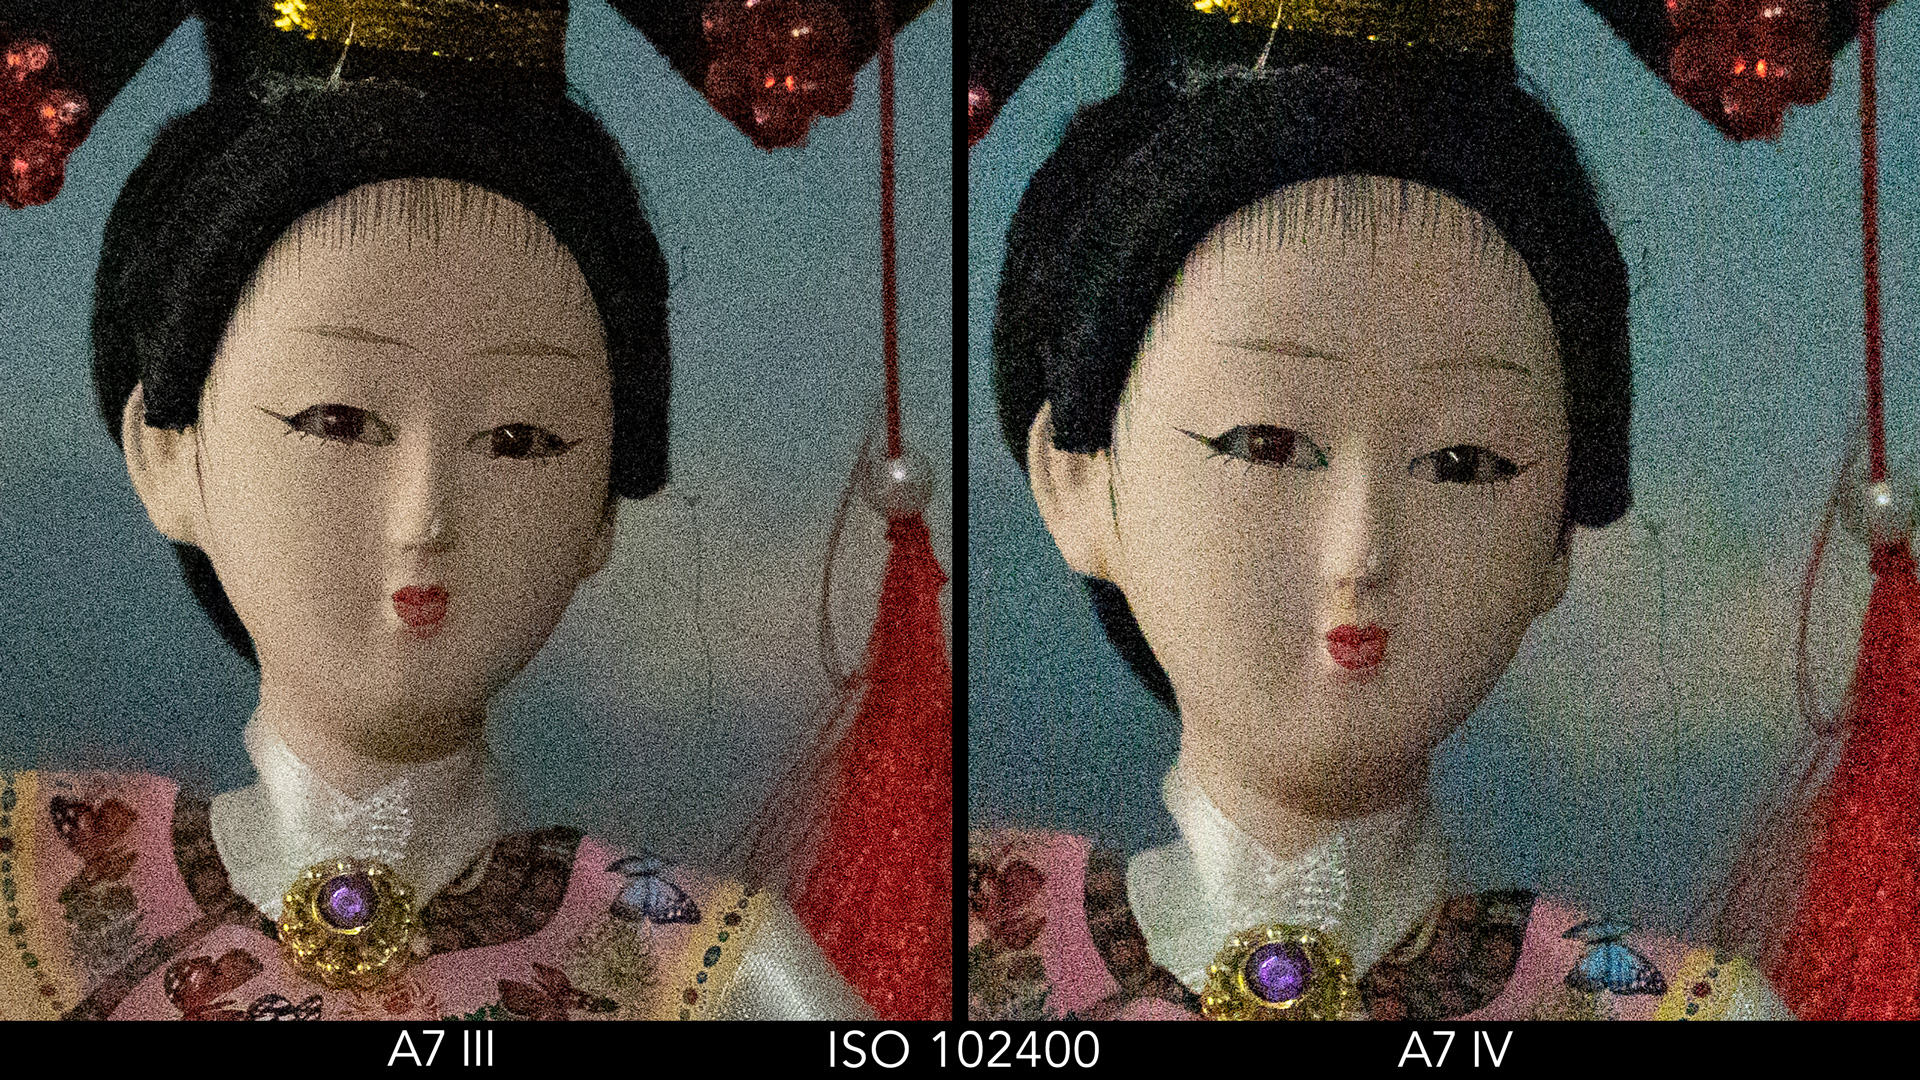
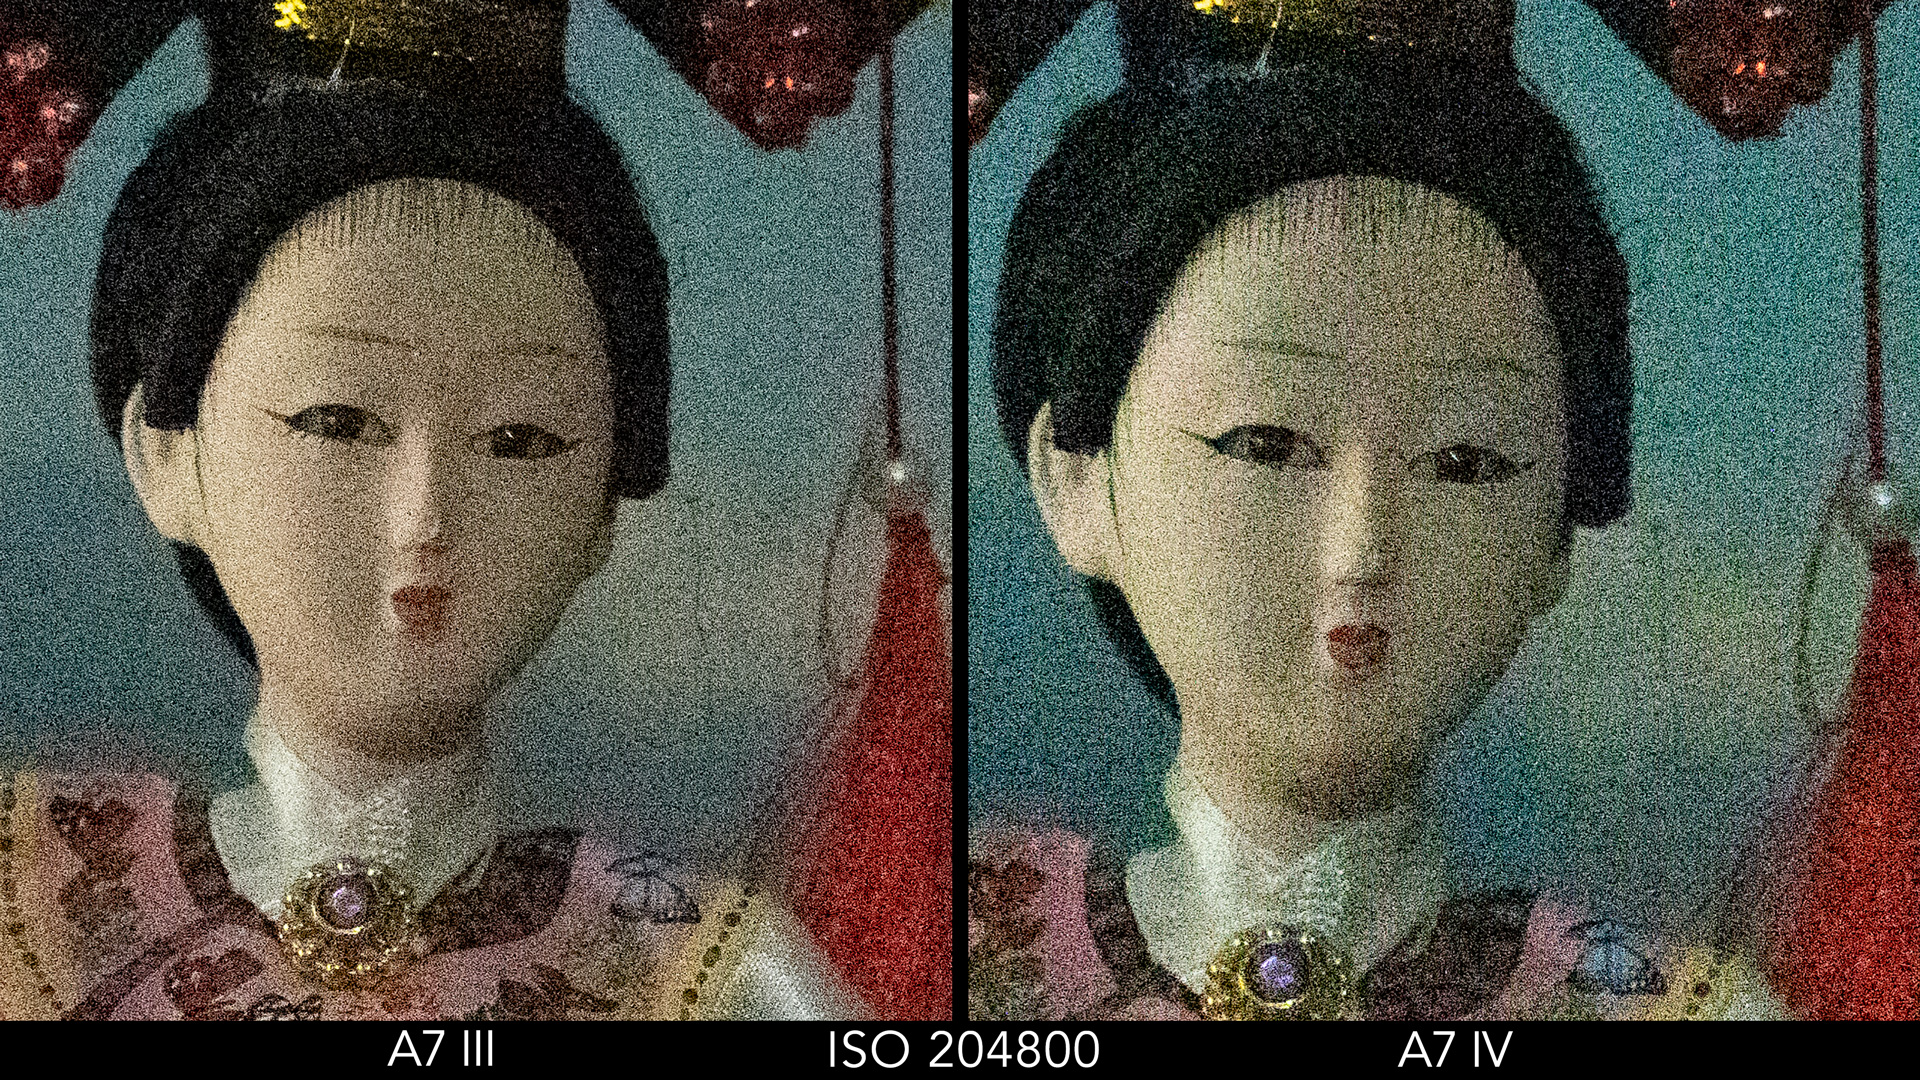
When the two cameras are put side by side, the quality is very similar overall. If you look carefully, you can see a bit more noise on the A7 IV images but the difference is hardly relevant until ISO 51,200. The highest value of 204,800 shows a visible colour cast on the mark IV model (although it is unlikely you’ll ever need to take pictures with such a high sensitivity).


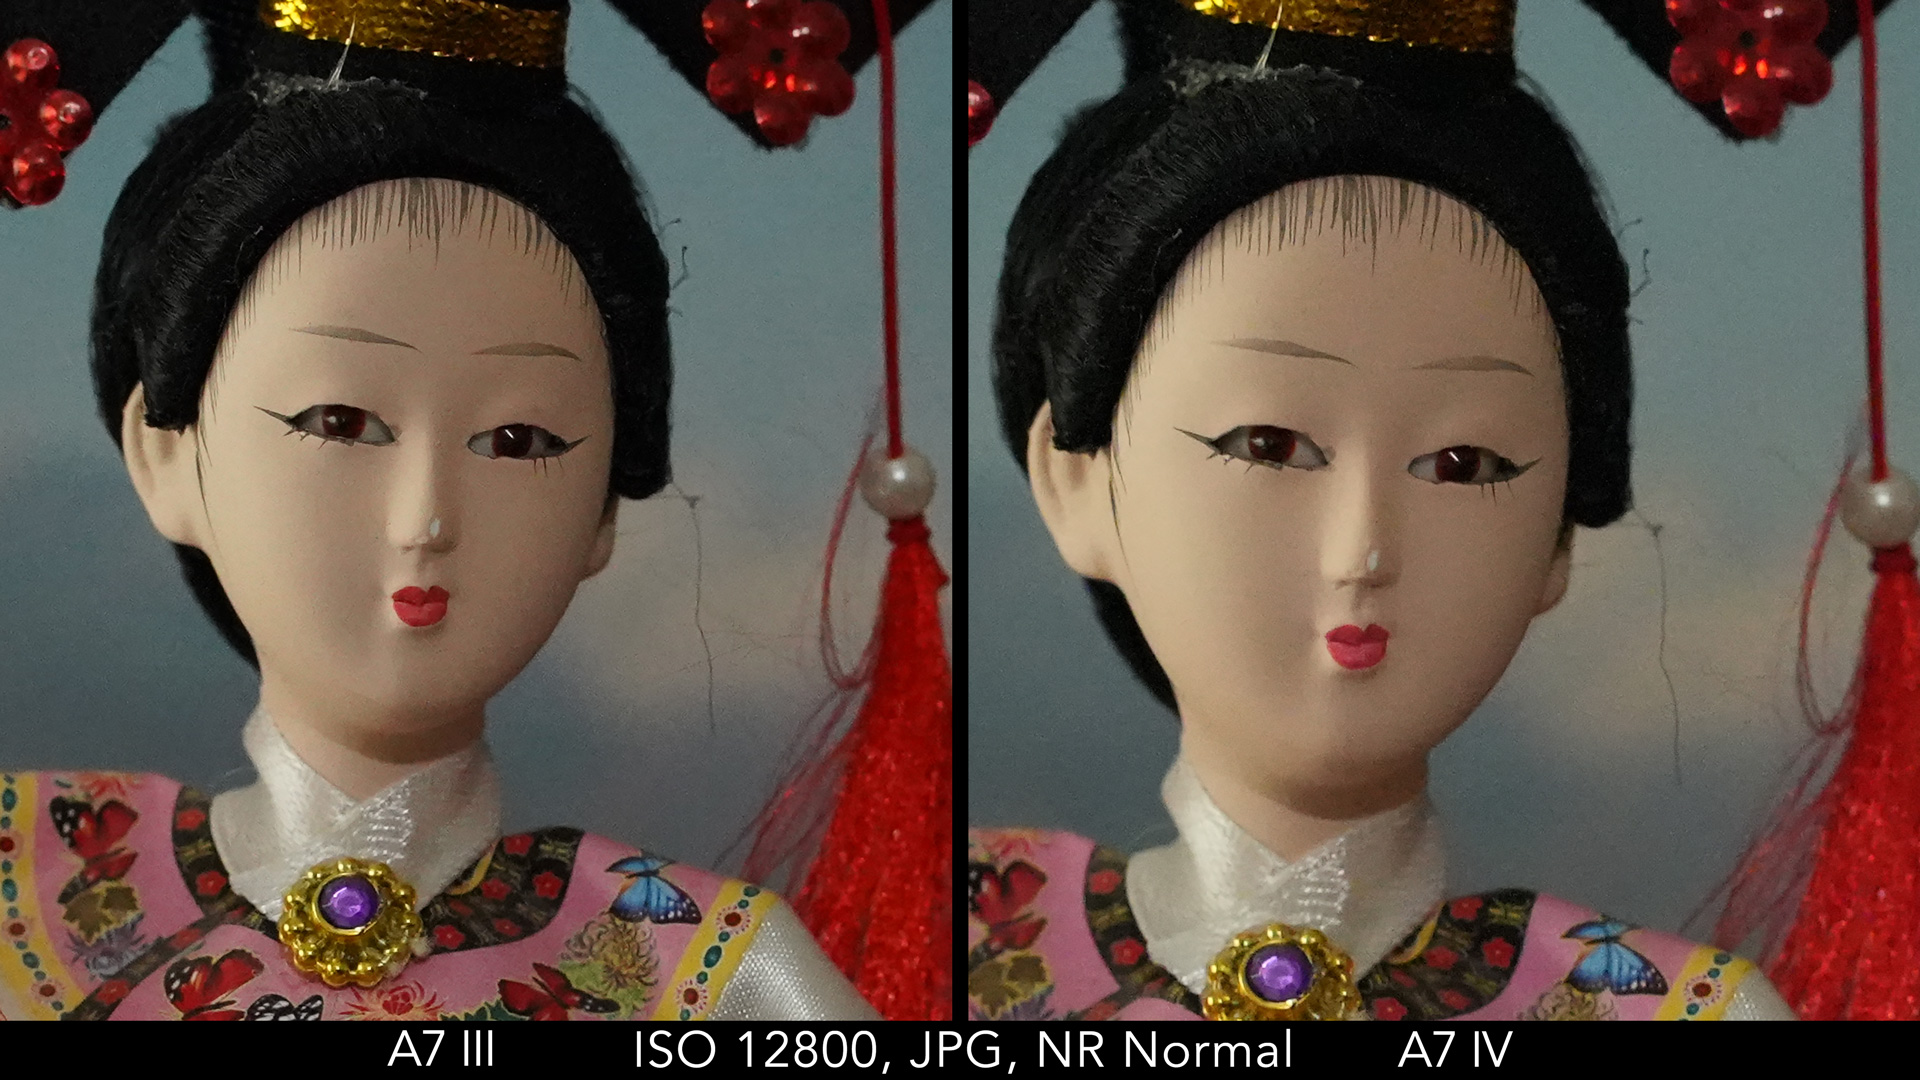
If you’re working with JPGs, each camera has a Noise Reduction setting with three levels. The results are similar when it is turned off, otherwise I find it to be slightly more aggressive on the A7 IV files.


The mark IV model has a new ISO Range Limit option to reduce the minimum and maximum values of the sensitivity range when working in manual ISO mode (if you know you won’t use all of it for example).
Dynamic Range
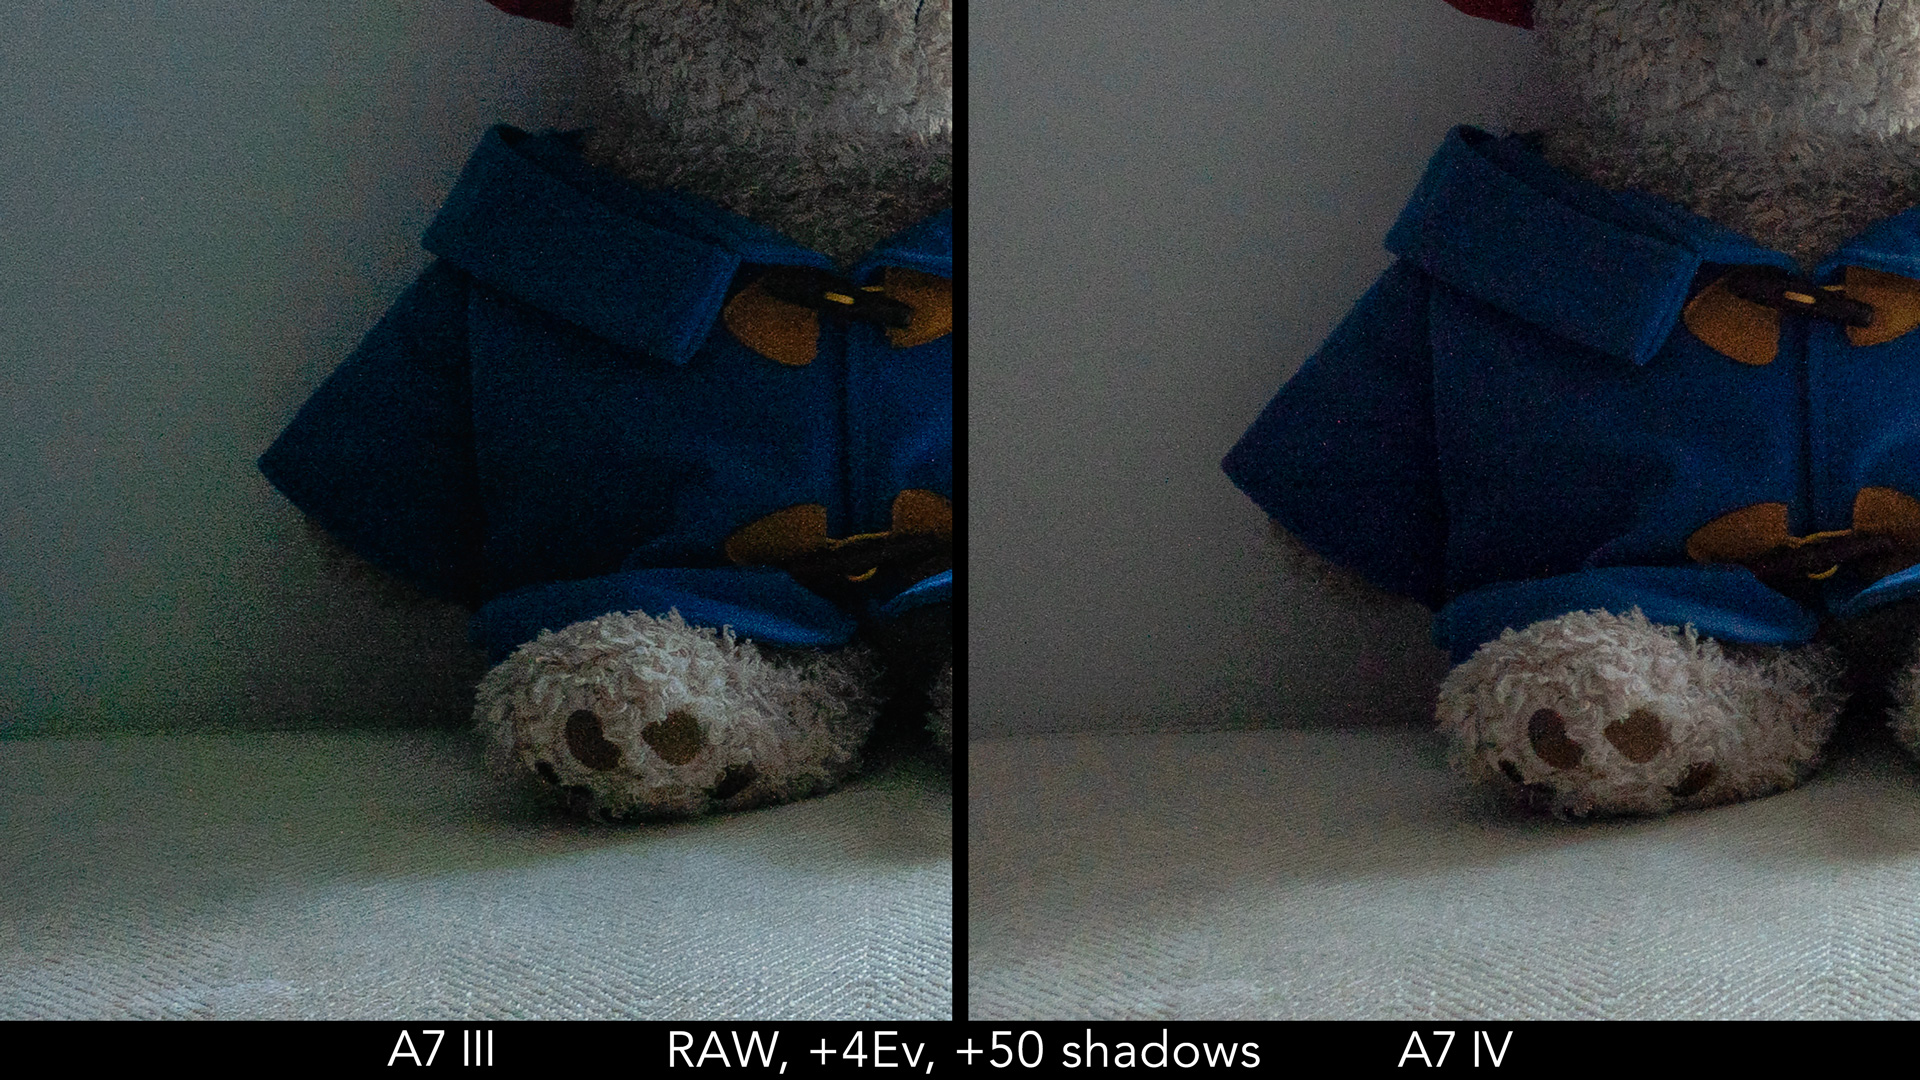
The A7 IV has an advantage when it comes to shadow recovery. As you can see below, it displays less noise and fewer colour artefacts after a heavy exposure adjustment in Lightroom.
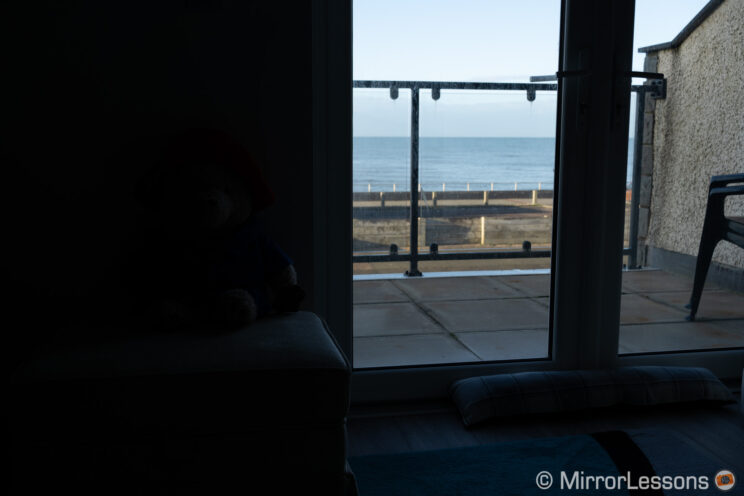

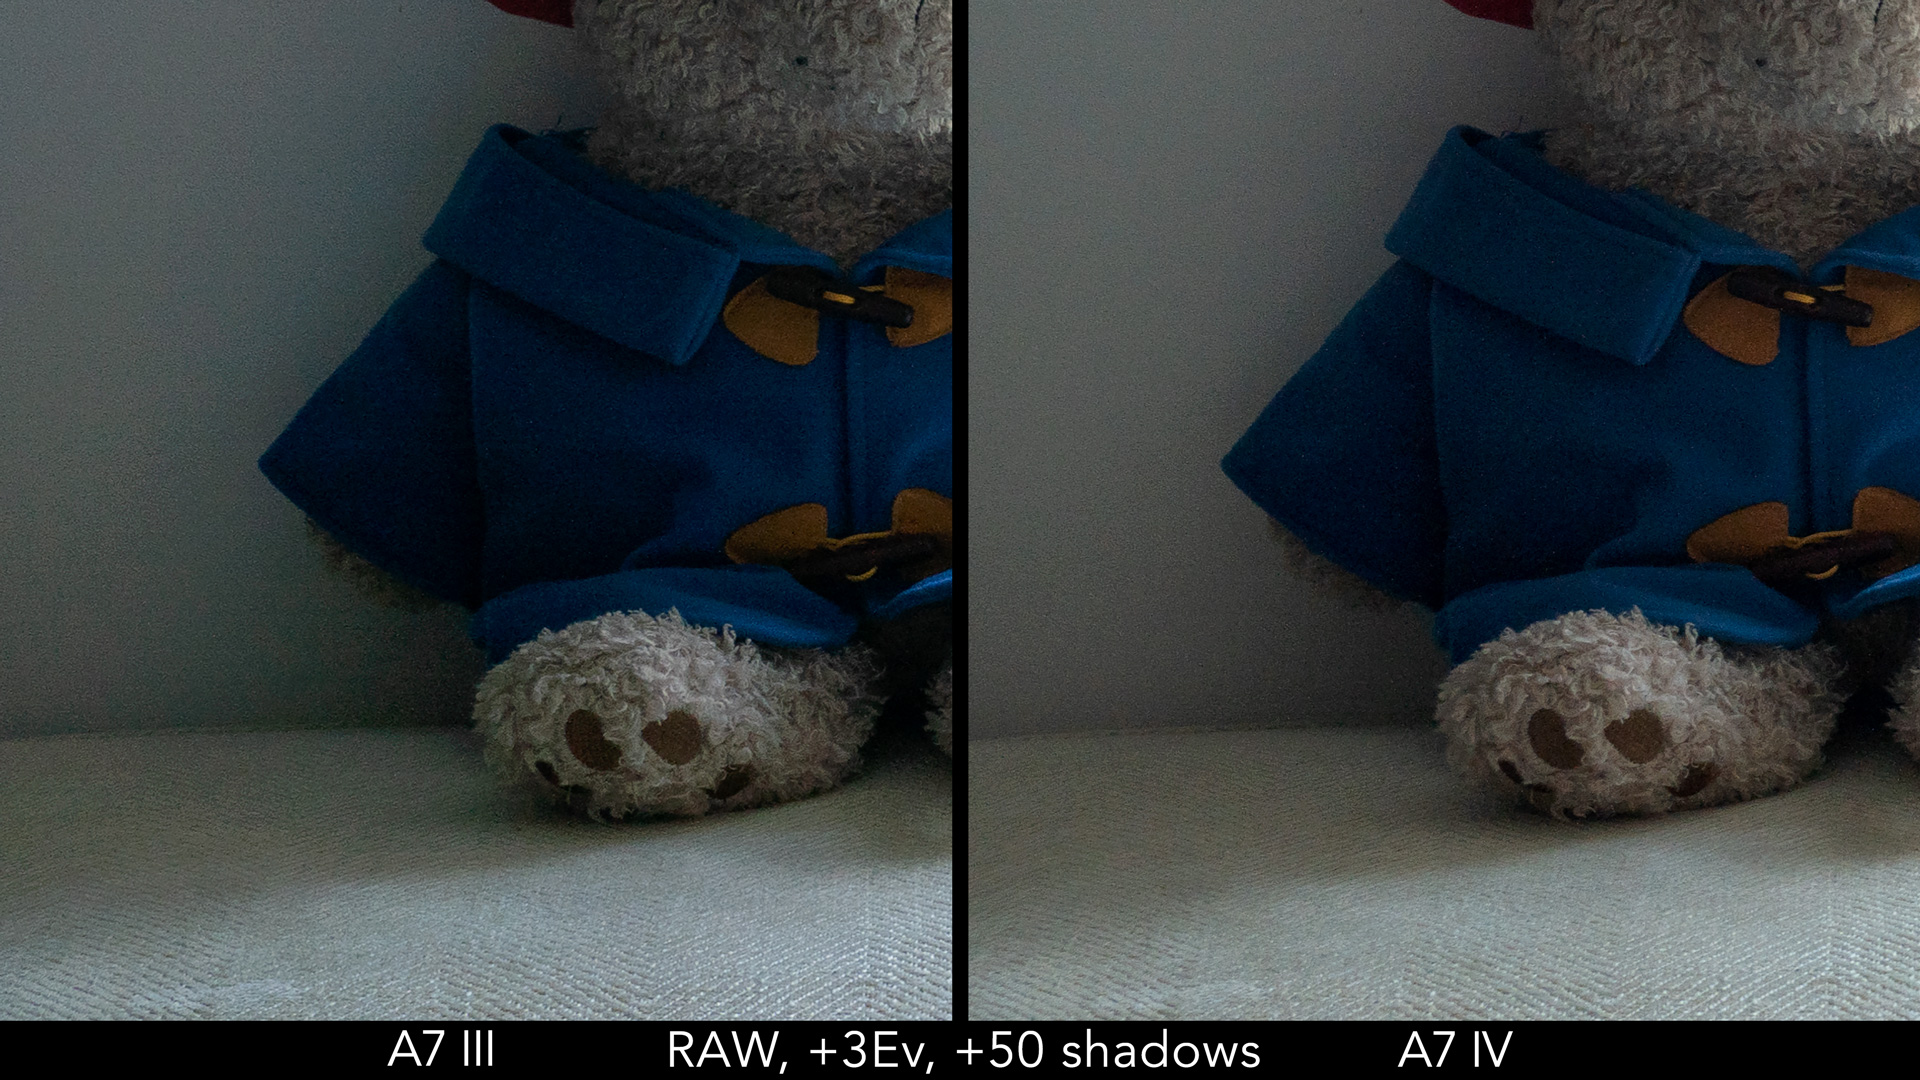
With a 3 stop recovery, the A7 IV remains superior.
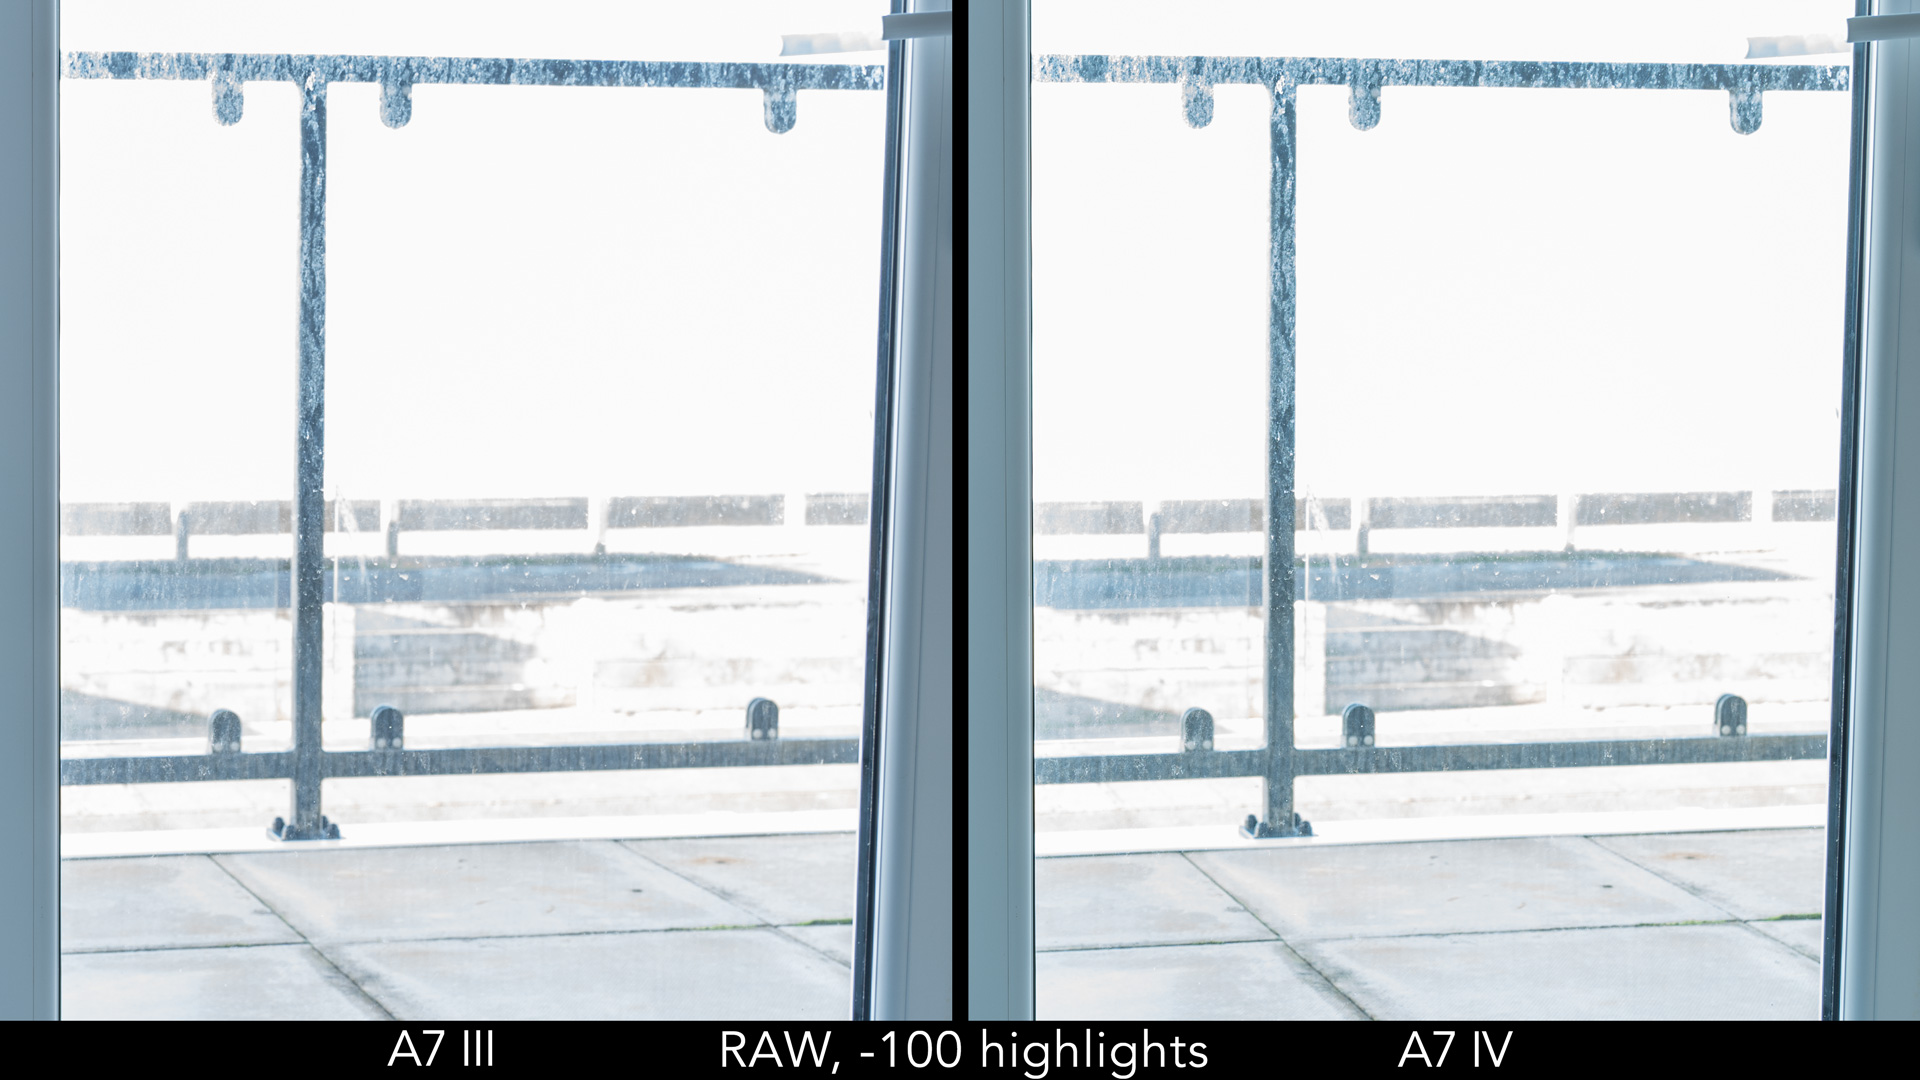
Concerning the highlights, you can recover the same amount of details in over-exposed areas with both cameras.

A welcome addition on the A7 IV is the possibility to choose a third compression option for the RAW files: Lossless Compressed. On the A7 III, it’s either Compressed or Uncompressed.
In terms of file size, the scene above captured with the three compression settings gave me the following:
| RAW Quality | A7 III | A7 IV |
|---|---|---|
| Uncompressed | 49MB | 68MB |
| Lossless Compressed | – | 38MB |
| Compressed | 25MB | 35MB |
The Lossless version is close to the Compressed version in terms of file size. As for the quality, a strong 4Ev exposure recovery didn’t highlight a relevant difference between the three options.
Colours and Parameters
The A7 IV inherits Sony’s latest colour palette and image processing tweaks that the company introduced with the A7S III (although a few changes, such as improved skin tone rendition, already appeared on the A7R IV).
What I noticed from the start when comparing the two cameras is that the A7 IV leans towards a more greenish look. Also, the sky has more cyan compared to that captured by the A7 III. This is visible with the RAW files (if all the basic settings are equalised) as well as the Creative profiles on the JPG.
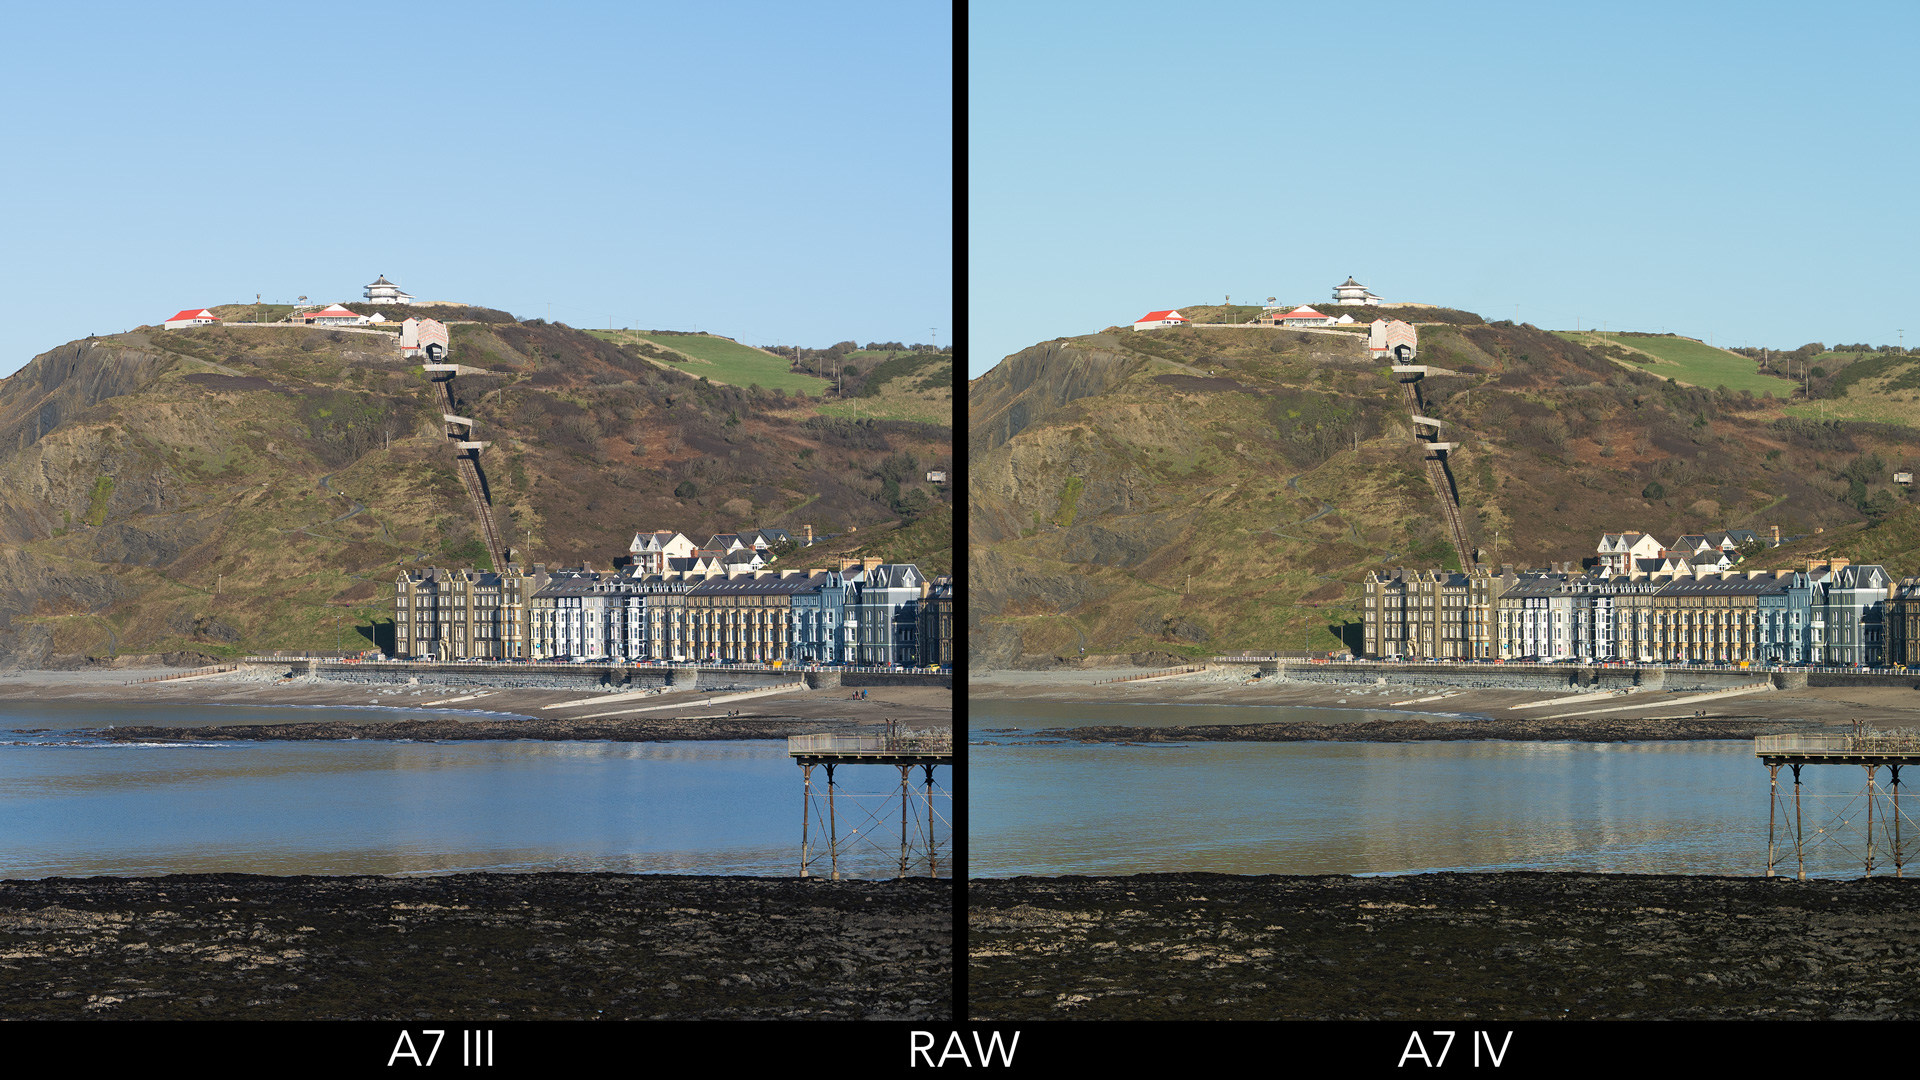
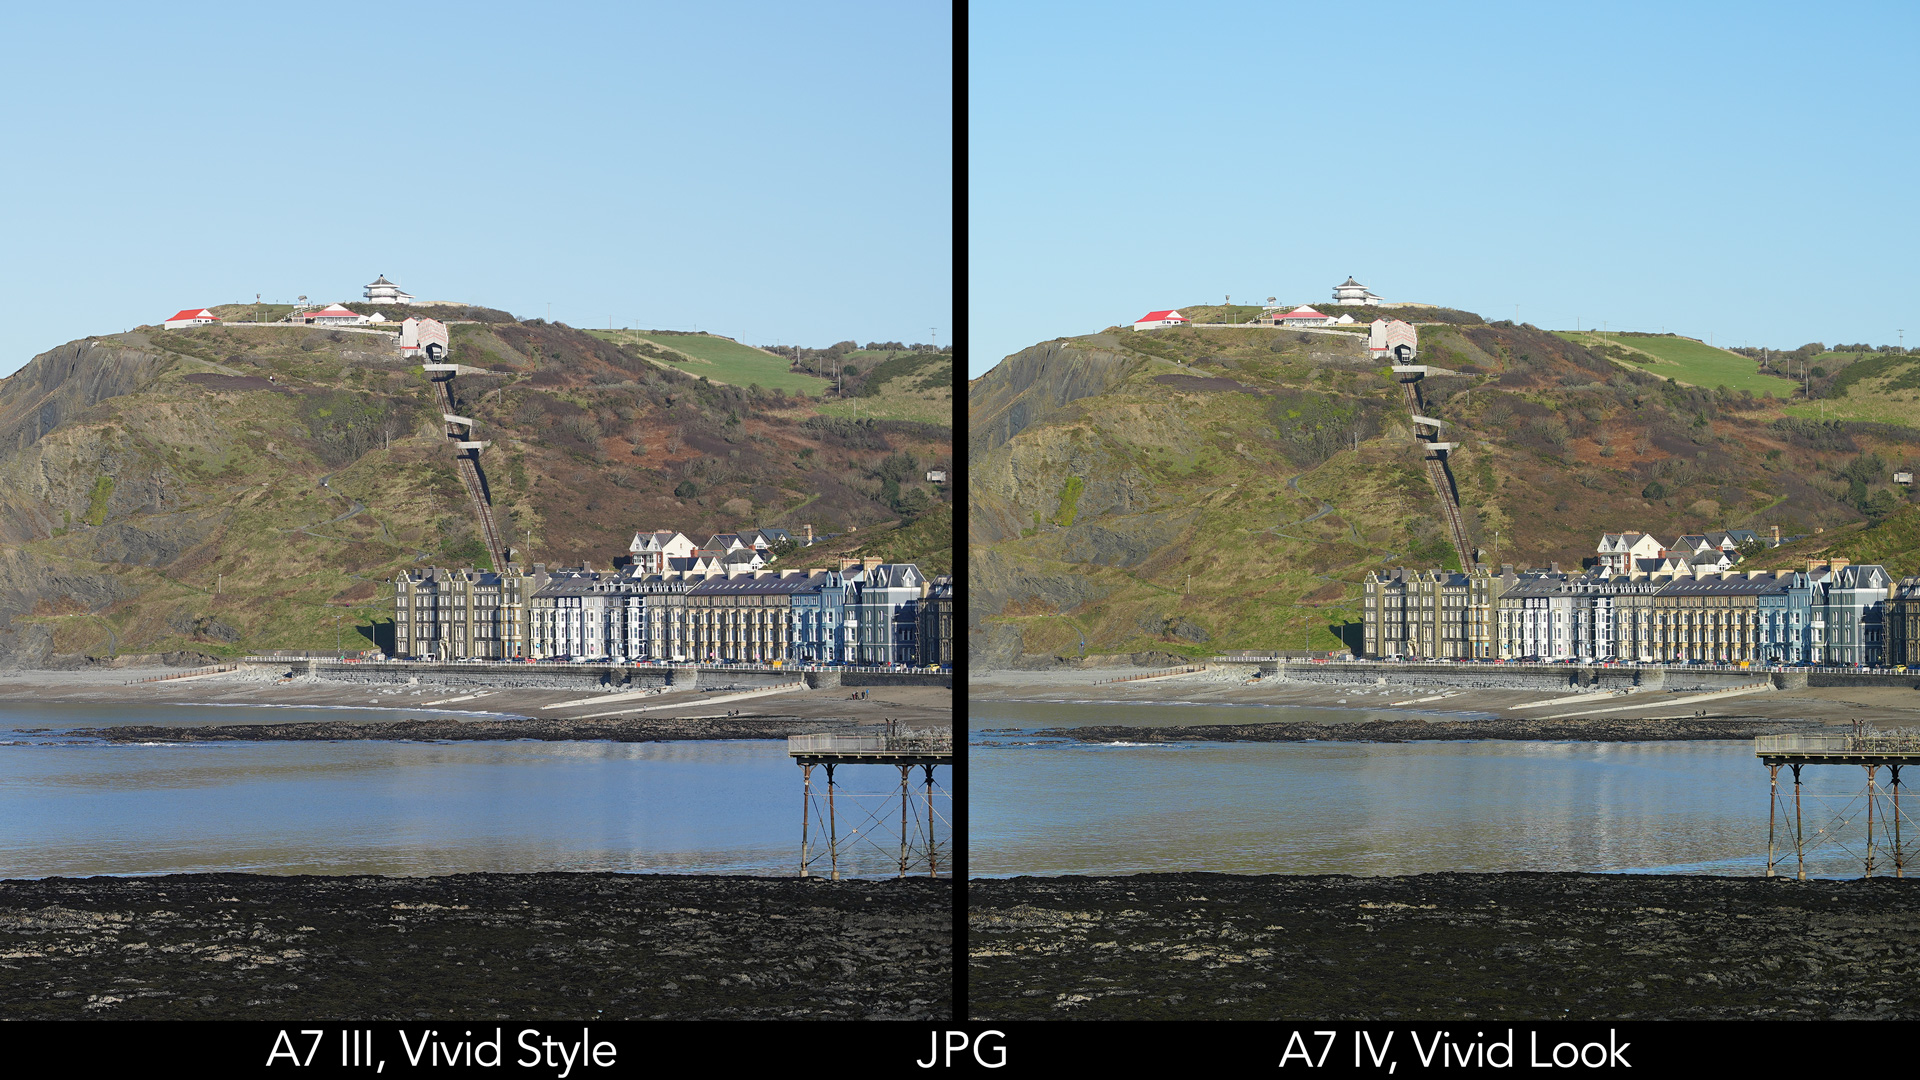
With the enlargement below you can see that the hill in the background has more patches of vibrant green when using the A7 IV, especially when the Vivid profile is selected.

As always, it’s important to interpret the results above in the correct way. With RAW files, the difference is less important because this format is designed to be post processed and each photographer has their own method, presets, taste and favourite software that will influence the final result. Also, the two RAW images can be easily matched with a few adjustments in the same editing program.
The JPGs give us a better insight into the updates brought by Sony. This is also a good time to talk about the picture profiles.
The A7 IV has a brand new set called Creative Look. There are 10 of them, including one for Black & White and one for Sepia. Each profile can be customised with 8 different parameters: contrast, highlights, shadows, fade, saturation, sharpness, sharpness range and clarity. (Note that ‘sharpness range’ is not available for video.)
The A7 III features the old Creative Style that has been around since Nex APS-C cameras. There are 13 of them, with only three parameters to edit for each (contrast, saturation, sharpness). Furthermore, these parameters can be controlled in fewer steps than the A7 IV. For example, sharpness works in 6 steps as opposed to 9 steps on the successor model.
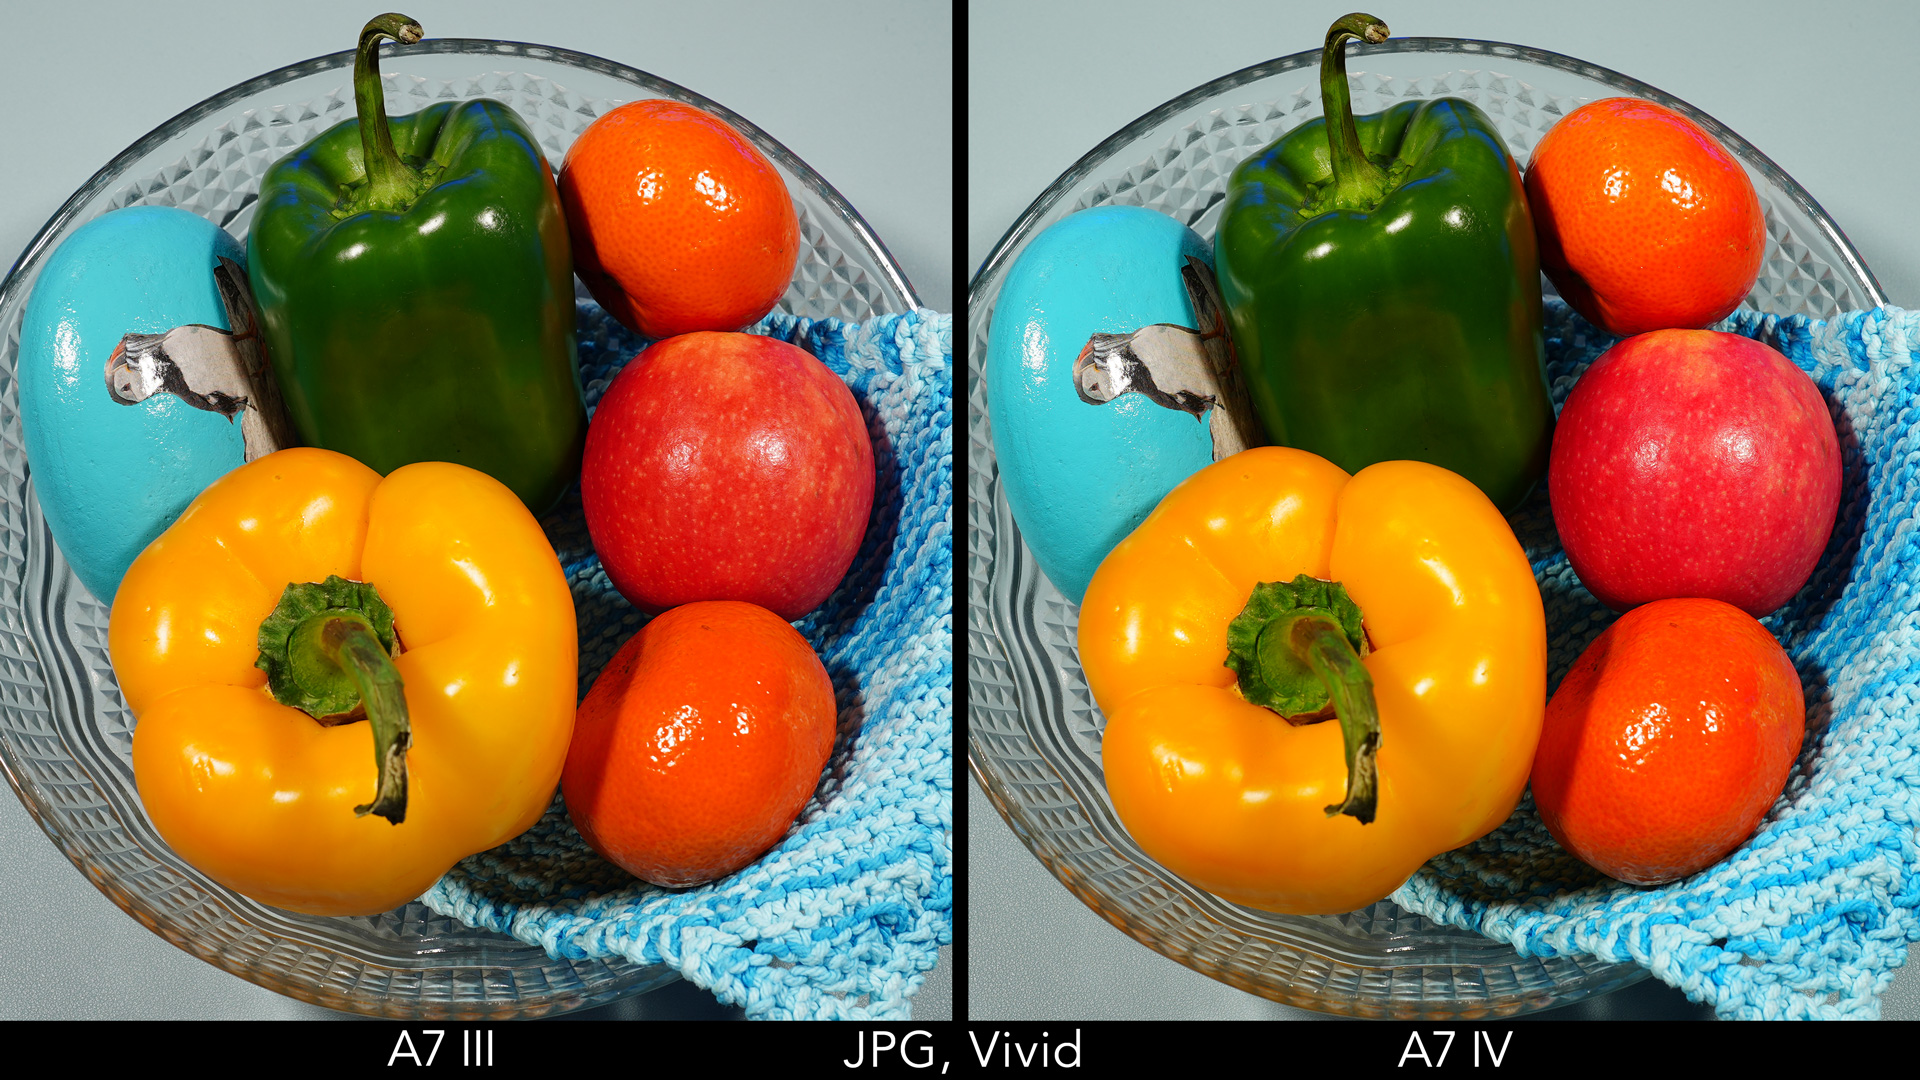
The differences can be subtle. If you look at the second scene below, the A7 IV captured a slightly pinker apple and the blue stone is a bit more vibrant, but it’s not something you notice at first glance.
Now let’s have a look at portraits and skin tones.
With the RAW files, the A7 III has stronger reds and a hint of magenta which makes the photo appear cooler, whereas the A7 IV has a warmer look (with the exact same settings in Lightroom, using the Adobe Color profile).
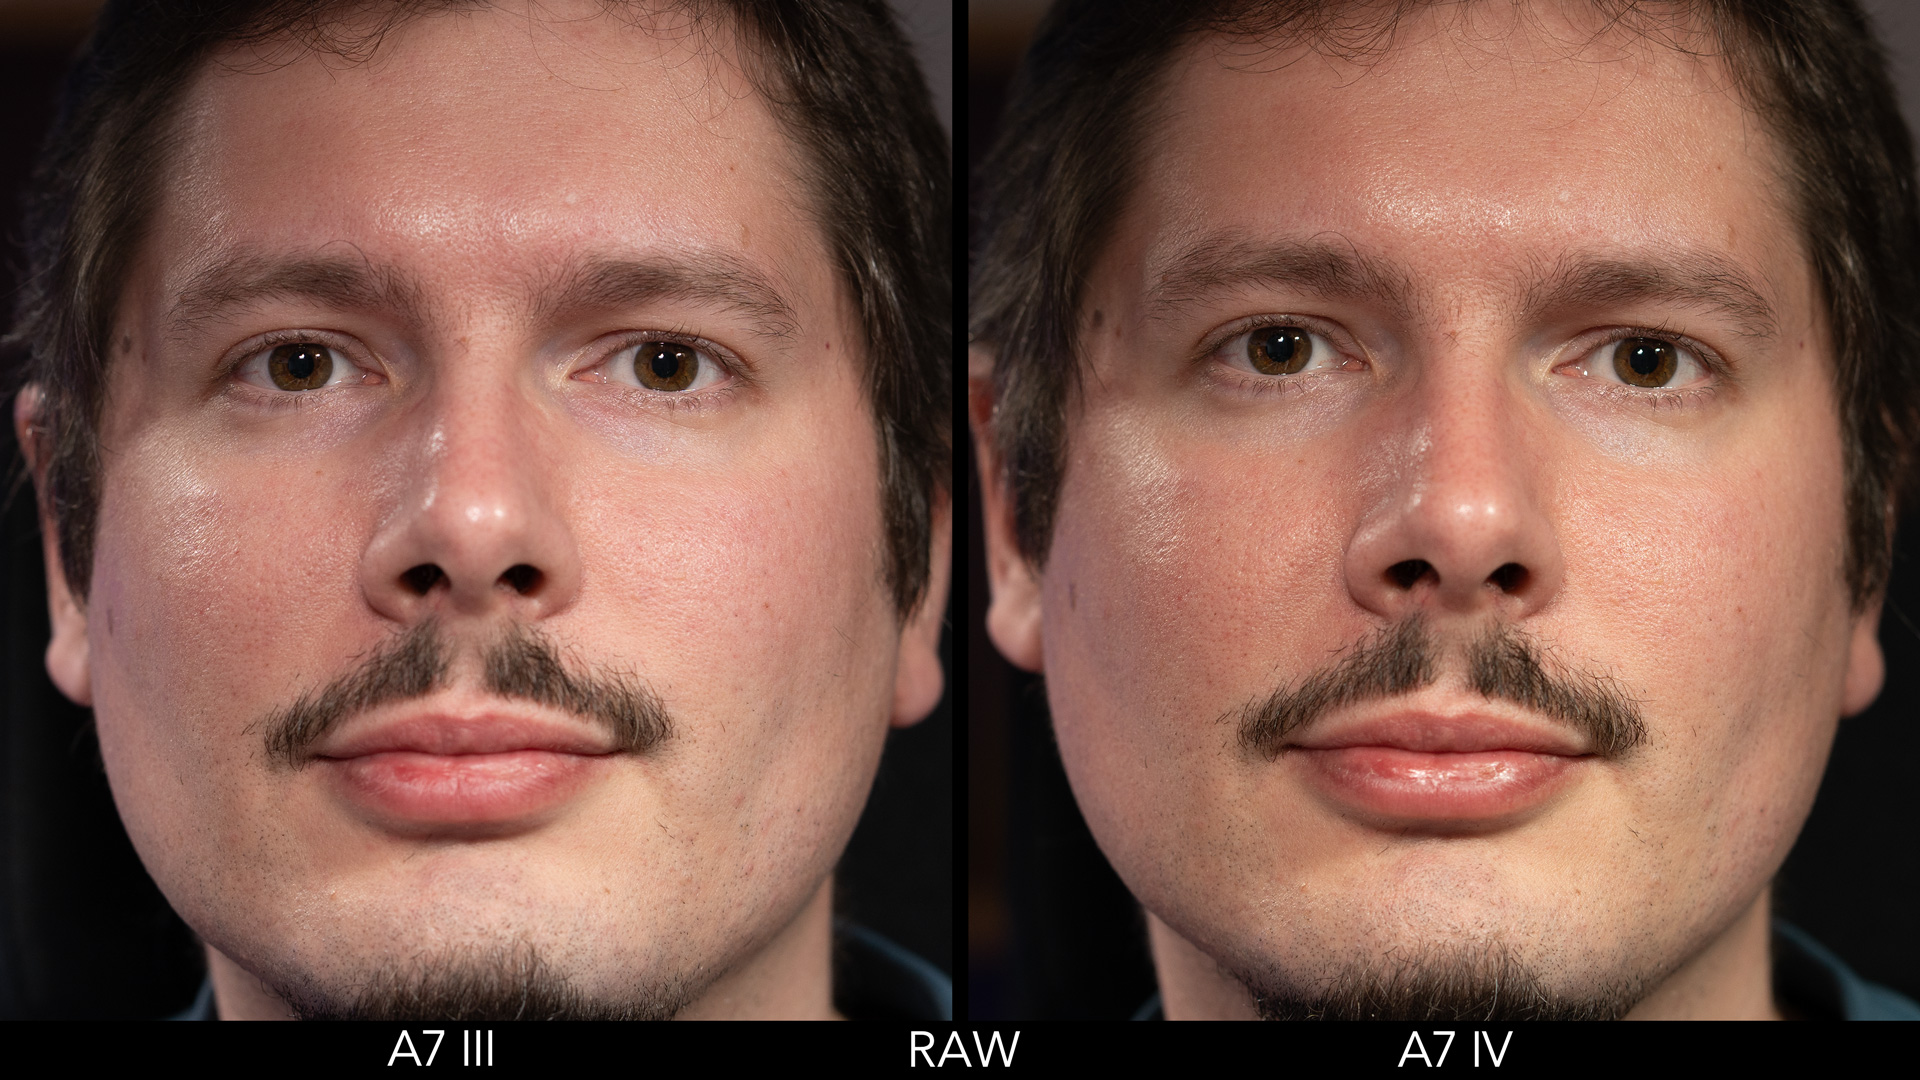
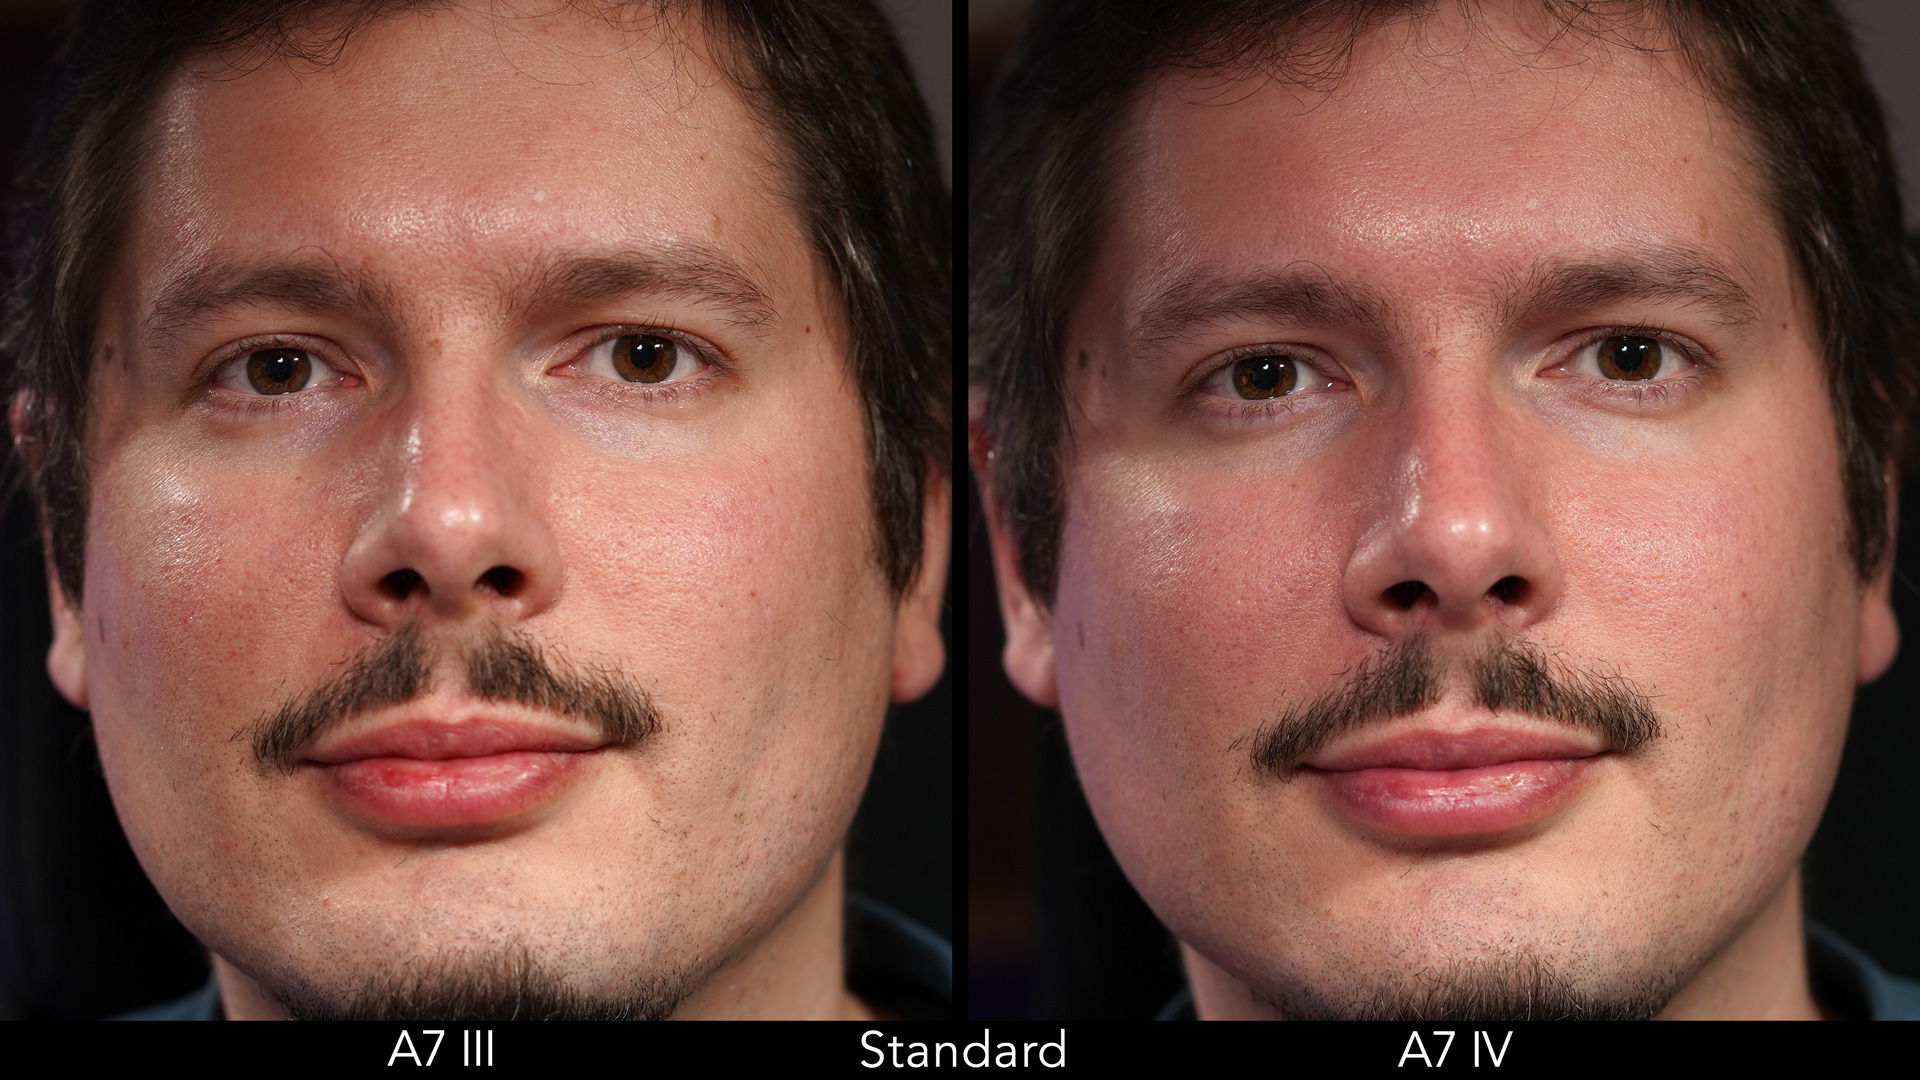
With JPG and the Standard Style / Look, it is the A7 IV that displays more reds on the face.
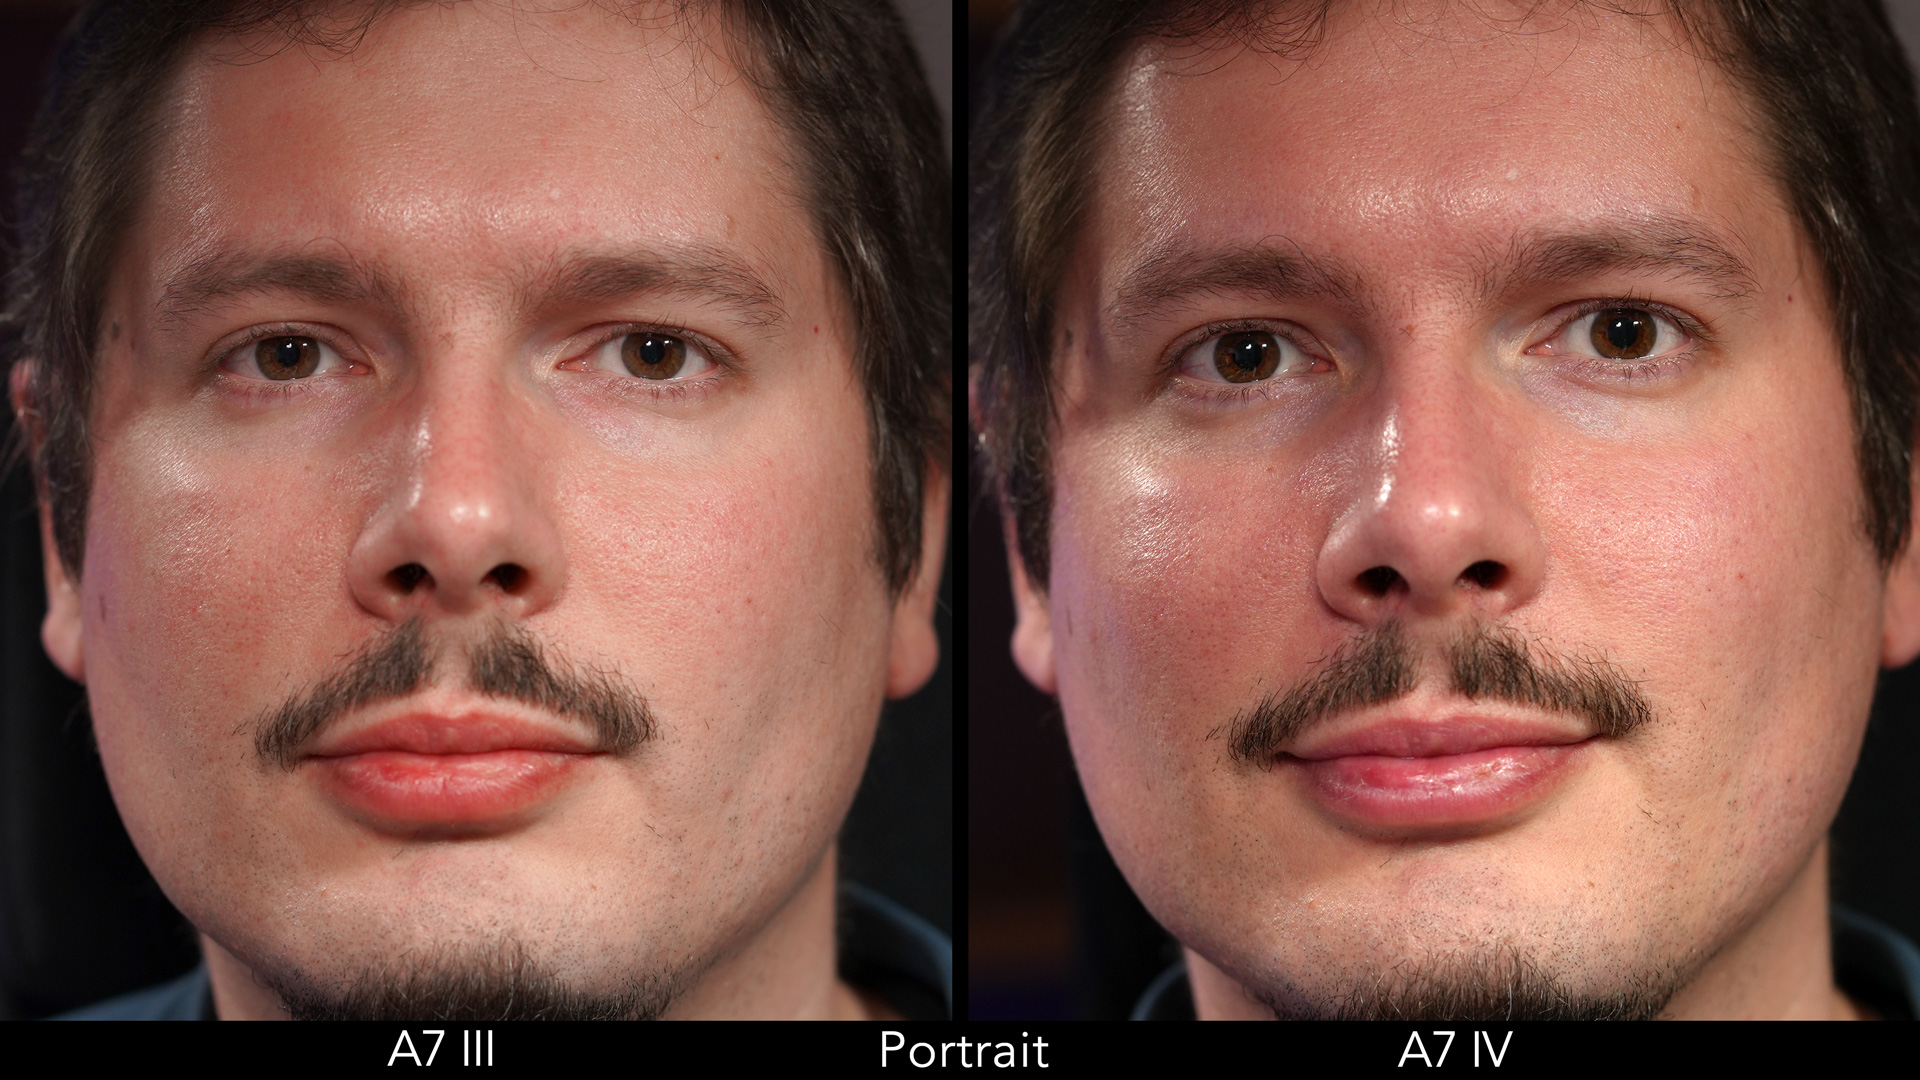
Switch to the Portrait profile, and the look is more subtle. The mark IV model maintains more red, but also shows smoother transitions between the various shades of colours. Also, I don’t like the colour of my lips with the A7 III portrait style – it looks like I’m wearing lipstick and is unrealistic compared to the rest of my face.
The Neutral profile decreases the saturation but here too I find the A7 IV has a more consistent rendering of the skin, and in this case, the mark III model once again has a magenta tone.

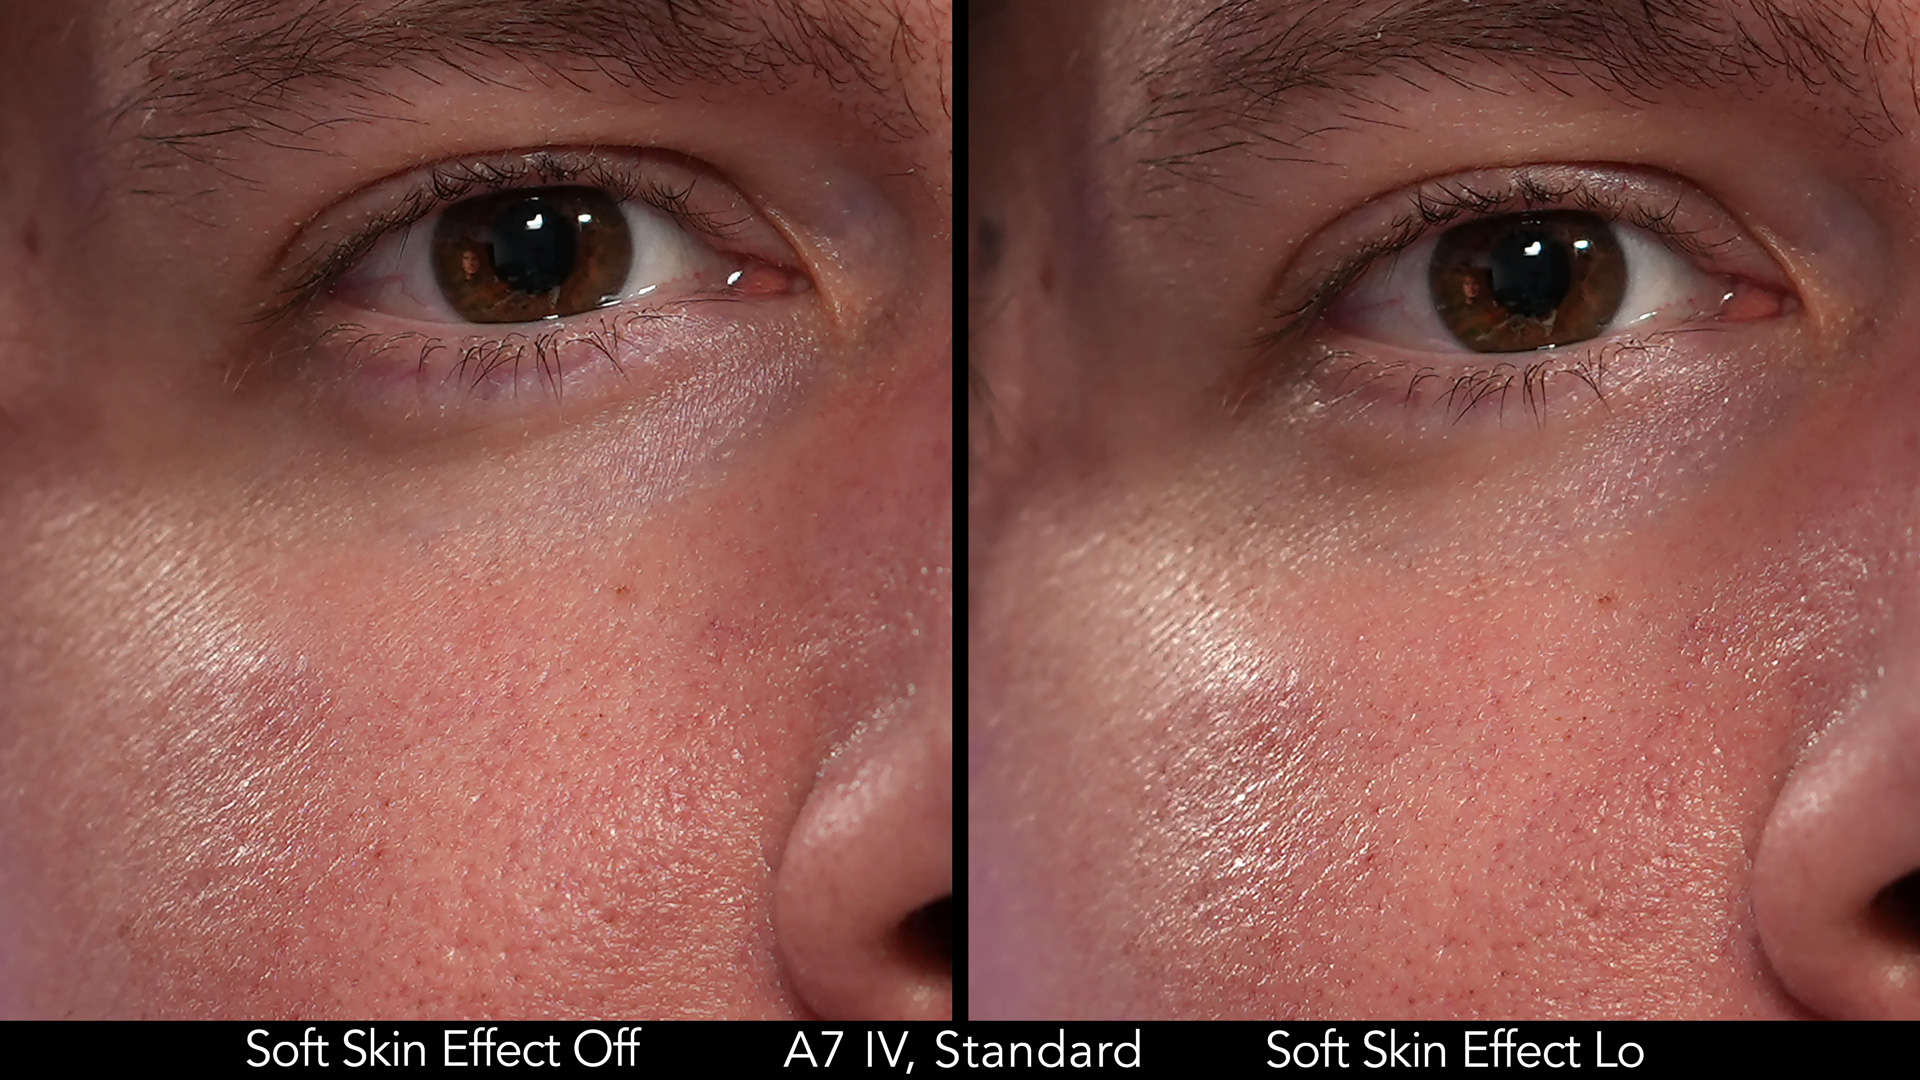
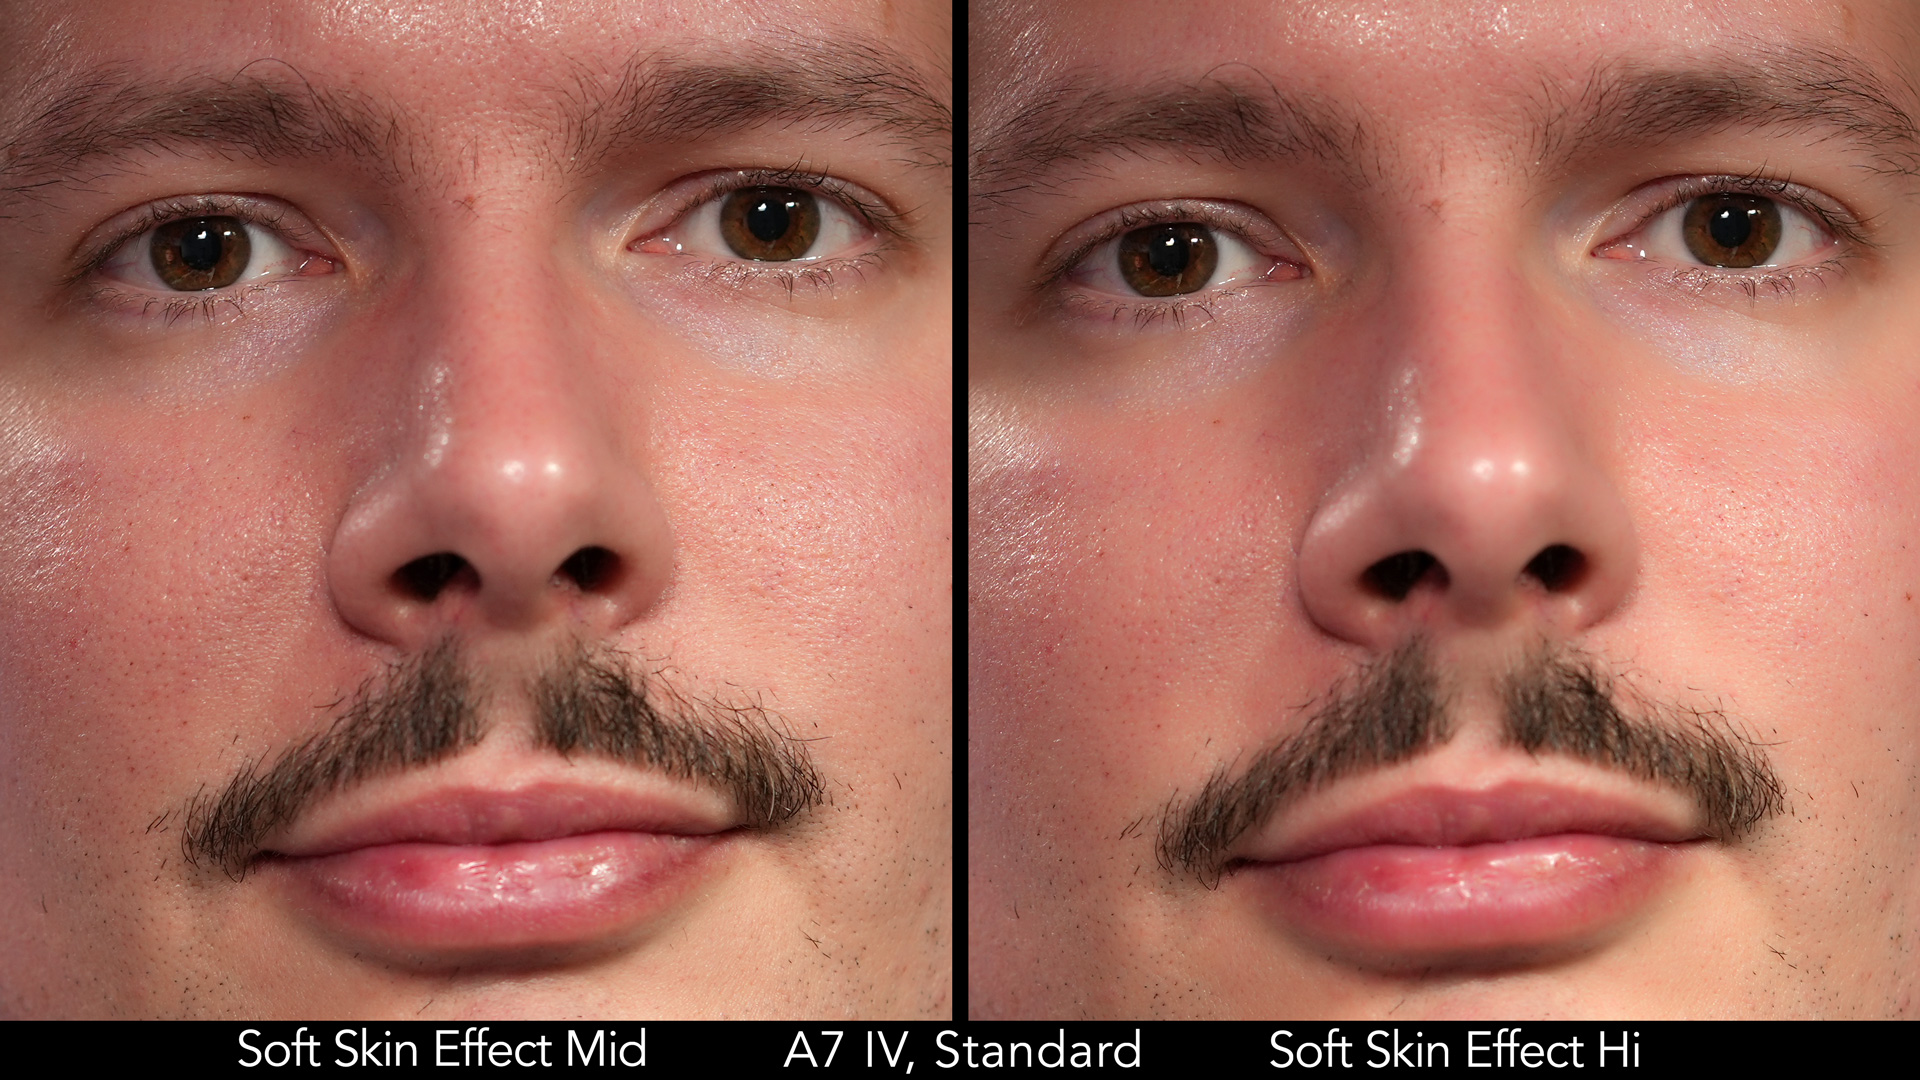
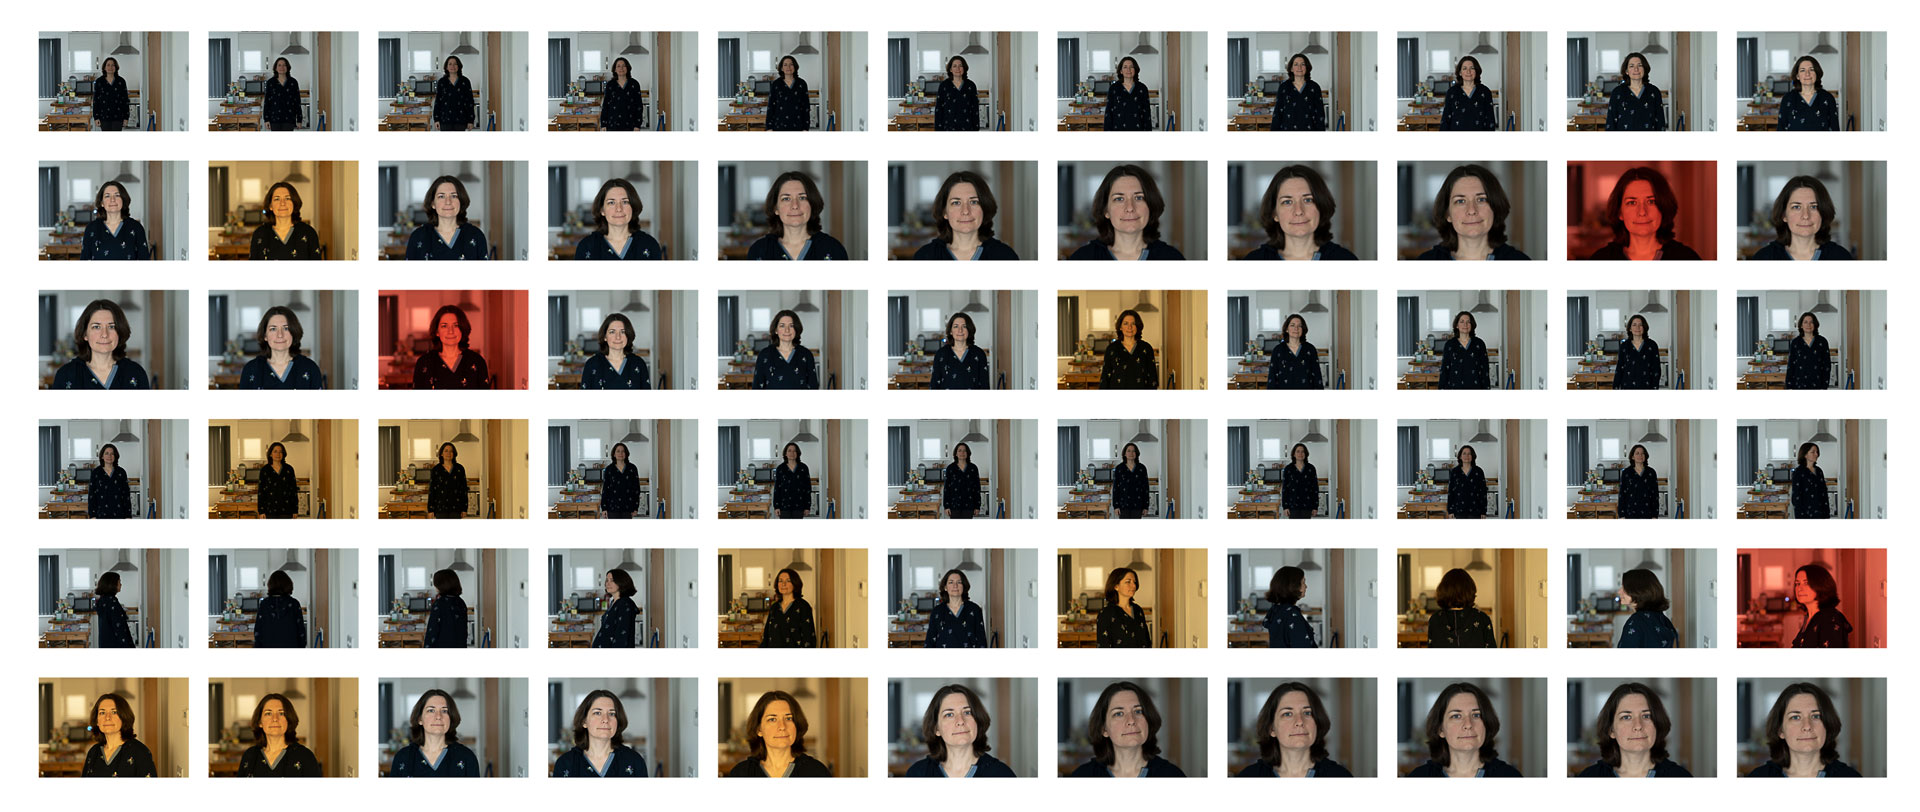
New to the A7 IV is the Soft Skin Effect setting that, as the name suggests, gives skin tones a smoother look. There are three levels to choose from and you can see the results below. The Low level is very subtle, and it’s difficult to discern a difference at first, although the most prominent wrinkles are reduced (look under the eyes for example).
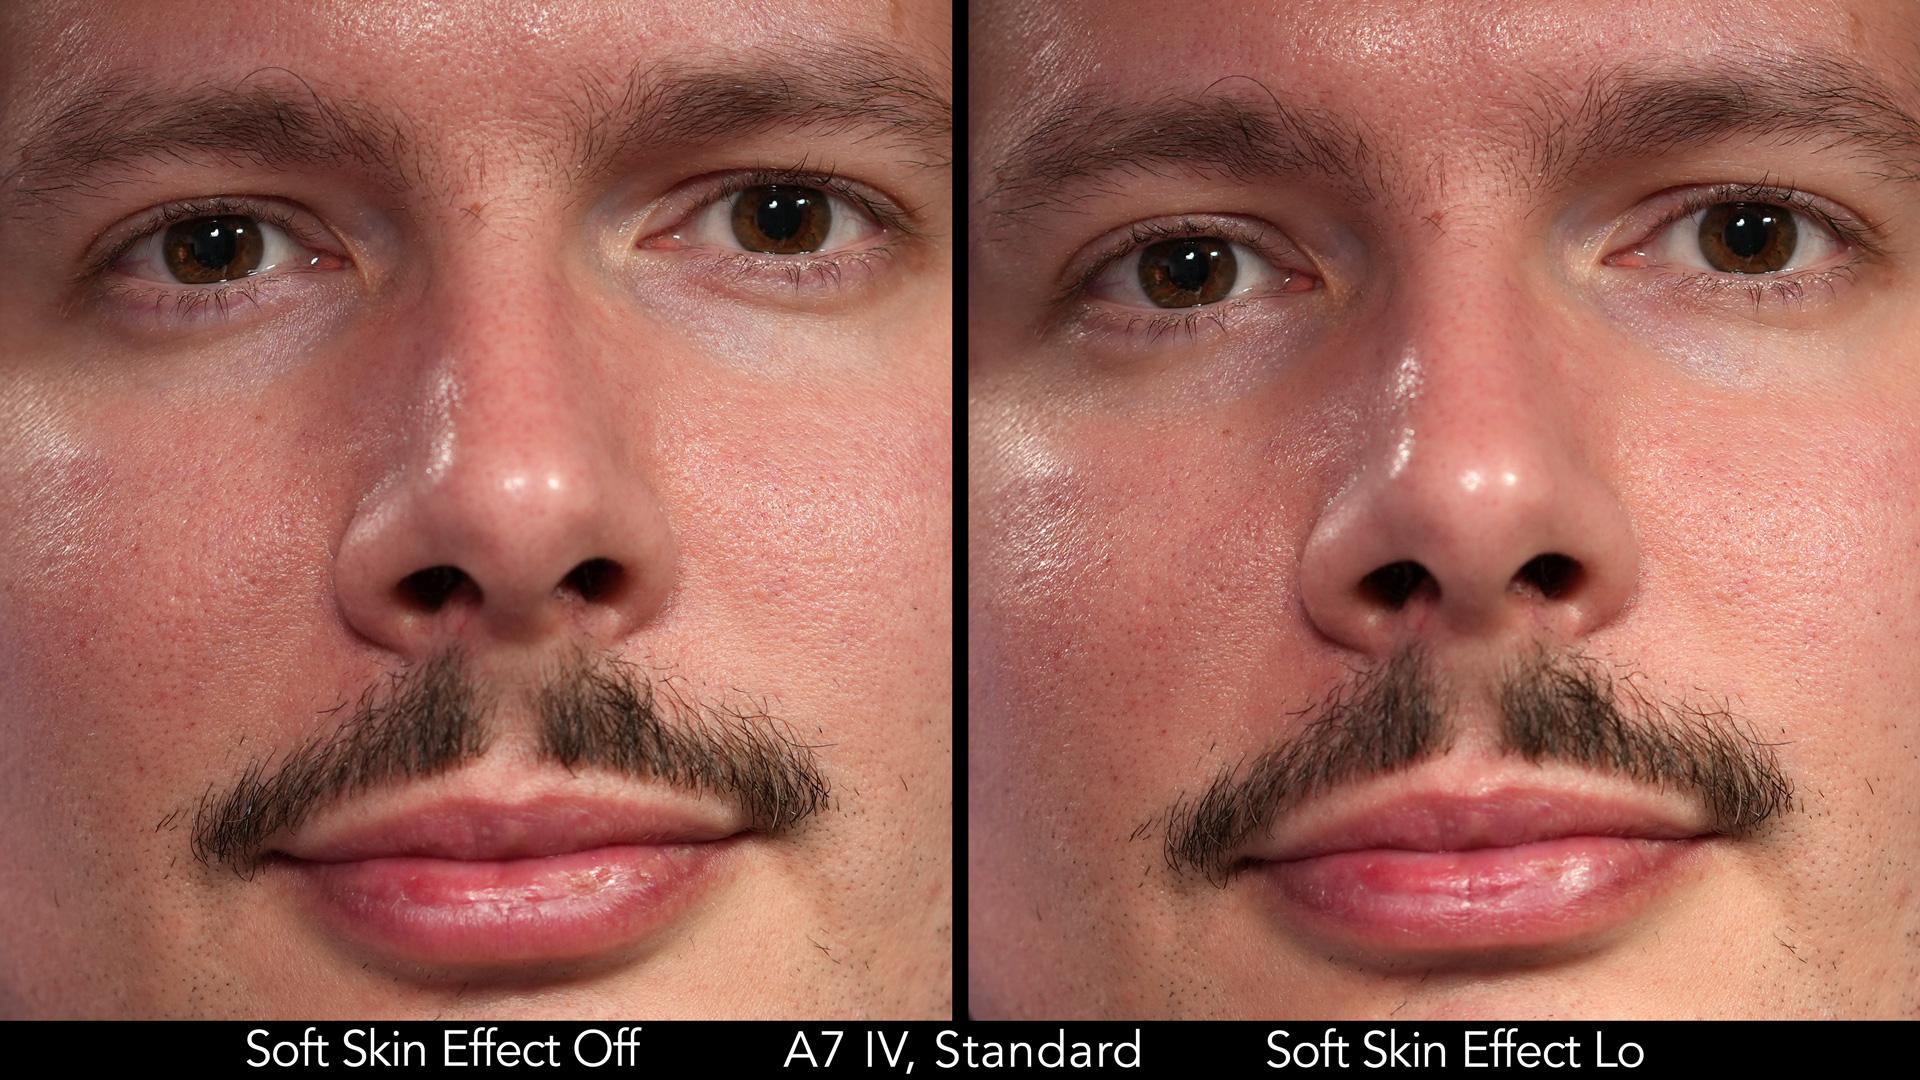
With Medium, the effect starts to be apparent, whereas the Hi level is invasive and unrealistic.
Concerning the Auto White Balance, both cameras behave in the same way with a tendency towards cool colours. With artificial light, you can prioritise the whites or the colour tone of the light source.
The A7 IV has a new setting called Shutter AWB Lock, which allows you to lock the white balance when the shutter button is half-pressed, or at the first shot of a burst sequence.
HDR images
The A7 IV has the option to record 10-bit HEIF images in addition to JPG and RAW, with a choice of 4:2:0 or 4:2:2, as well as the possibility to activate the HLG mode which records the photos with the BT.2100 colour space rather than the classic sRGB.
The main advantage of the HEIF format is much smaller files: around 8-9MB instead of 20MB when using JPG X-Fine. It also provides better colour depth, but keep in mind that it is not a popular format yet, so you can encounter incompatibility with post production softwares, including popular ones such as Photoshop and Lightroom.
Below you can see a quick comparison between two JPG files and the HEIF version. These examples include a version with the DR Optimiser setting set to Level 5 on the JPGs, which brightens the shadows. The HLG version retains more details in the highlights but has darker shadows due to the DRO setting being disabled automatically. Also, when the HLG mode is enabled, the minimum ISO available is 125.

For now, the HDR format mainly aims at devices that are HDR compatible such as a modern TV for example. I can’t see it replacing the JPG workflow yet.
2. Autofocus
The A7 III features 693 phase and 425 contrast detection points. The phase area covers approximately 93% of the sensor surface.
The A7 IV increases the AF coverage slightly (94%) with a total of 759 phase detection points. This is the same amount used by the A7S III and the flagship A1. The contrast detection points remain the same (425).
Single AF
Sony says that autofocus has been improved not only in continuous mode, but also in S-AF mode, in which the phase detection points have been optimised to make focus acquisition quicker and more responsive.
Using various lenses I have at home (FE 35mm F1.8, FE 55mm F1.8 ZA, FE 85mm F1.8, FE 200-600mm G), I tried to see if the A7 IV would indeed focus faster and my feeling is that it is a bit more responsive and quicker at changing the focus point, but it’s not a big difference.
Low Light
Another improvement concerns low light sensitivity, which is -4Ev on the A7 IV vs -3Ev on the older model (measured with an F2 aperture). Furthermore, phase detection autofocus works down to f/22 on the A7 IV (versus f/11 for the A7 III) when using high continuous shooting speeds.
In situations that we can label low light but where there is enough brightness and contrast to distinguish the subject, both cameras do equally well.
I tried to find a difference by testing the two cameras in a very dark environment (the kind where you need to raise the ISO near the maximum available, like in the image below), but both cameras continued to behave in a similar way. At the beginning, it looked like the A7 IV was being more successful with C-AF, but further testing showed that it often struggled as much as its predecessor.
Concerning the improvement with small apertures and phase detection, I can use the FE 200-600mm with the 2.0x teleconverter (largest aperture is f/13 at 600mm) attached to my A7 IV and maintain full AF performance in the fastest burst mode. With the same set-up on the A7 III, contrast detection is used instead, and focus is locked on the first frame when using the Mid, High and High+ burst modes.
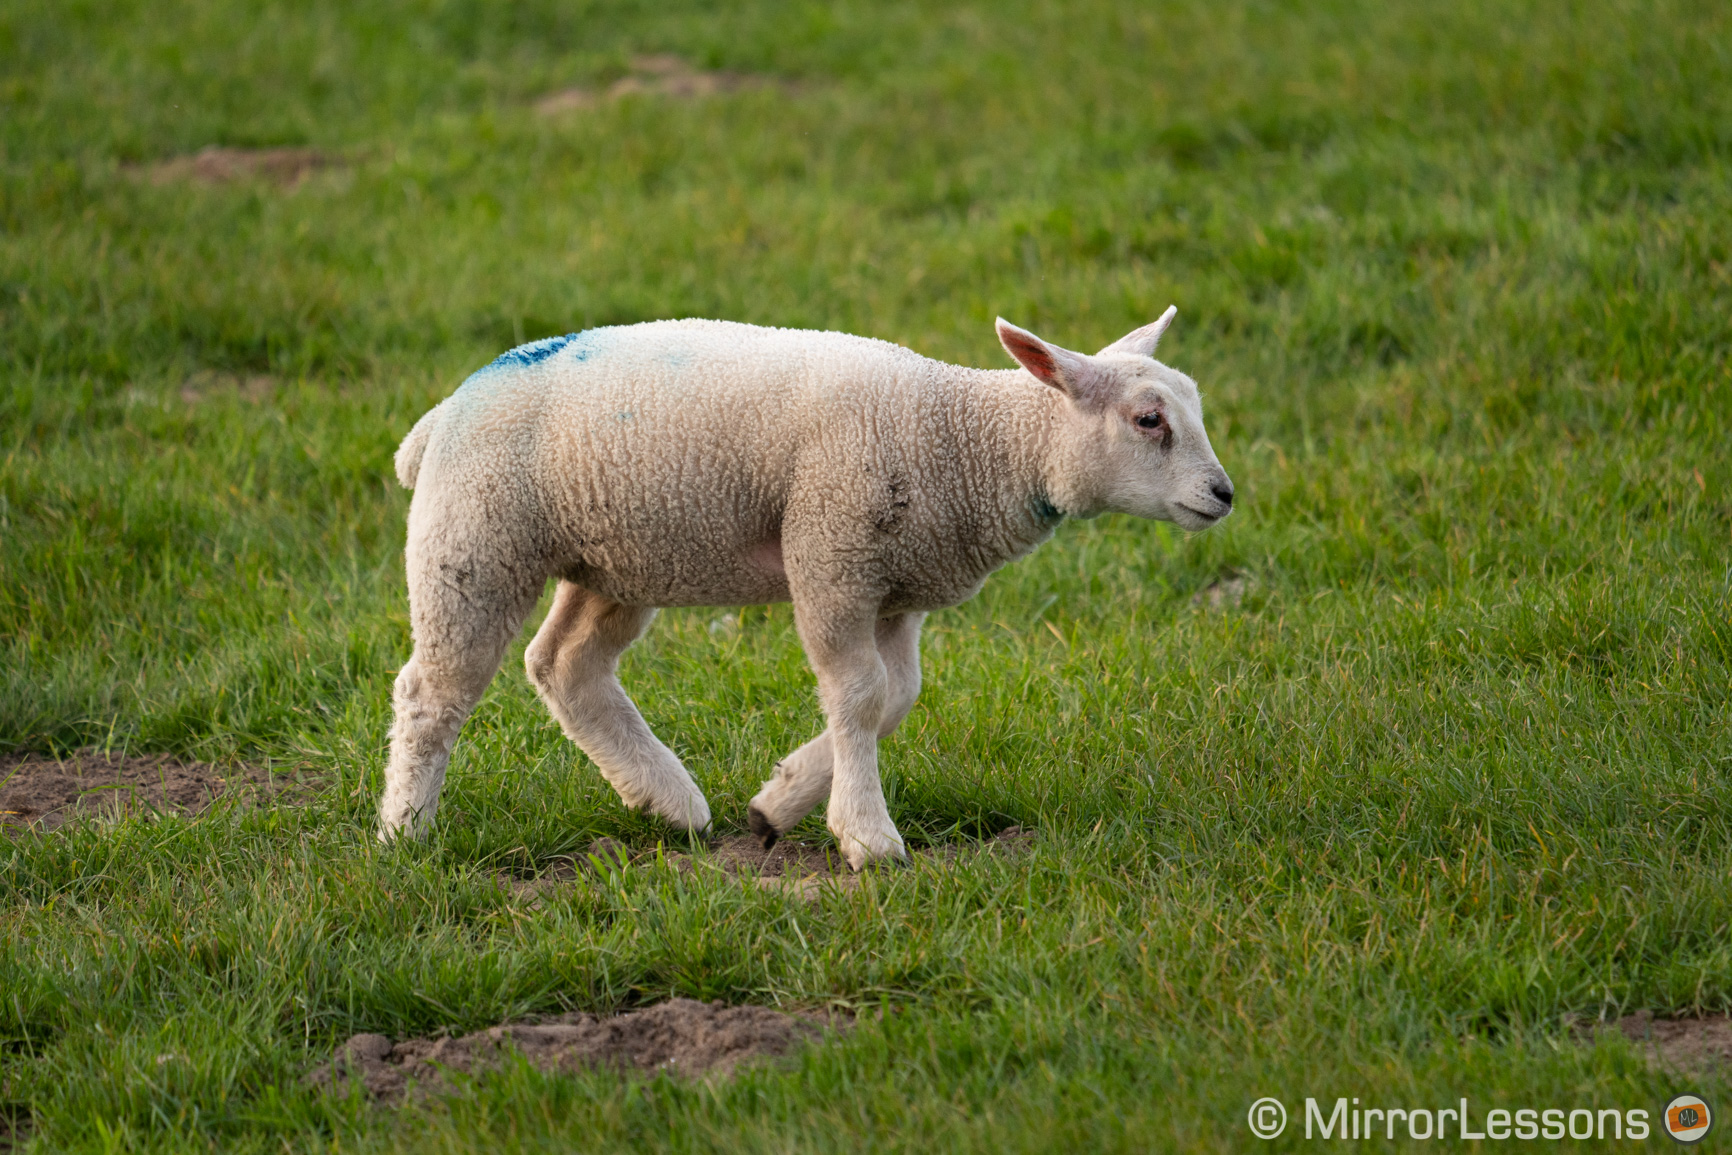
AF Tracking
The mark IV model sees a significant boost when it comes to the autofocus software and machine learning. It has real-time tracking and real-time Eye AF that works for humans and animals, including birds. Eye AF works for video as well (including for animals and birds). Overall, Sony says that the accuracy of Eye AF has been improved by 30% in comparison to the A7 III.
The mark III model received Eye AF for animals via firmware (version 3.0) but it is an older version and doesn’t work with birds. Plus, Eye AF (humans/animals) is not available during movie recording.
Captured with Eye AF
Eye AF for Human
In my first test with a human subject, the A7 IV gave me a keeper rate of 80% while the person moved back and forth, whereas the A7 III couldn’t do better than 60%. The predecessor struggles to keep focus at all times, and especially when the person walked away from the camera. The number of out of focus shots on the mark IV model were much lower overall.
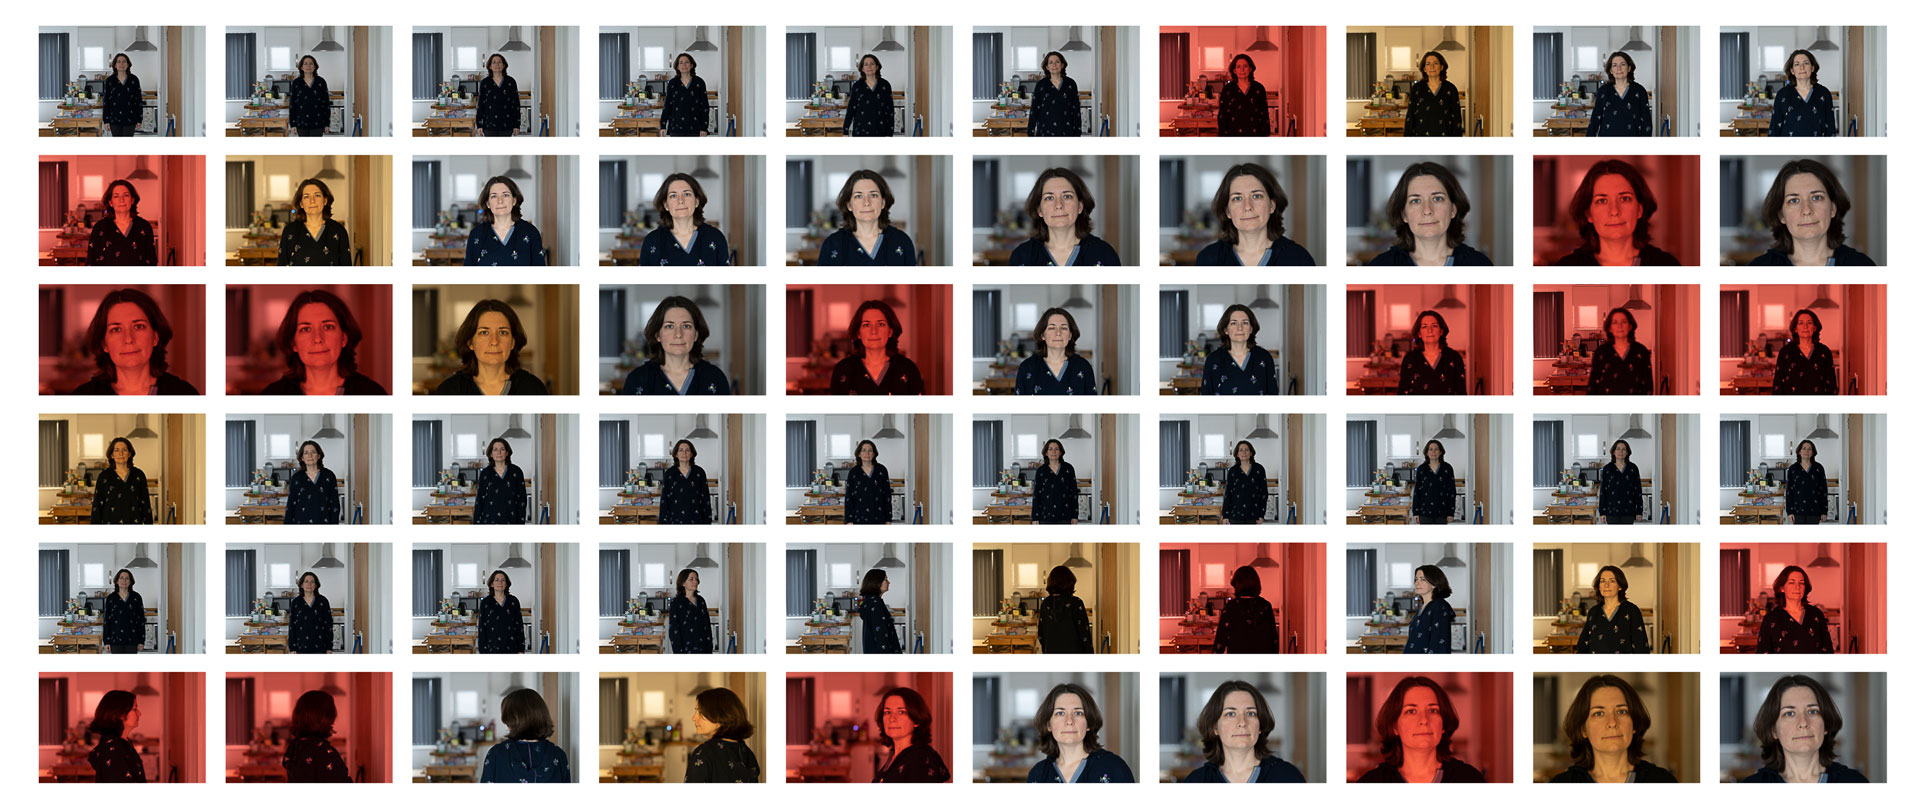
One key thing that sets the two cameras apart is the different tracking methods they use. On the A7 III, you have the old Lock-On AF mode but it struggles more to keep focus on the subject when it turns around and the face becomes covered momentarily. Also, the camera is less prone to use Eye AF when Lock-On is active.
For the A7 IV, the tracking mode can analyse the scene at different levels (brightness, depth, colour, focus, face and eyes) and is much more precise. Furthermore, face and eyes are always prioritised when detected.
I’ve used the tracking mode on the A7 IV a lot to take pictures of my toddler, and once it starts tracking him, it rarely lets it go despite him moving around a lot. It’s reliable and makes the whole AF experience much easier.
The A7 IV offers additional settings to control Eye AF, like for example the possibility of prioritising the left or right eye (doesn’t work with birds), a very useful setting to have assigned to a custom button when taking portraits, and a feature I often miss on my A7 III.
Eye AF for Birds
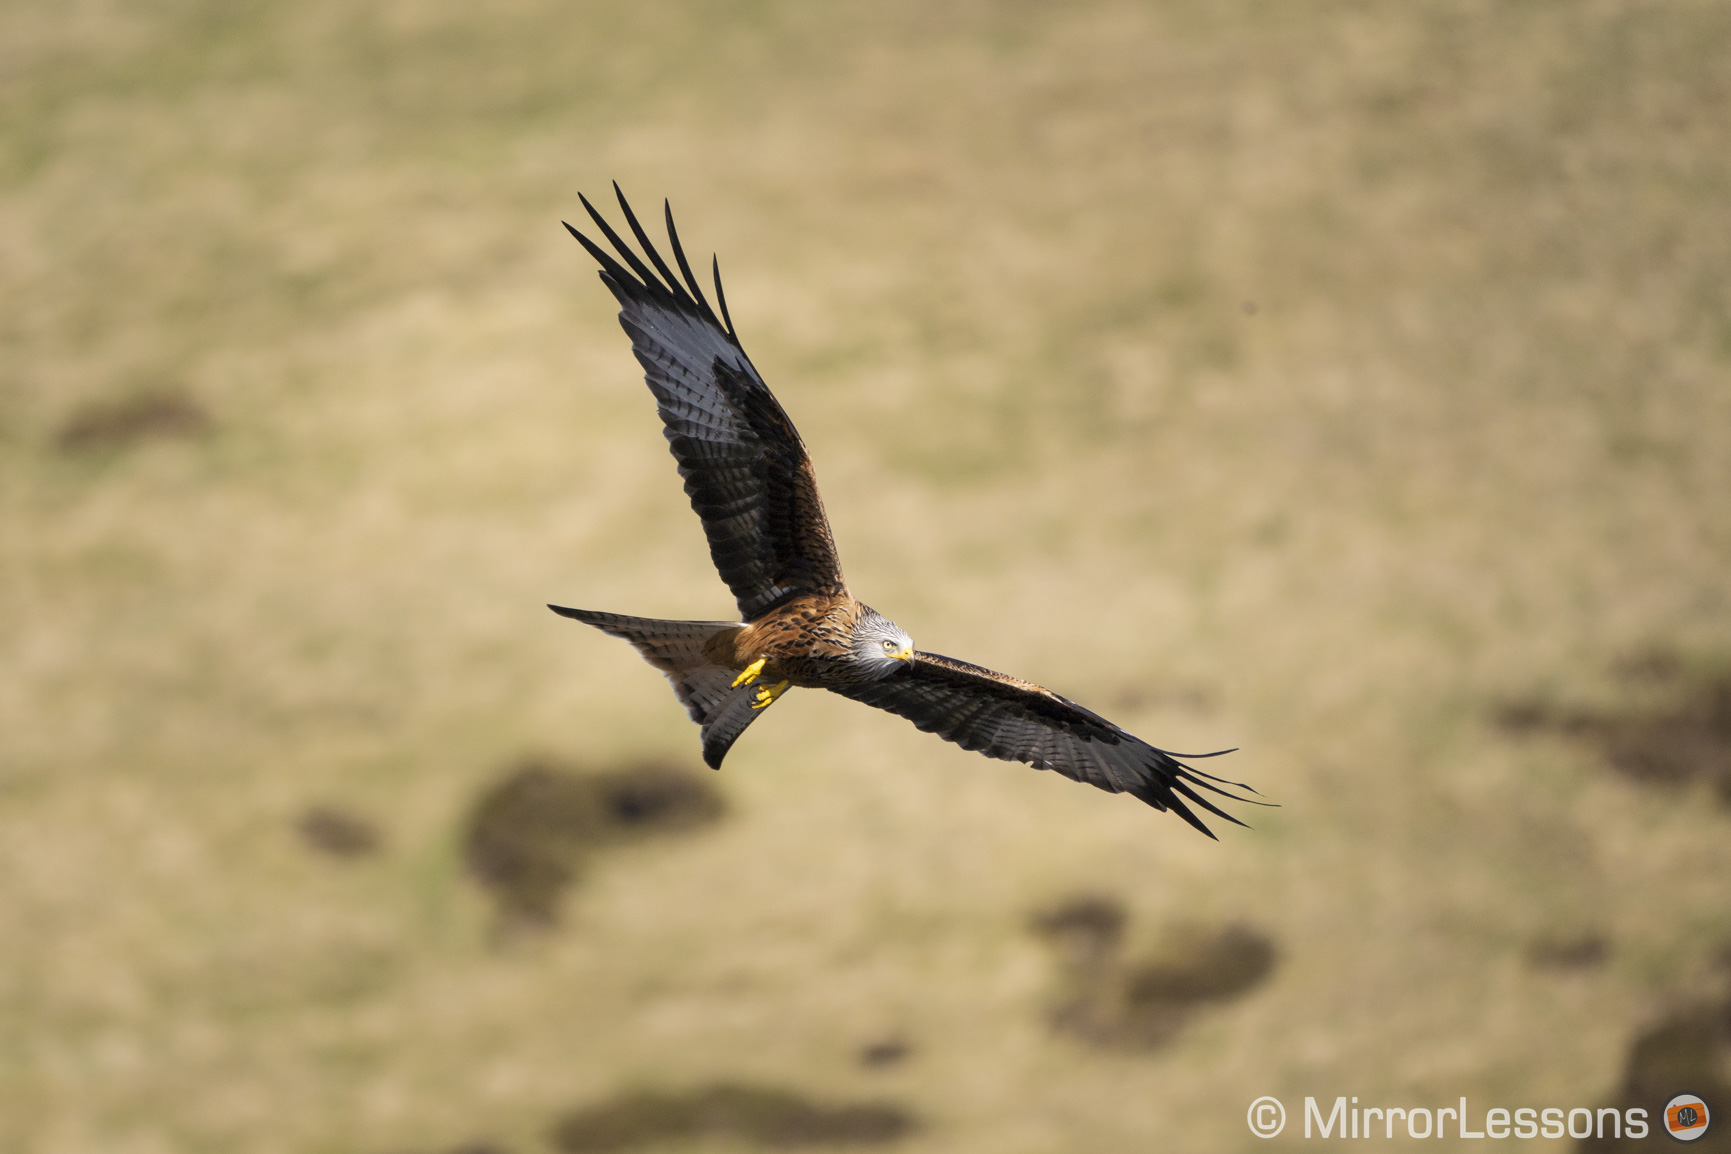
Eye AF works reliably with a vast range of animals and, on the A7 IV, Sony has added the possibility of doing the same with birds.
I took the A7 IV with the 200-600mm G and the teleconverters to various nature reserves, and Eye AF didn’t disappoint, providing accurate and precise results.

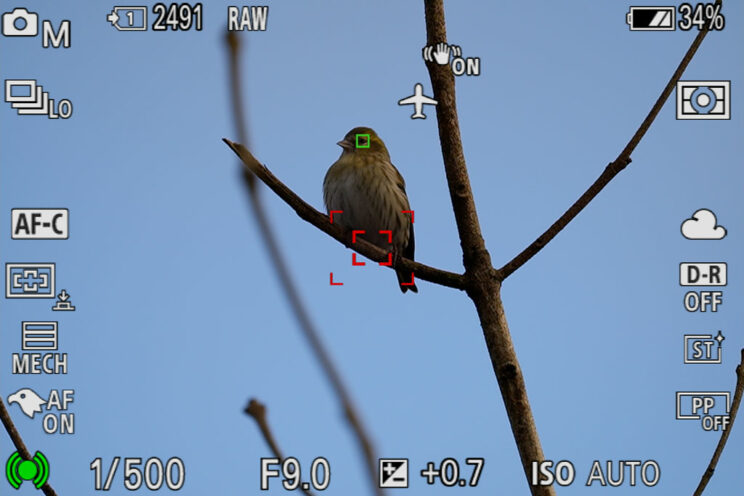
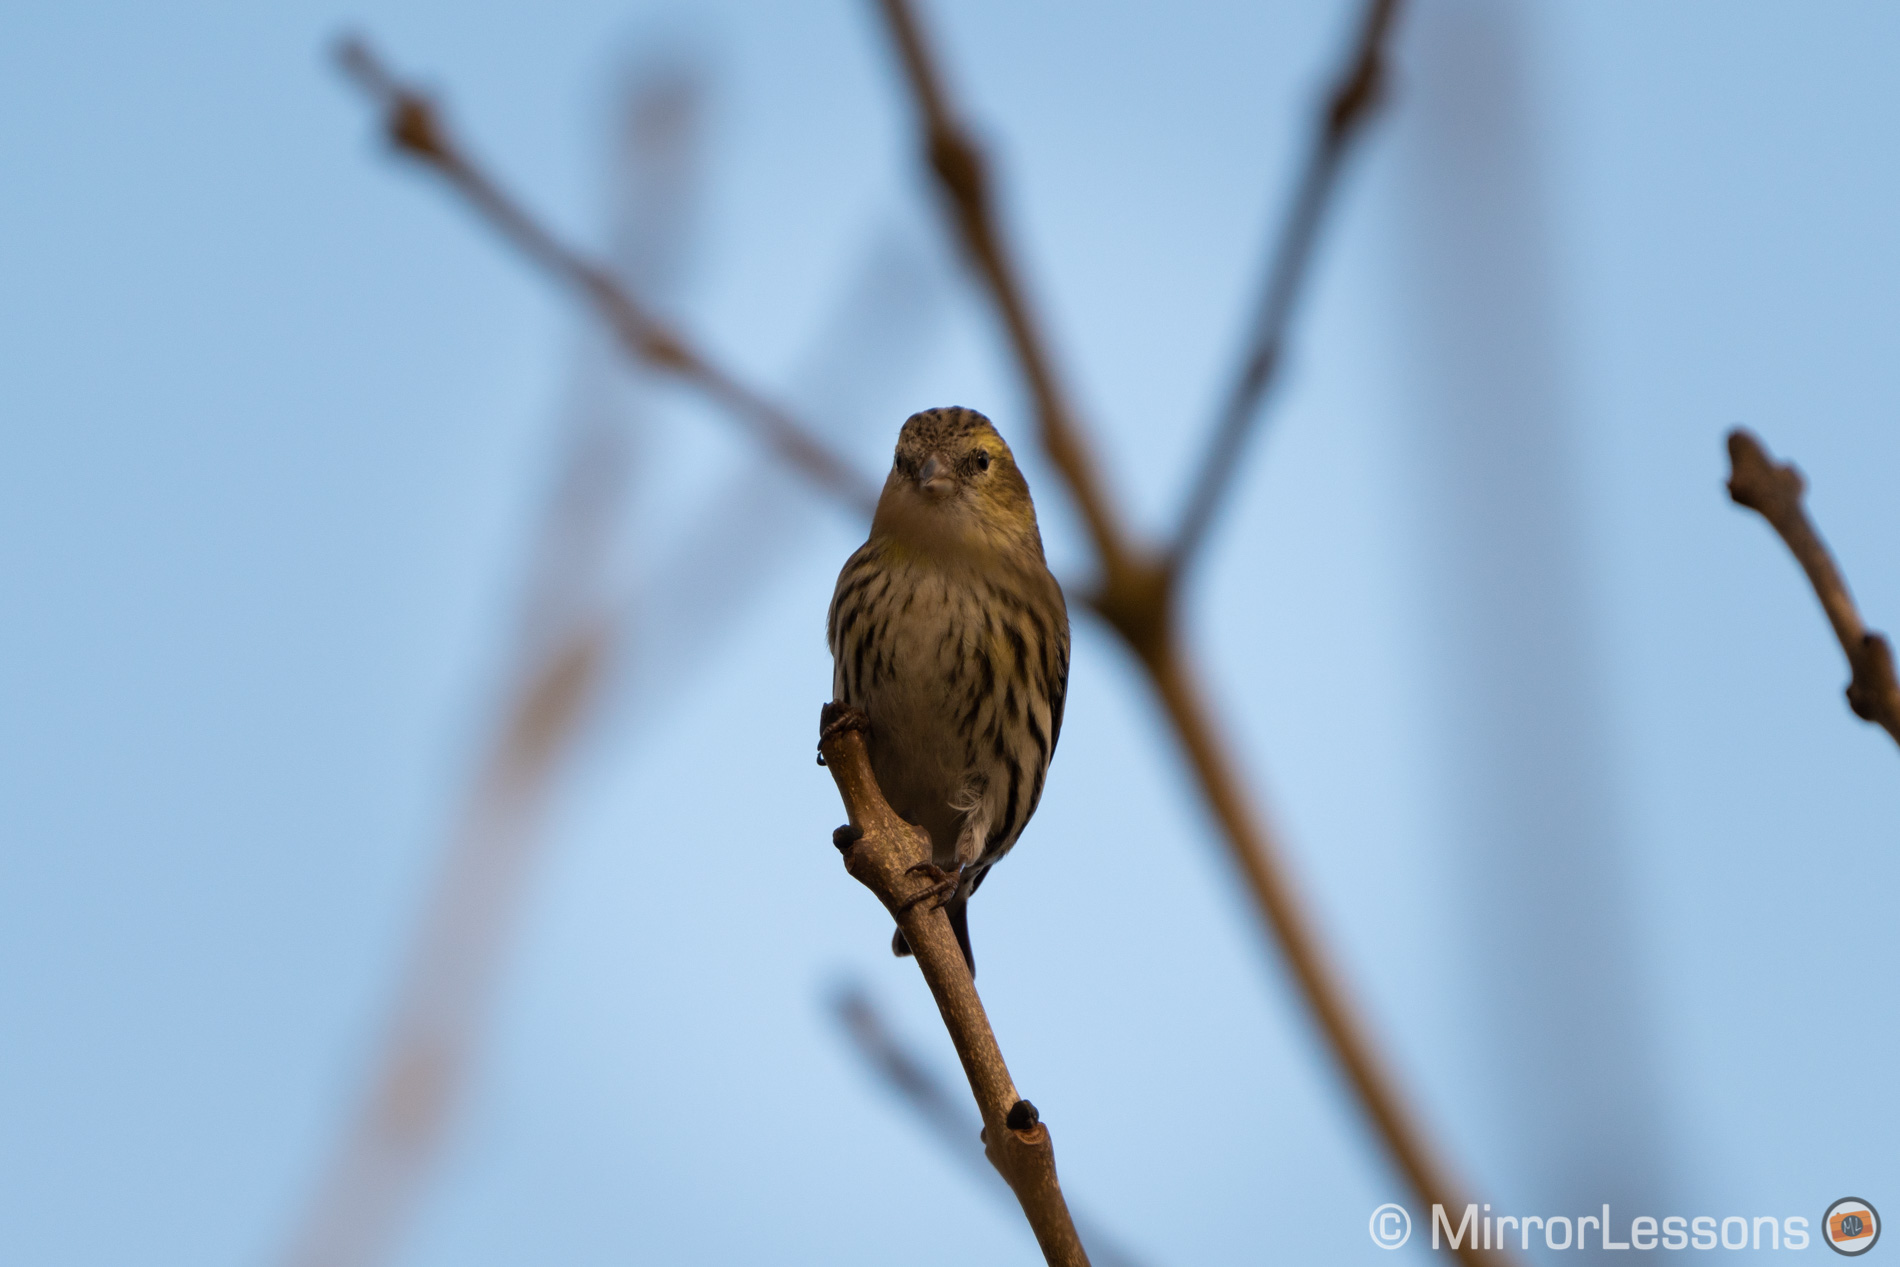
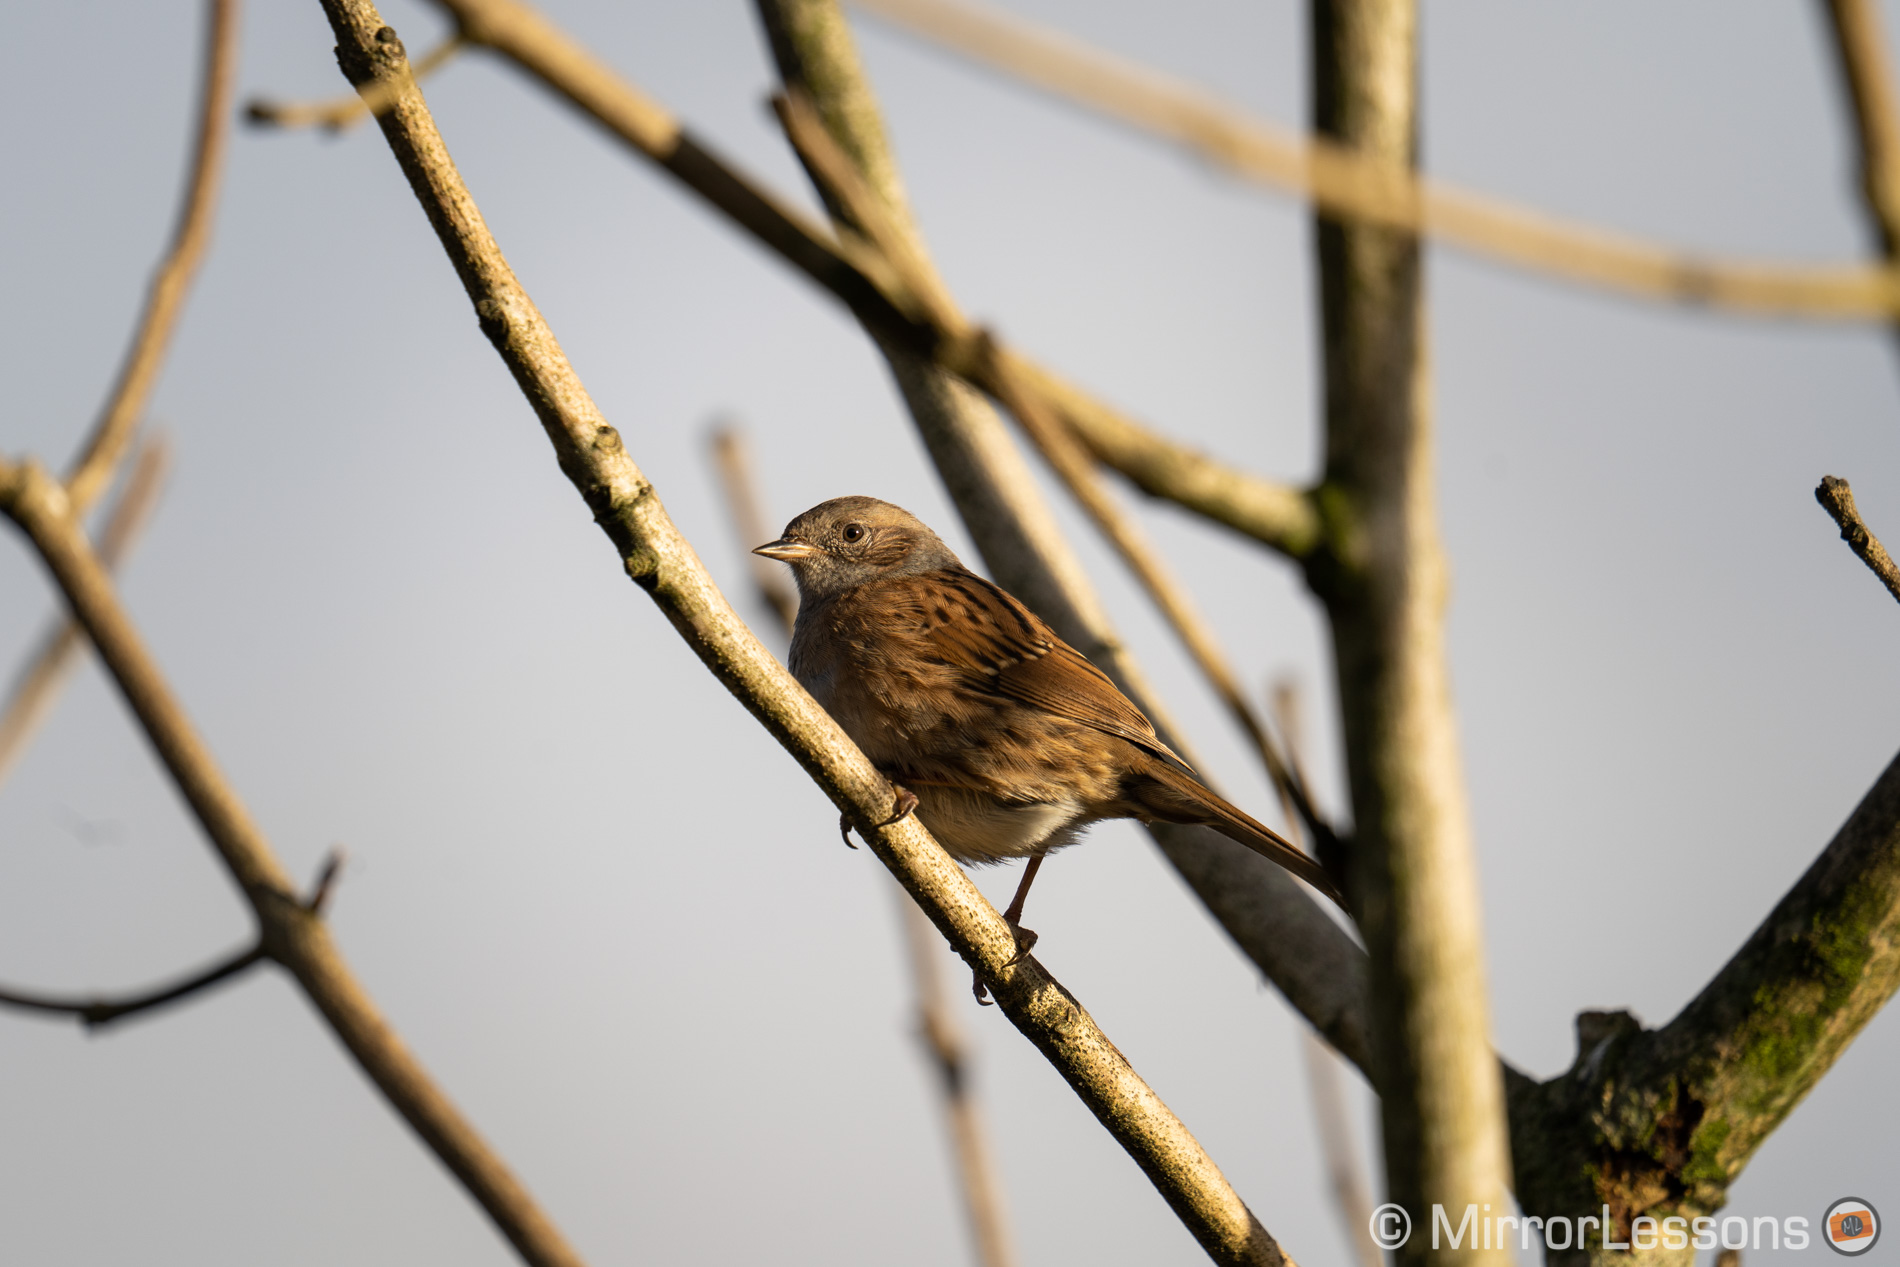
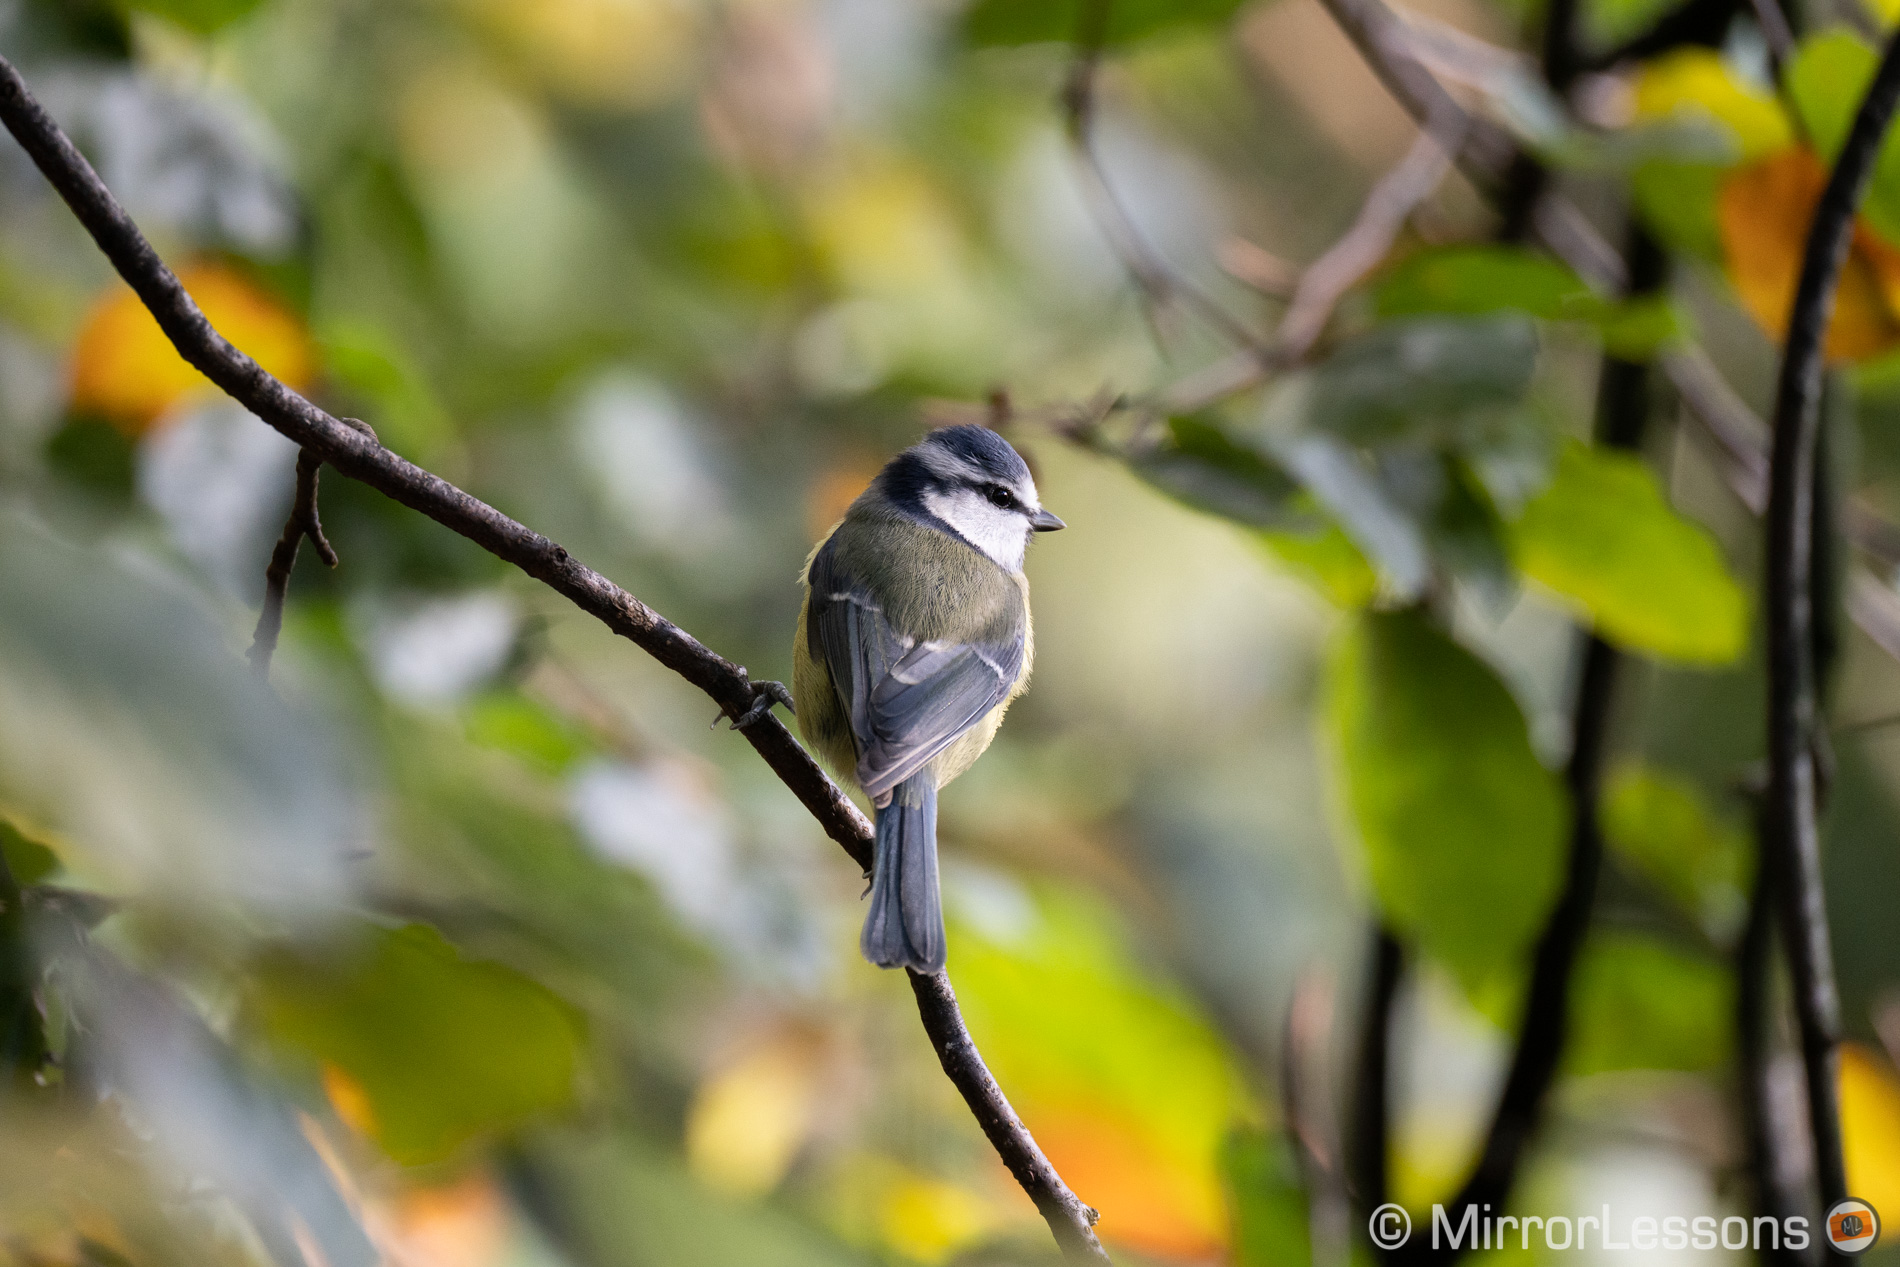
Where it surprised me the most was with small birds perched on a tree, and thin branches covering part of the body or even part of the head. The camera managed to keep focus on the eye and avoided mis-focusing on the nearby branches in the foreground. It wasn’t perfect every single time but, with any other setting, the bird would have been out of focus.
Taken with Eye AF
Eye AF also helps to ensure that the head of the bird is in focus, rather than the body. With the A7 III, I use a small AF point like Flexible Spot, but it’s not always easy to keep that area on the small bird’s head because it moves all the time. So instead, I focus on the body which it is larger, but depending on the distance, focal length and aperture, that can result in the bird’s eye being soft. With the eye being tracked automatically on the A7 IV, this is less likely to happen.
Despite the caveats, it is possible to capture fine photos of small birds with the A7 III (as long as the body is clearly visible) and I’ve managed to take some nice shots over the years. But there is no doubt that Eye AF makes focus accuracy and composition in general easier to manage.
So overall Eye AF works a treat for birds, but it’s not perfect and there are a few things you need to be aware of.
First, Animals and Birds are two separate settings in the menu. The camera won’t automatically switch from one to the other. You need to choose manually which type of subject you want to track.
Second, it is important to combine it with the Tracking mode and start focusing on the bird’s body initially, if possible with a clear view of said body (no elements in front of it that can confuse the AF). The camera will then automatically go for the eye if detected, or stay on the body if no eyes are visible (like when the bird turns its head backwards).
Third, eyes are not always detected depending on the species of bird, or their distance from the camera. For example, with ducks the AF area often stayed on the body, especially when the face was in the shade. The camera also occasionally confused the eye with another part of the body. If the bird is too far away (that is, it doesn’t fill a good portion of the frame), the eye might not be detected at all.
I mentioned birds and branches, and here are a few examples where it didn’t work properly. With the heron photograph, the subject was too distant for the eye to be recognised, and the camera always chose the thin branches in front of it.
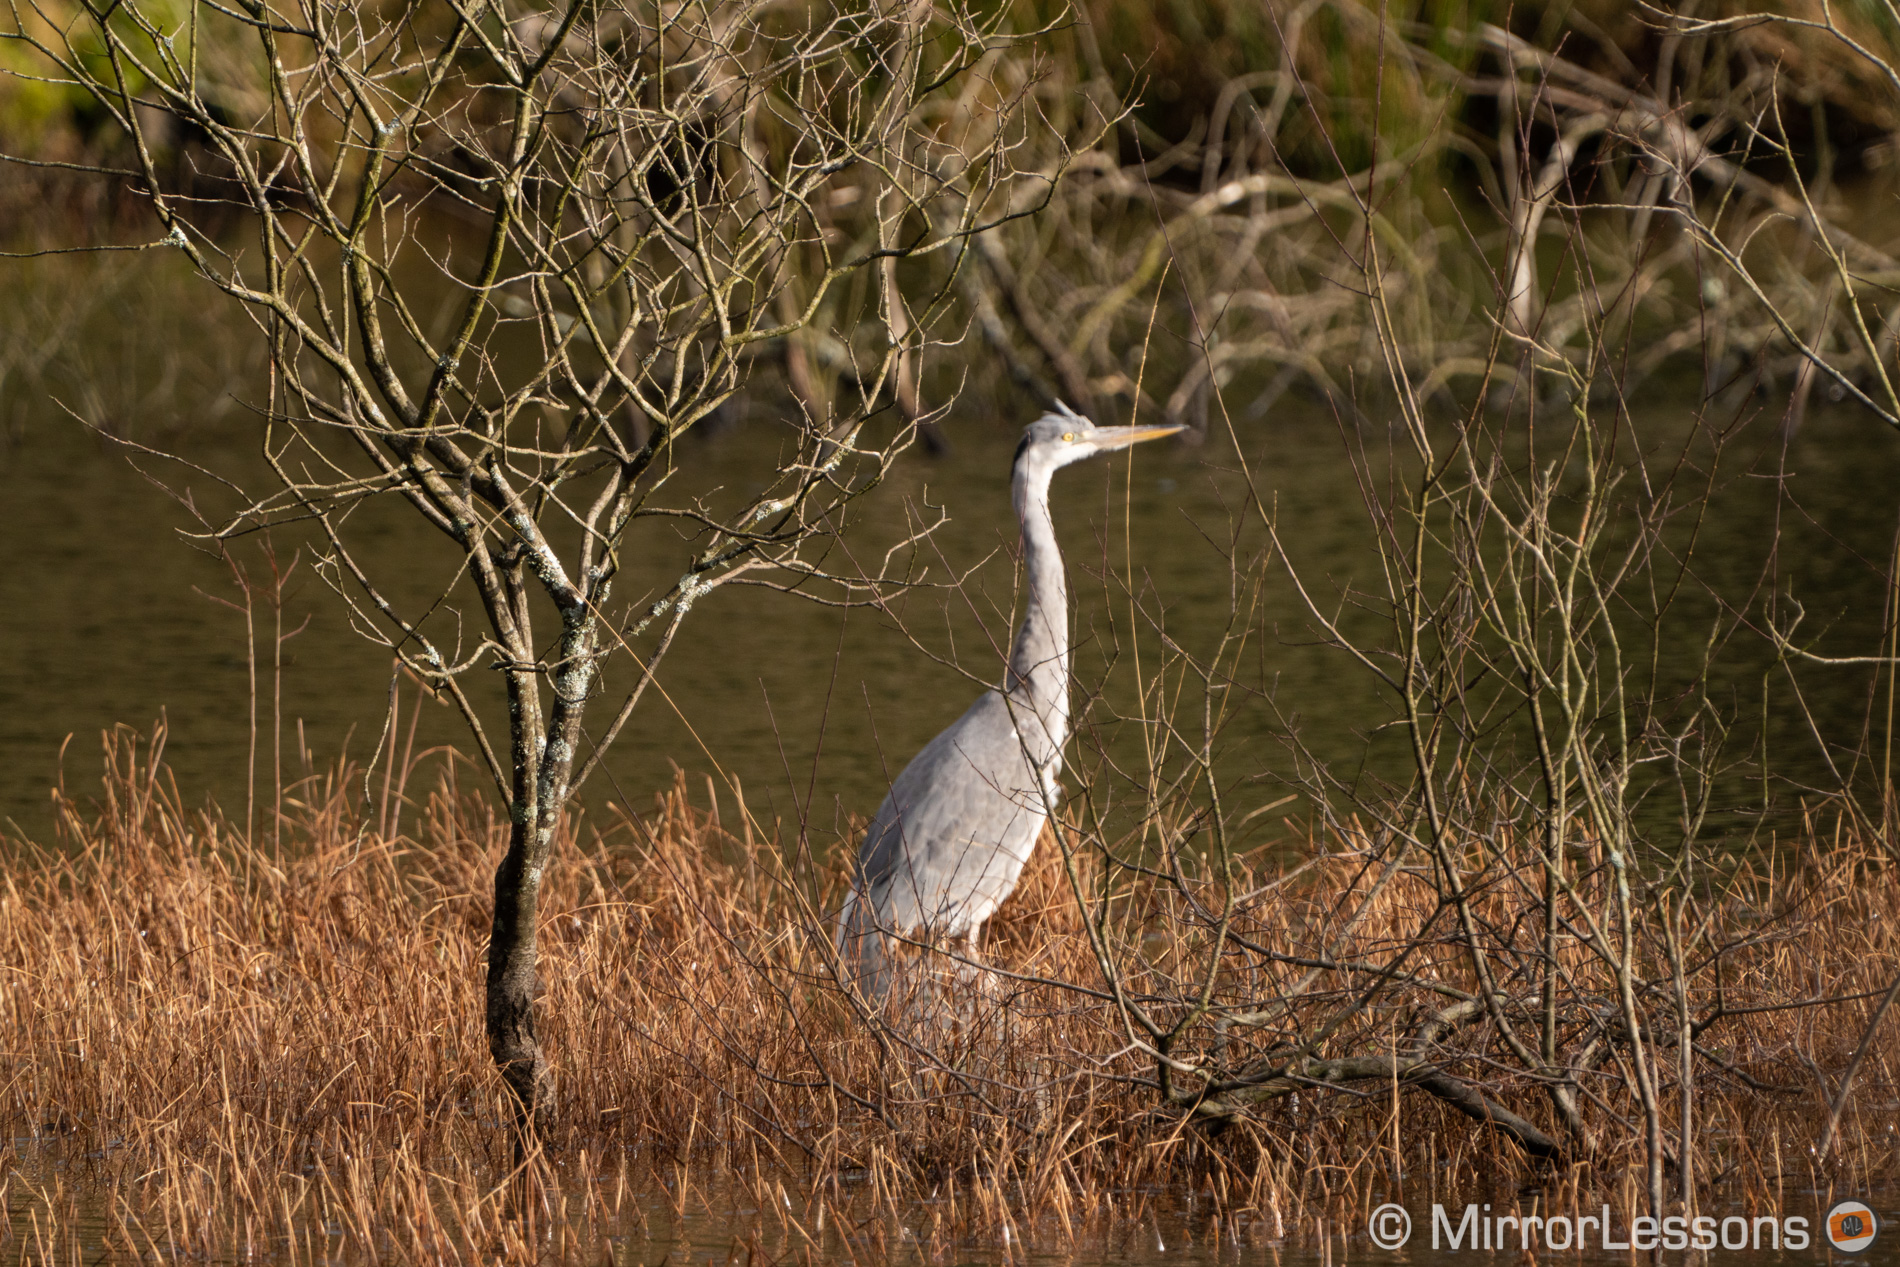
Eye AF not detected, the camera fails to lock on the heron.
With the robin, it was initially covered by a few branches and the camera mis-focused. This is why it is important to start the tracking with as clear a view as possible of the subject. I moved a bit closer, tried again and the camera had no problem. From there, it kept tracking the eye even when the bird moved a bit and went behind a branch.
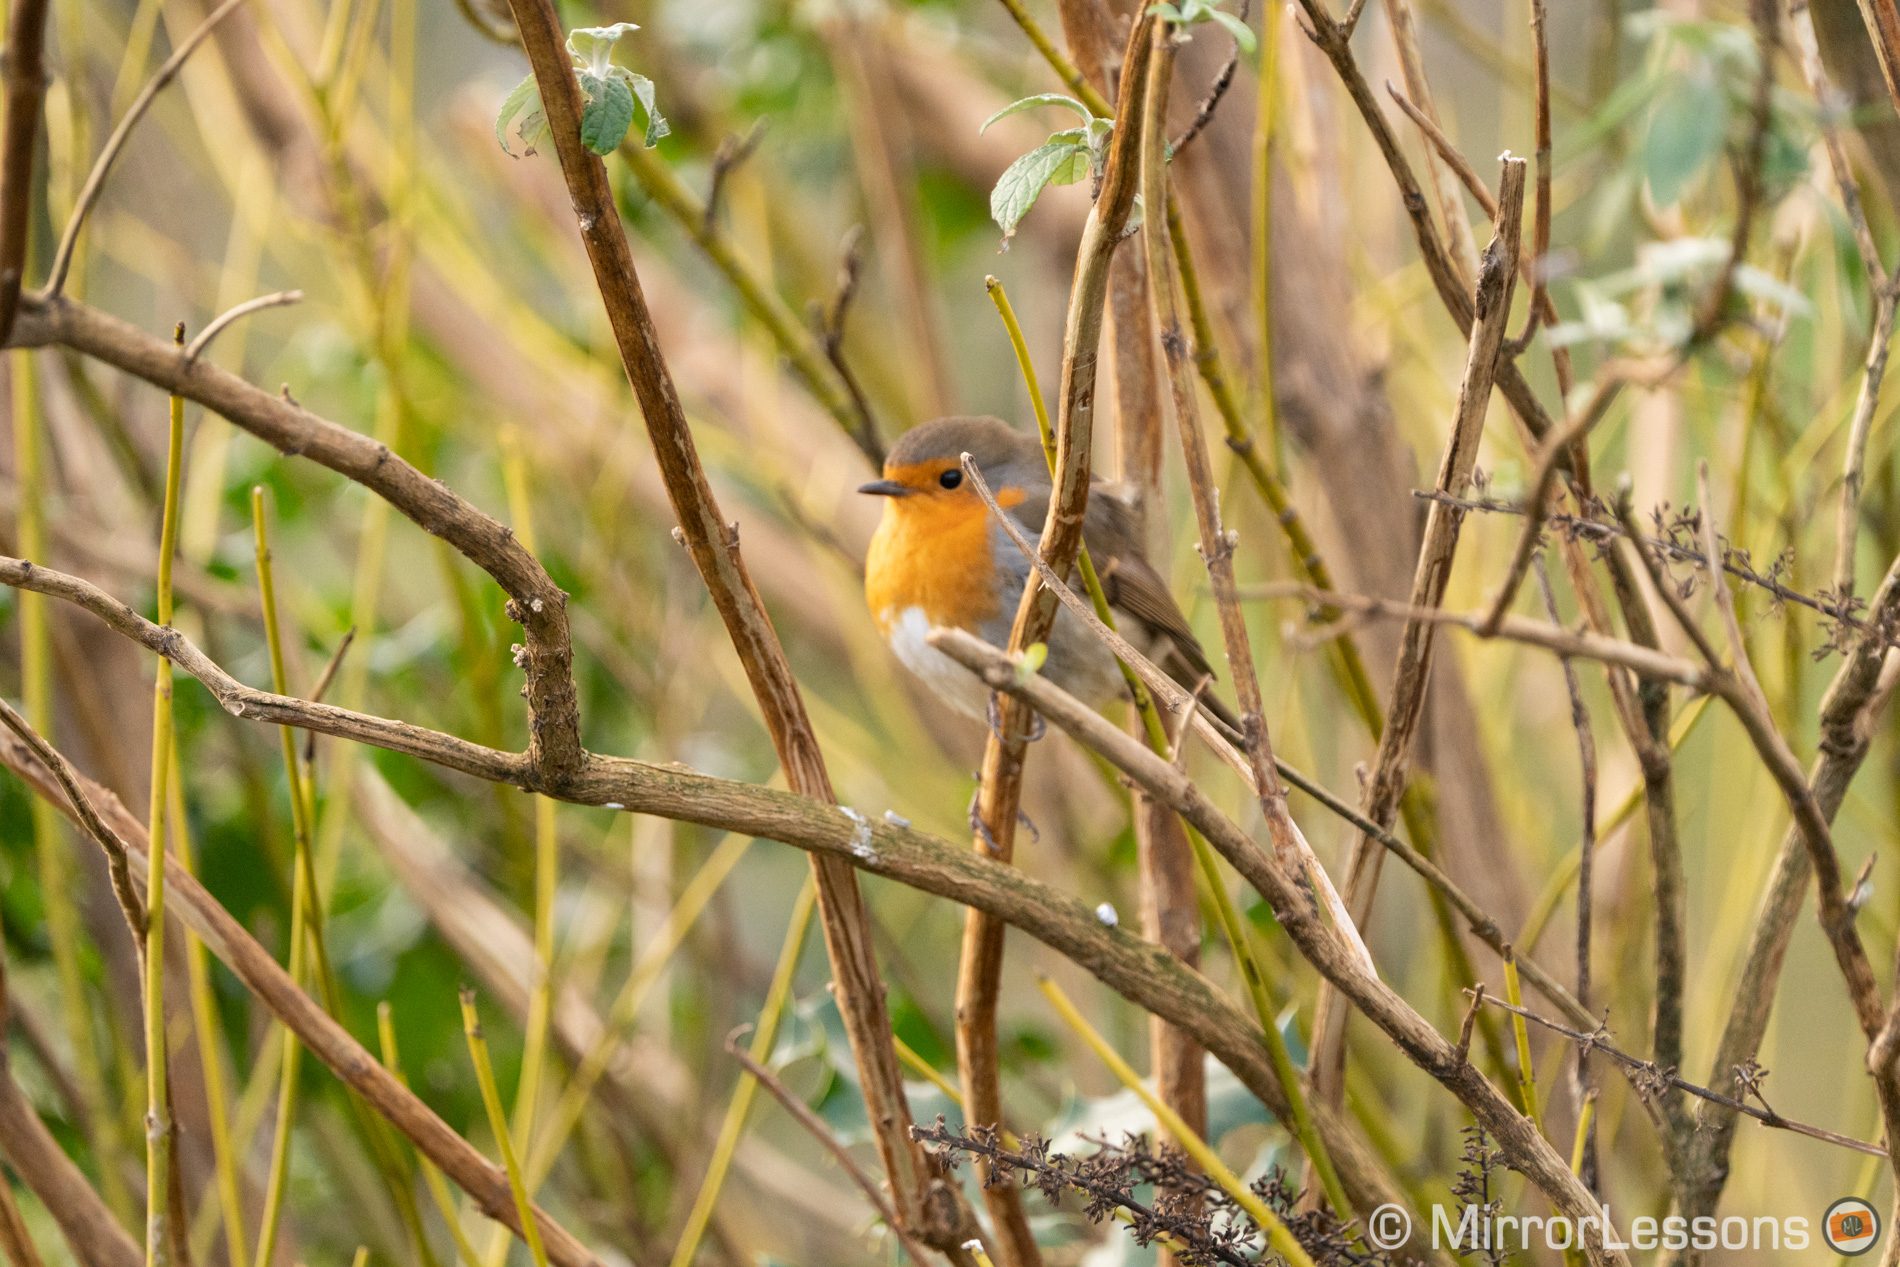
Too many branches covering the robin, focus is too short.
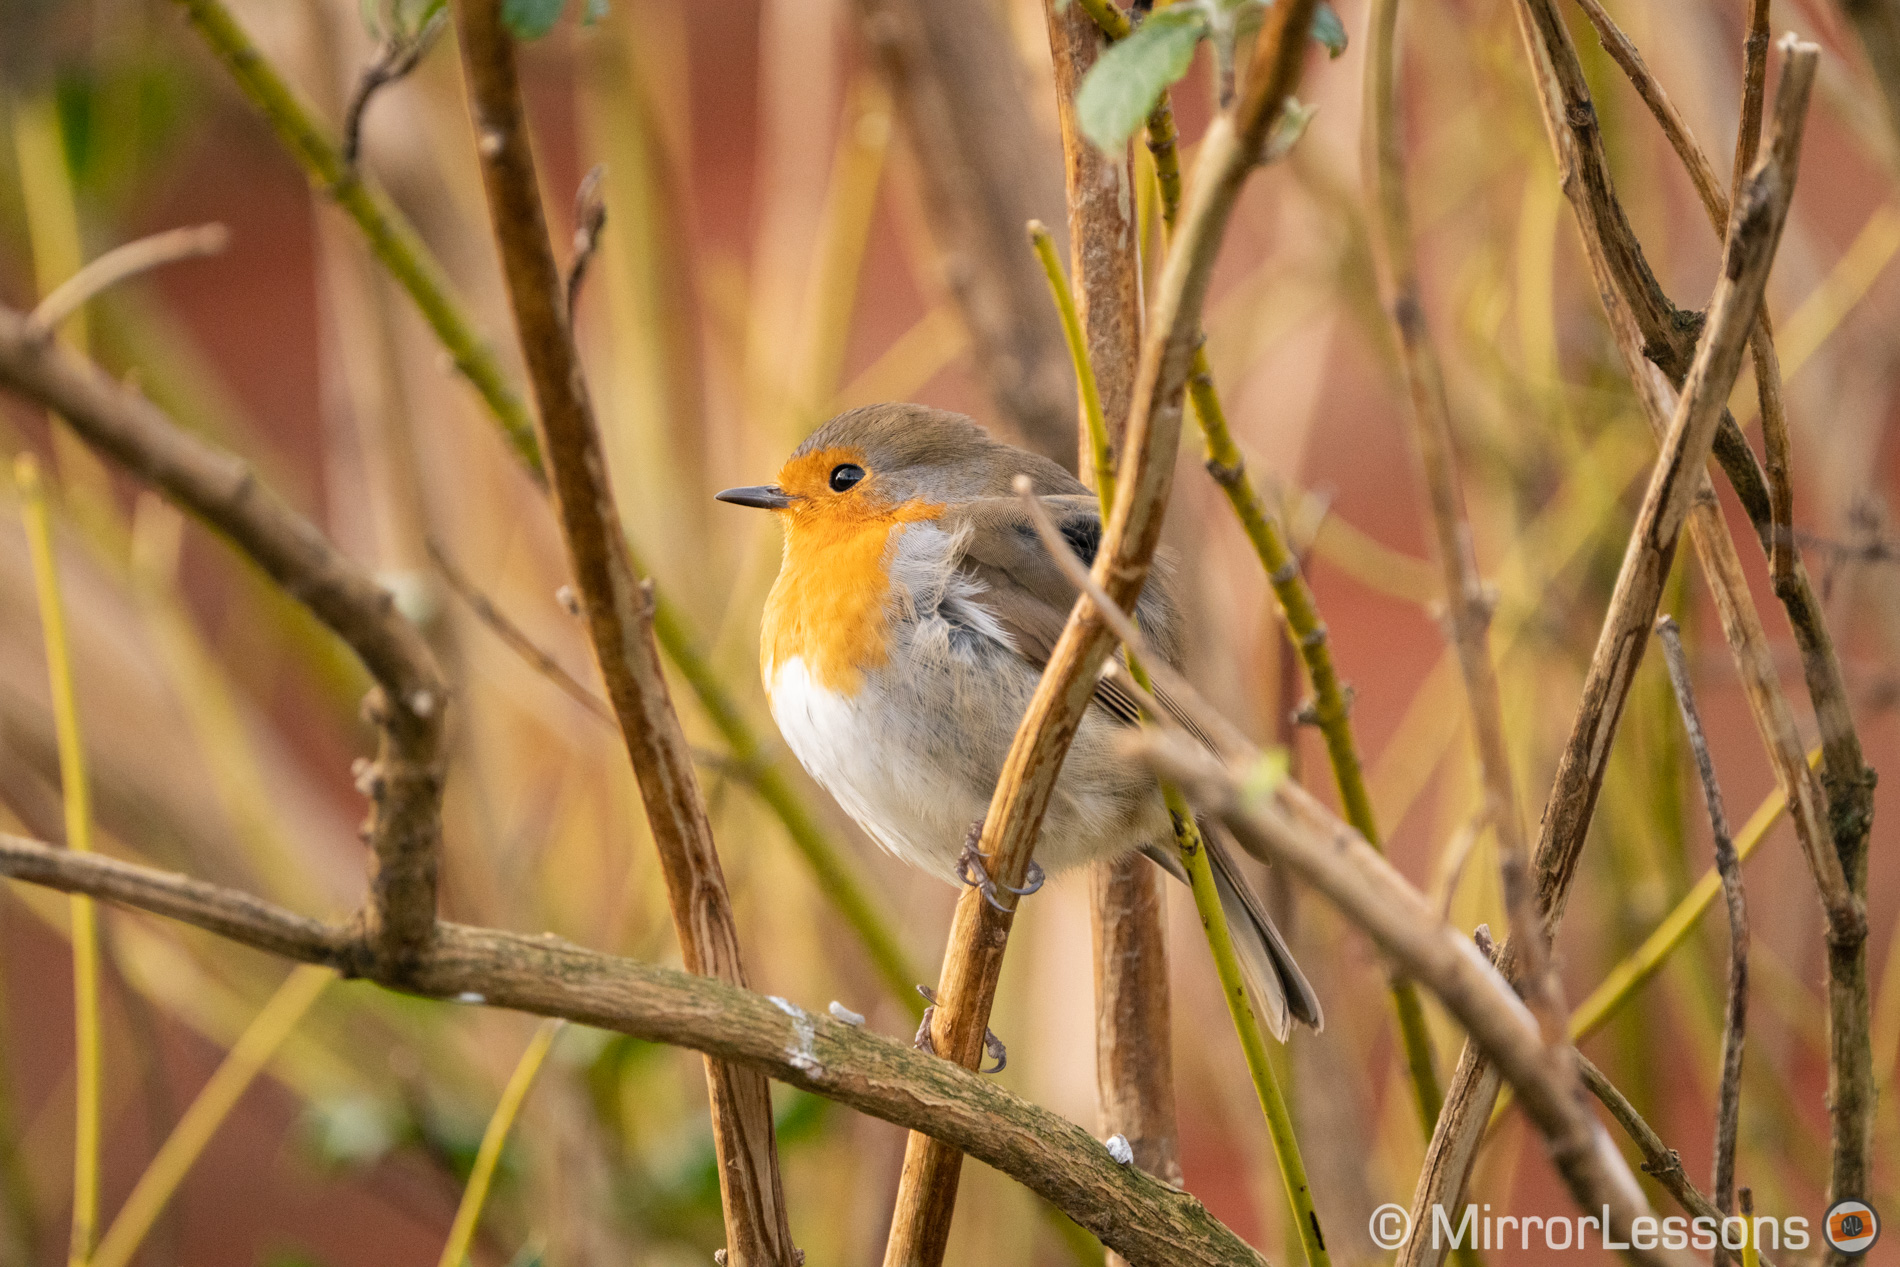
Enough of the robin’s body is clear, the camera locks successfully and immediately goes for the eye.
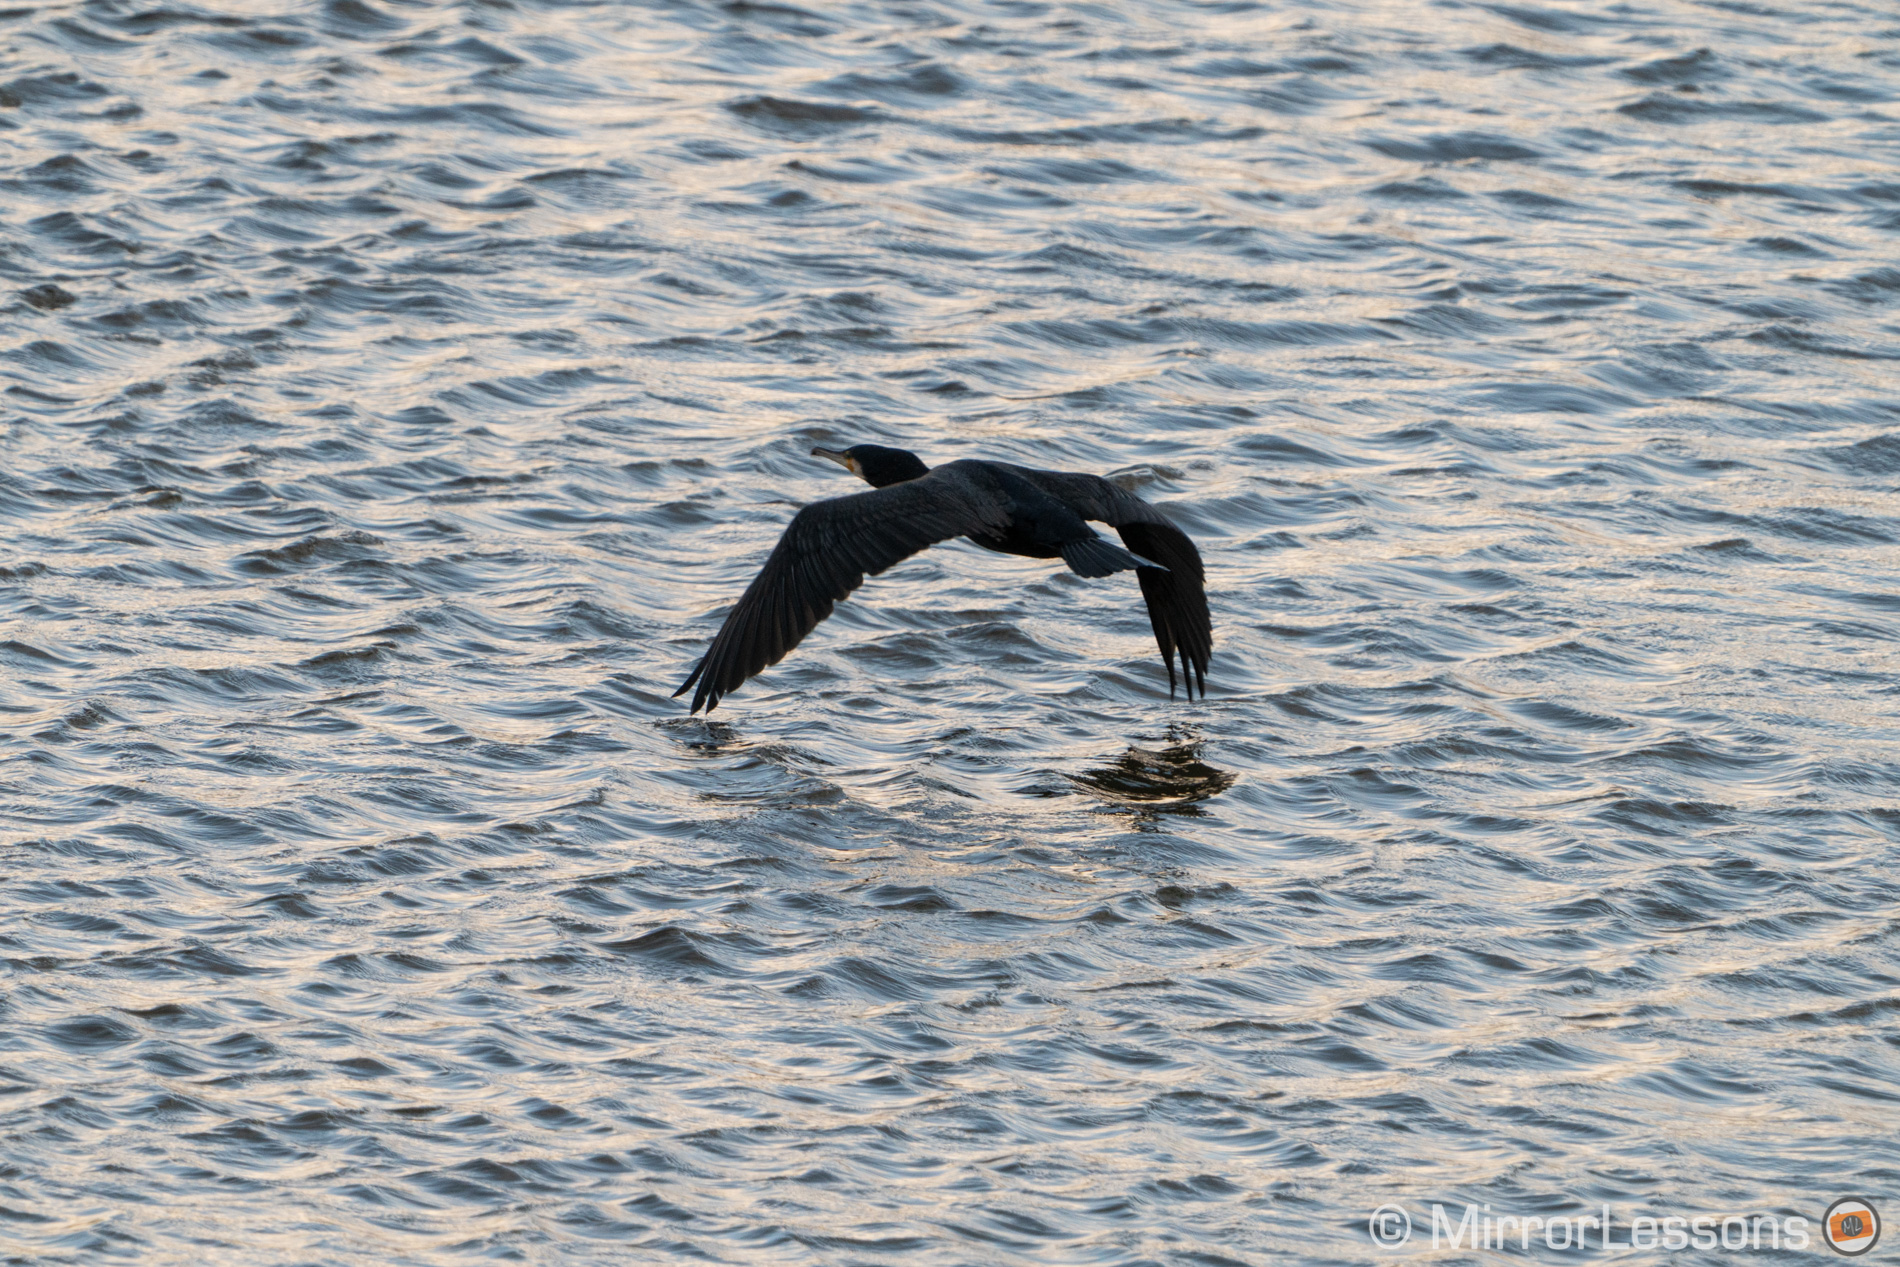
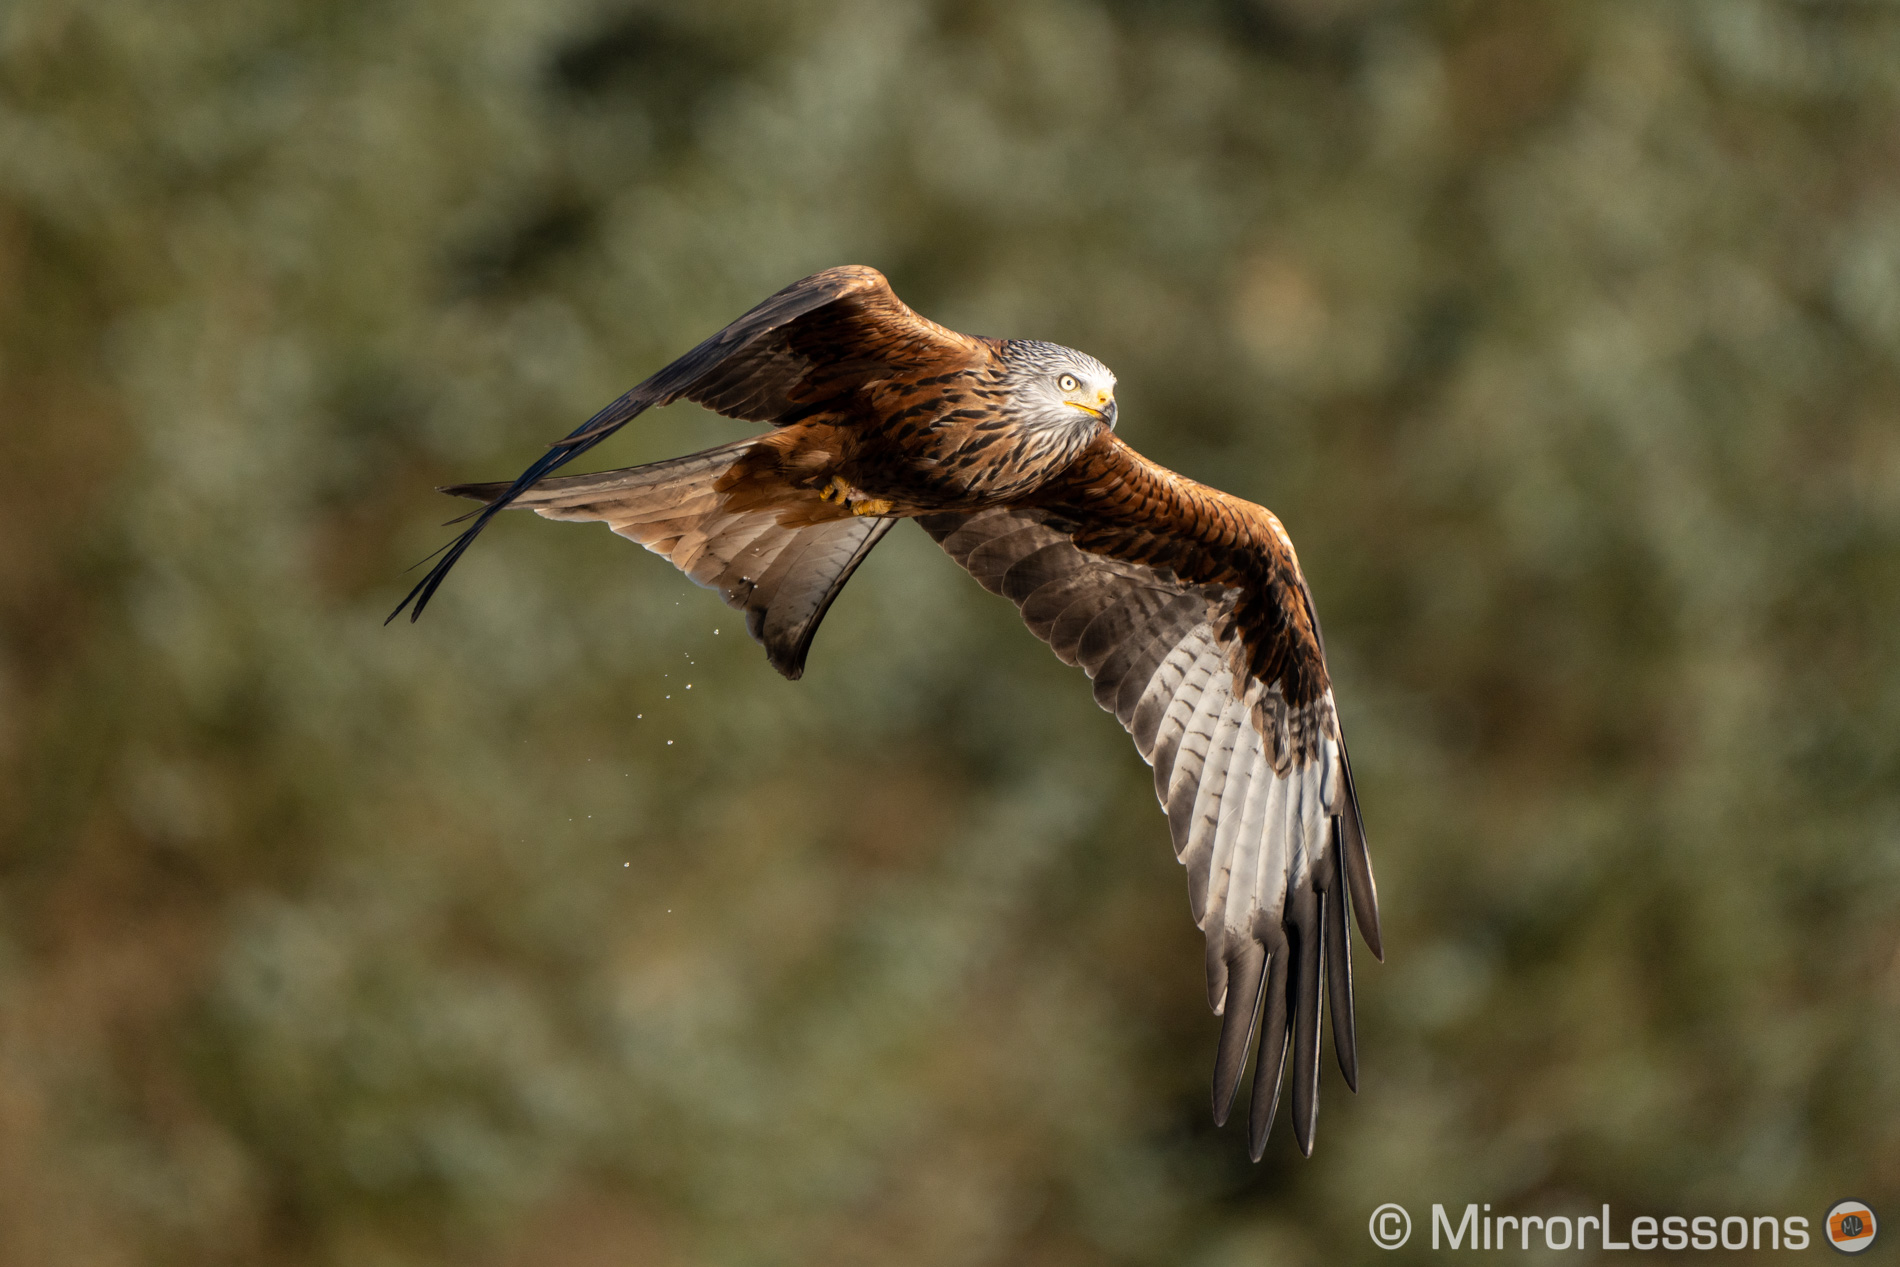
Birds in Flight
The old tracking mode on the A7 III (Lock-On AF) is not reliable for fast subjects like birds in flight. The focus area often jumps away from the bird to track the background or, occasionally, even the blue sky. So, my favourite setting is Zone Area, combined with level 5 for the AF Tracking Sensitivity and Focus Priority in C-AF.
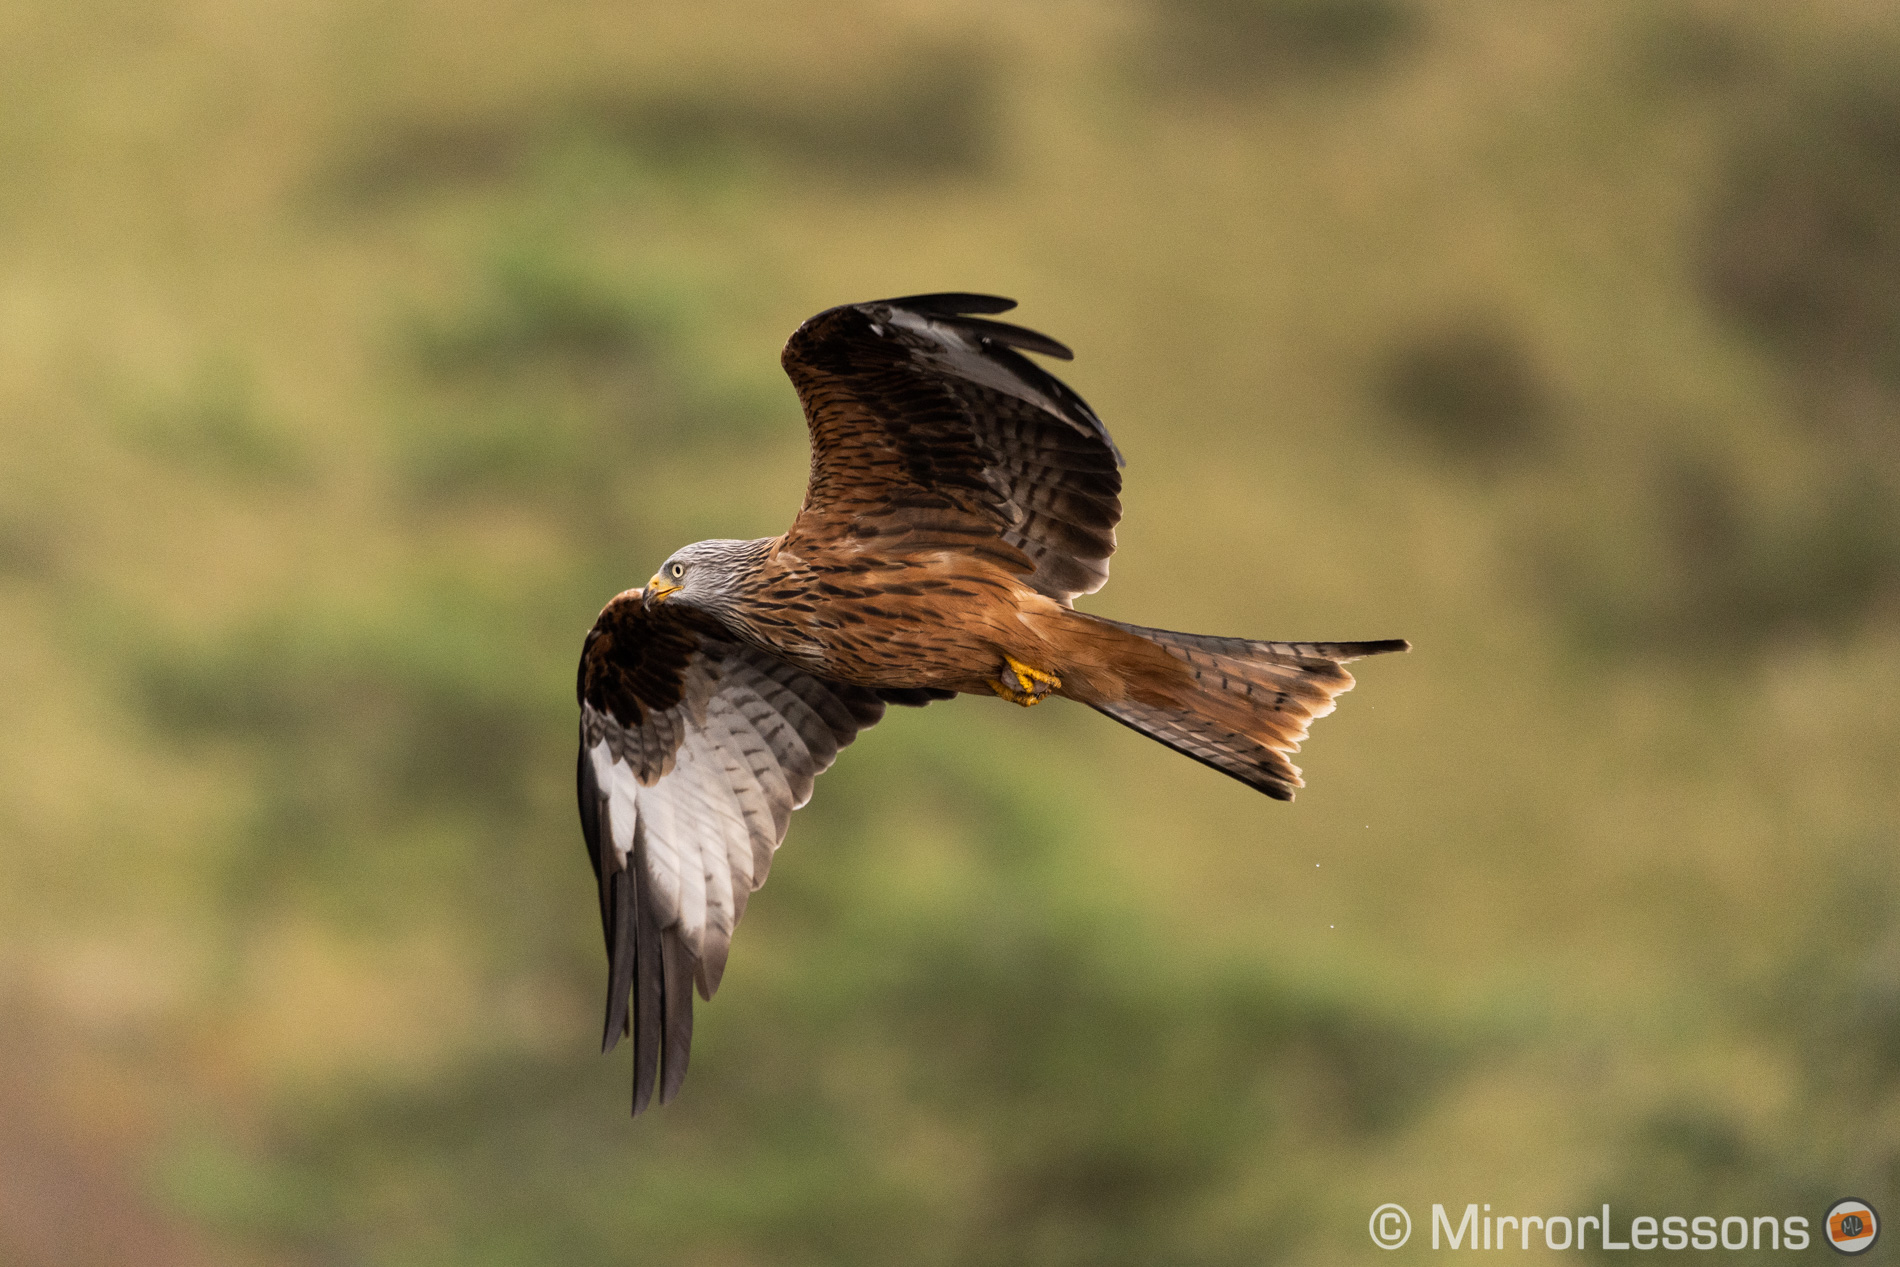
With the A7 IV on the other hand, real time tracking is good enough that I can use it for these challenging subjects, and in fact it proved to be the best setting to use for my red kite test.
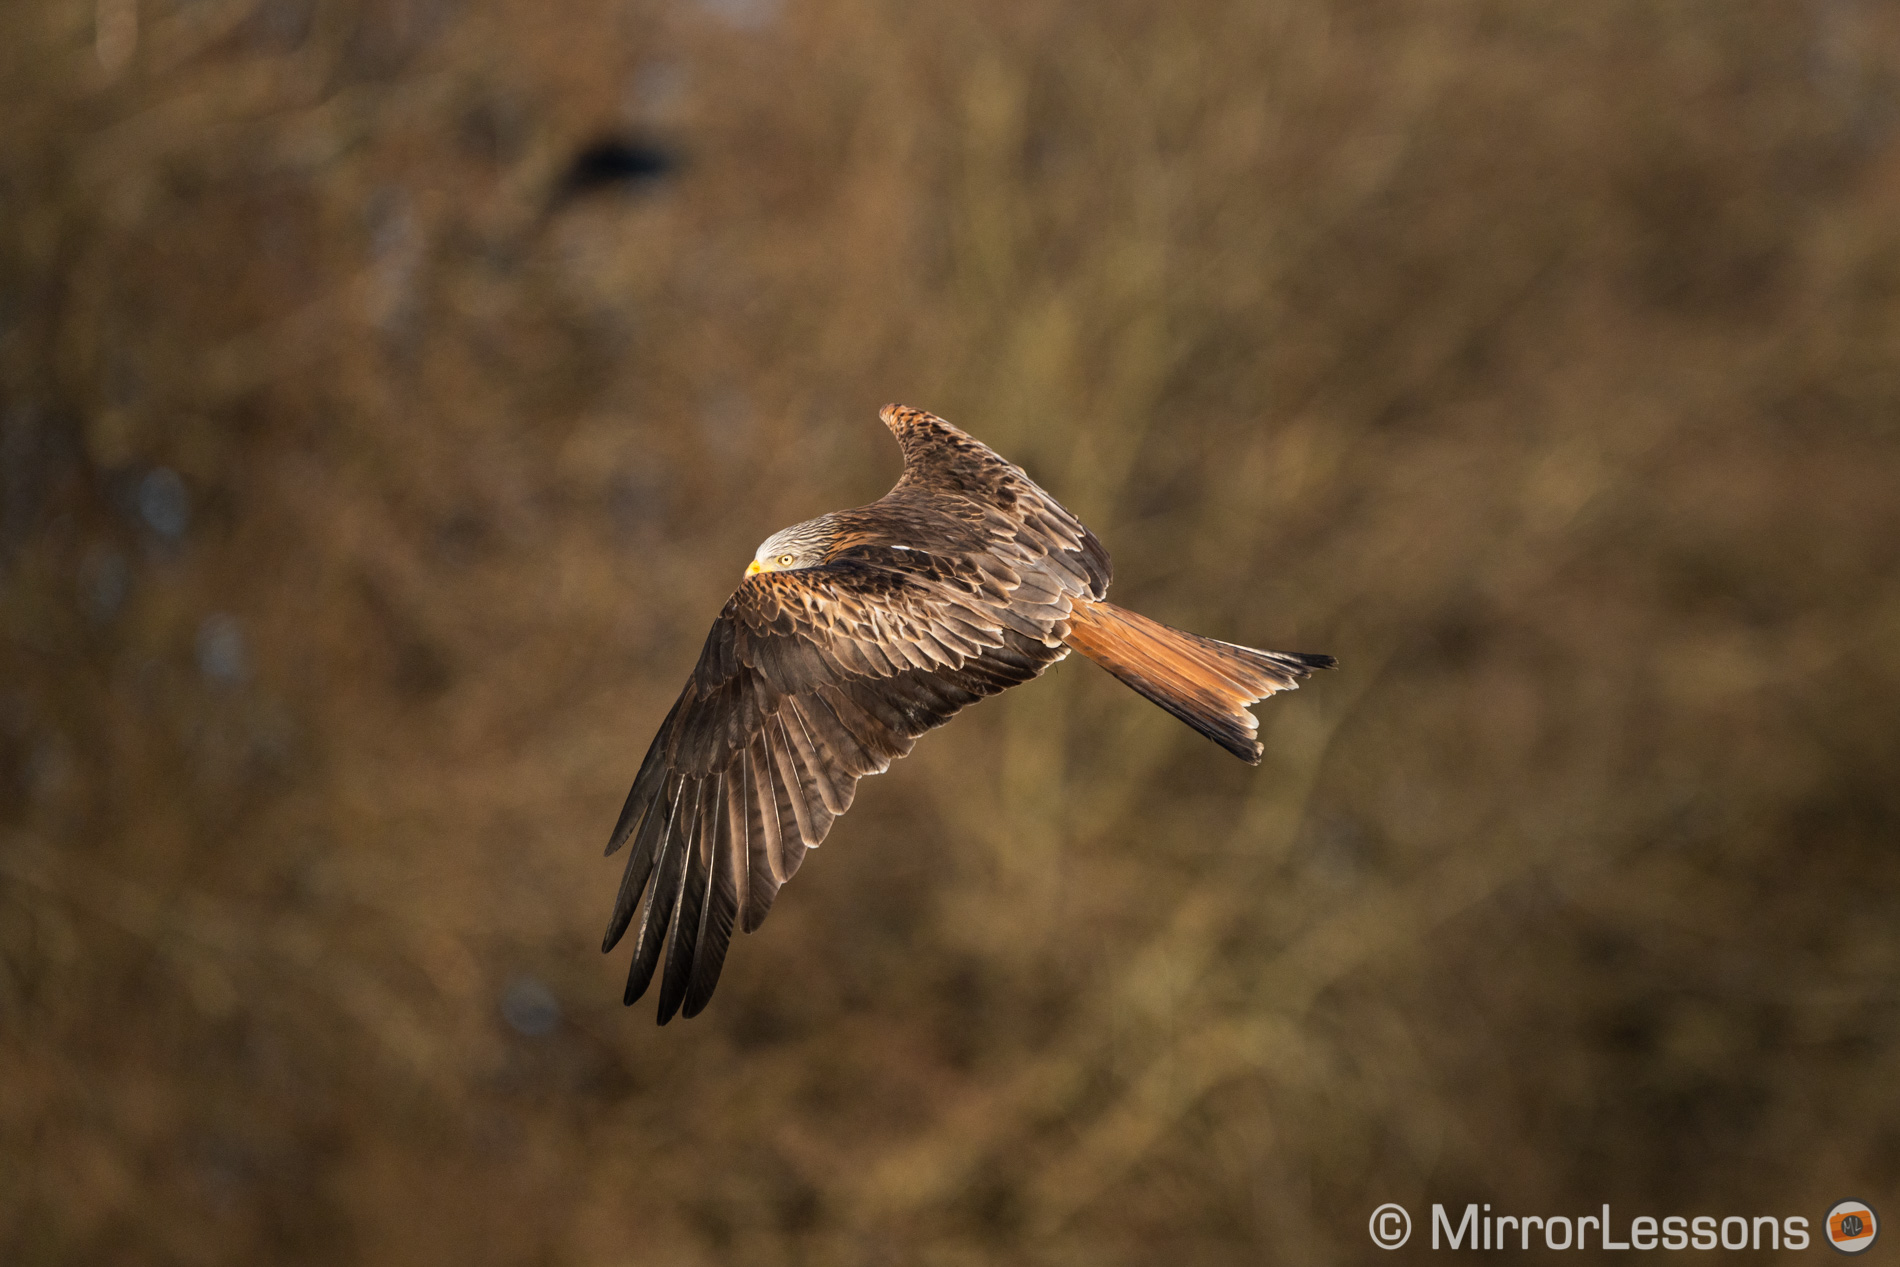
One advantage of using Real-Time Tracking over Zone is that with the latter, the camera occasionally focuses on the background, especially if the background has similar colours to the bird’s feather. With tracking, this behaviour doesn’t happen. You just have to make sure you’re positioning the bird right under the tracking area at the centre of the frame at the beginning of the sequence.
Note: I use Tracking with Expand Flexible Spot on the A7 IV, but you can combine it with any other AF area. However, with a larger area, the camera might decide to track something nearby rather than your subject. That’s why I prefer Expand Flexible Spot, a small point that I keep at the centre of the frame so that the camera understands better what I want. Once it starts tracking, it will follow the subject across the entire frame, no matter how small the AF area you selected is.
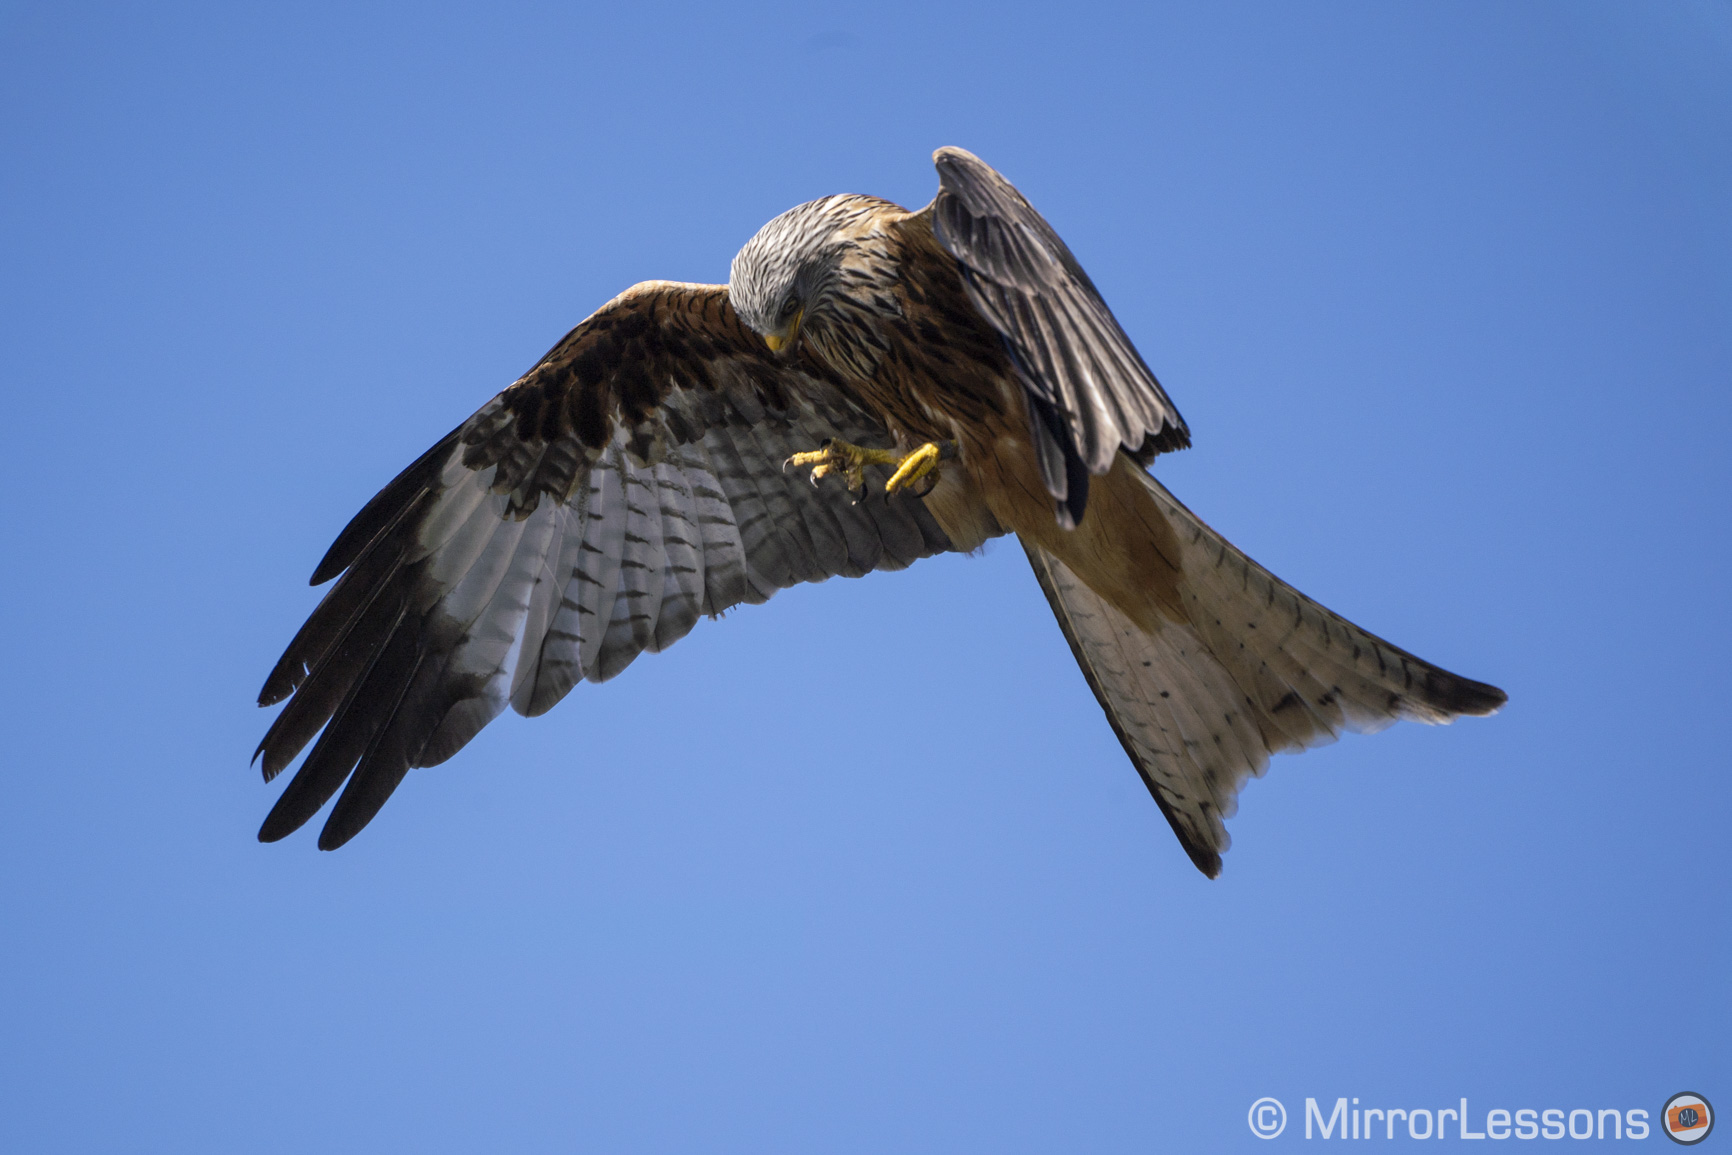
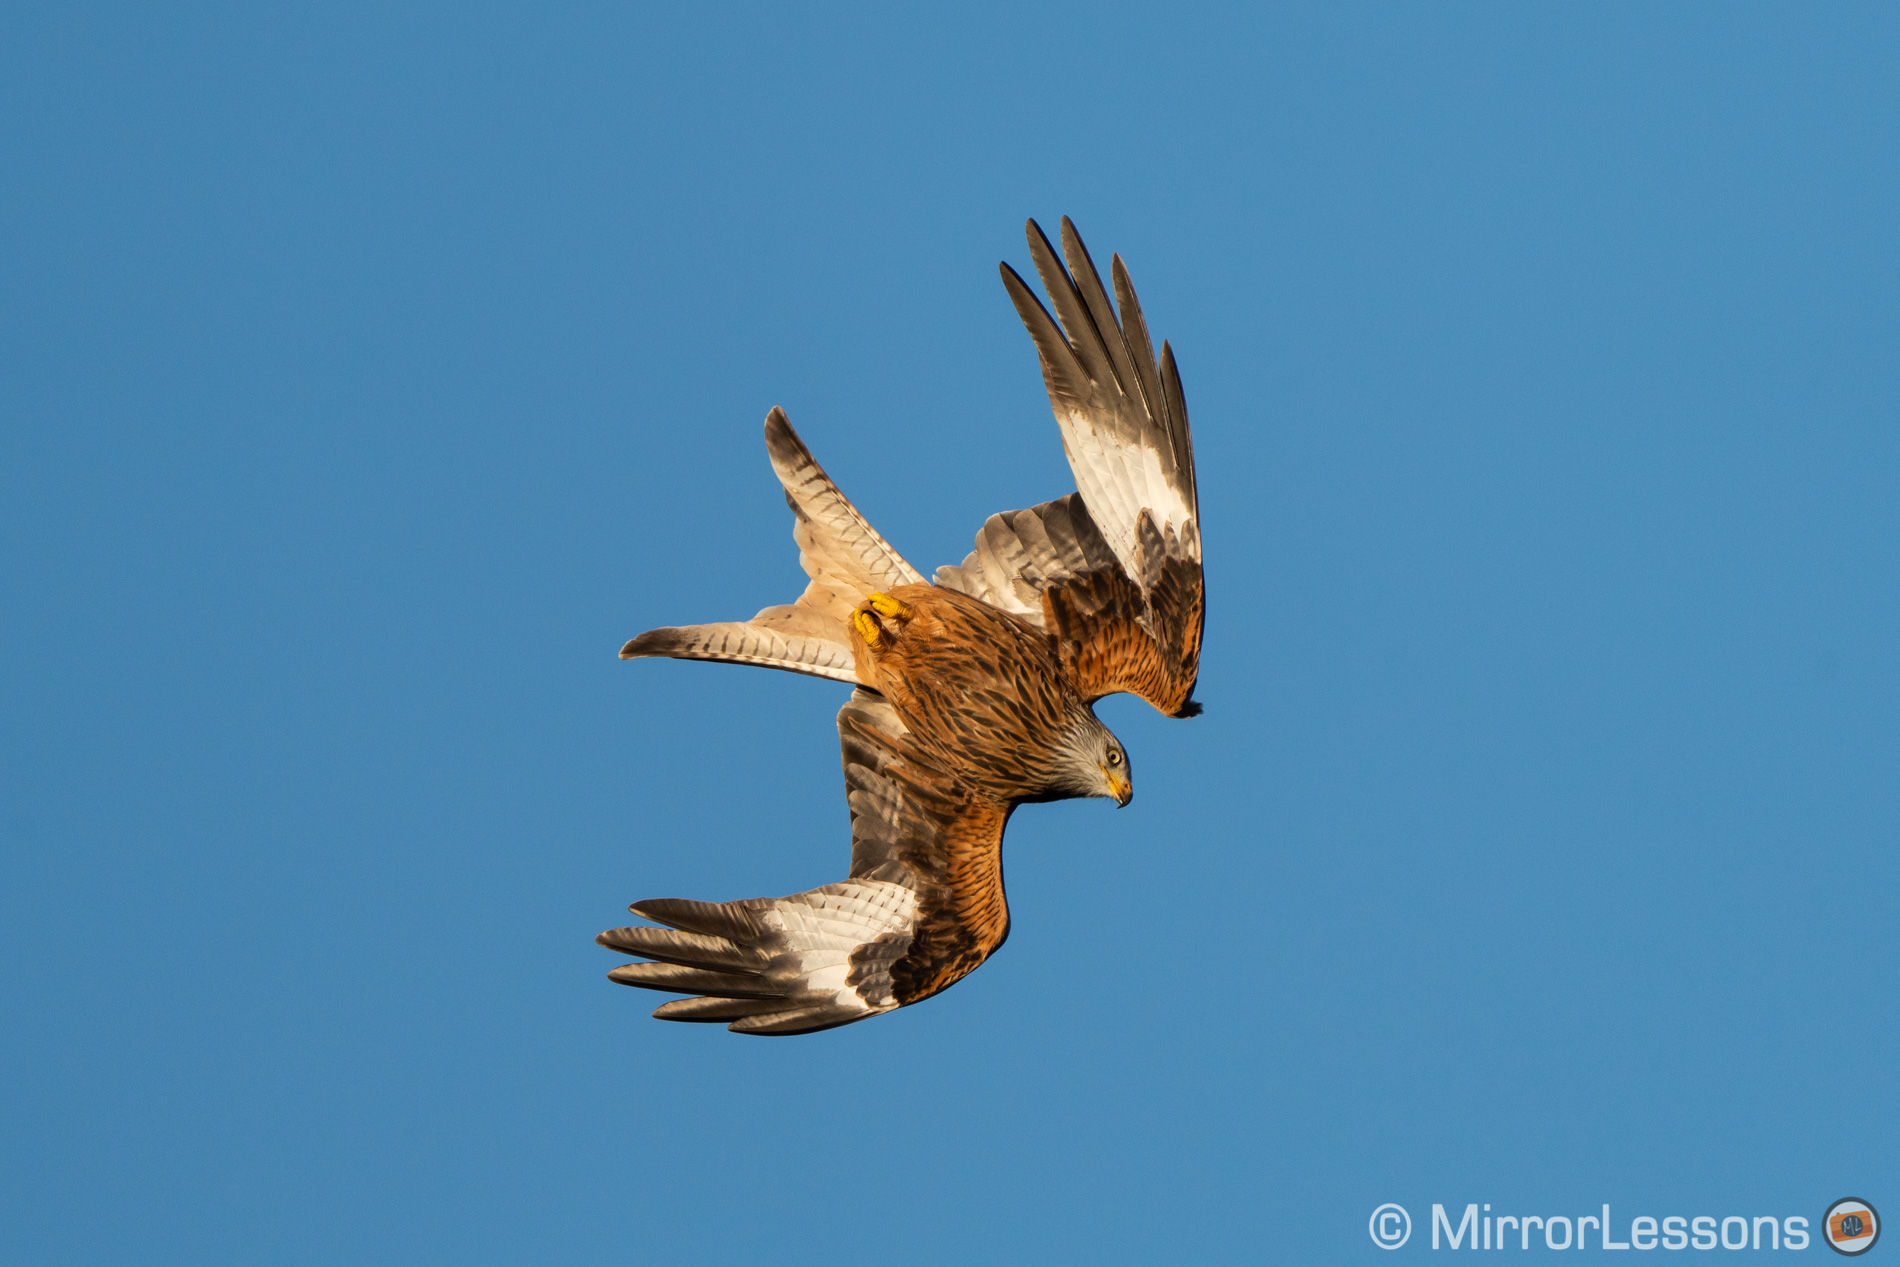
I tested the A7 IV on multiple occasions, and the best score I got was really close to that of the A9 / A9 II result. The A7 III is not far but I never managed to push it to the same level.
| A7 III: Best Score | 86% | 99% |
| A7 III: Average Score | 80% | 95% |
| A7 IV: Best Score | 94% | 99% |
| A7 IV: Average Score | 89% | 97% |
The first number (green) is for sharp images only, the second includes slightly soft results. The average score includes different days I went to the red kite feeding station, and various setting combinations I may have tried. You can find out more about my birds in flight test in the dedicated article.

Although the performance of the A7 IV is really good, I noticed a lack of consistency. Sometimes it would nail a sequence perfectly, other times there would be 5 or 6 shots out of focus or slightly soft.
Granted, the light conditions change from one location to another, and from one day to the next. In one location, the sun sets to the right and most of the trees the kites fly against are in the shade. This makes it a difficult scene to meter and the AF can be confused too. When I went back to the same location with more clouds and a softer light, the camera struggled less.
Other AF Settings For Photography
The two cameras have many settings in common including five Focus Modes, six Focus Areas, the Priority Settings (AF, Release or Balanced Emphasis) and the Tracking Sensitivity (5 steps).
The A7 IV offers additional adjustments such as:
- Focus Area Limit: limits the number of Focus Area settings displayed in the menu, so that you don’t have to scroll through all of them every time (if you know you’ll only use 2 out of 6 for example)
- Focus Area Color: allows you to change the colour of the focus area displayed on the live view, with a choice of white or red
- Circulation of Focus Point: allows you to move the focus point from one edge to the screen to the opposite side without going all the way back
- AF Frame Movement Amount: choose whether to move the focus point in smaller or larger steps (when using Spot or Expand Spot areas)
AF Performance and Settings For Video
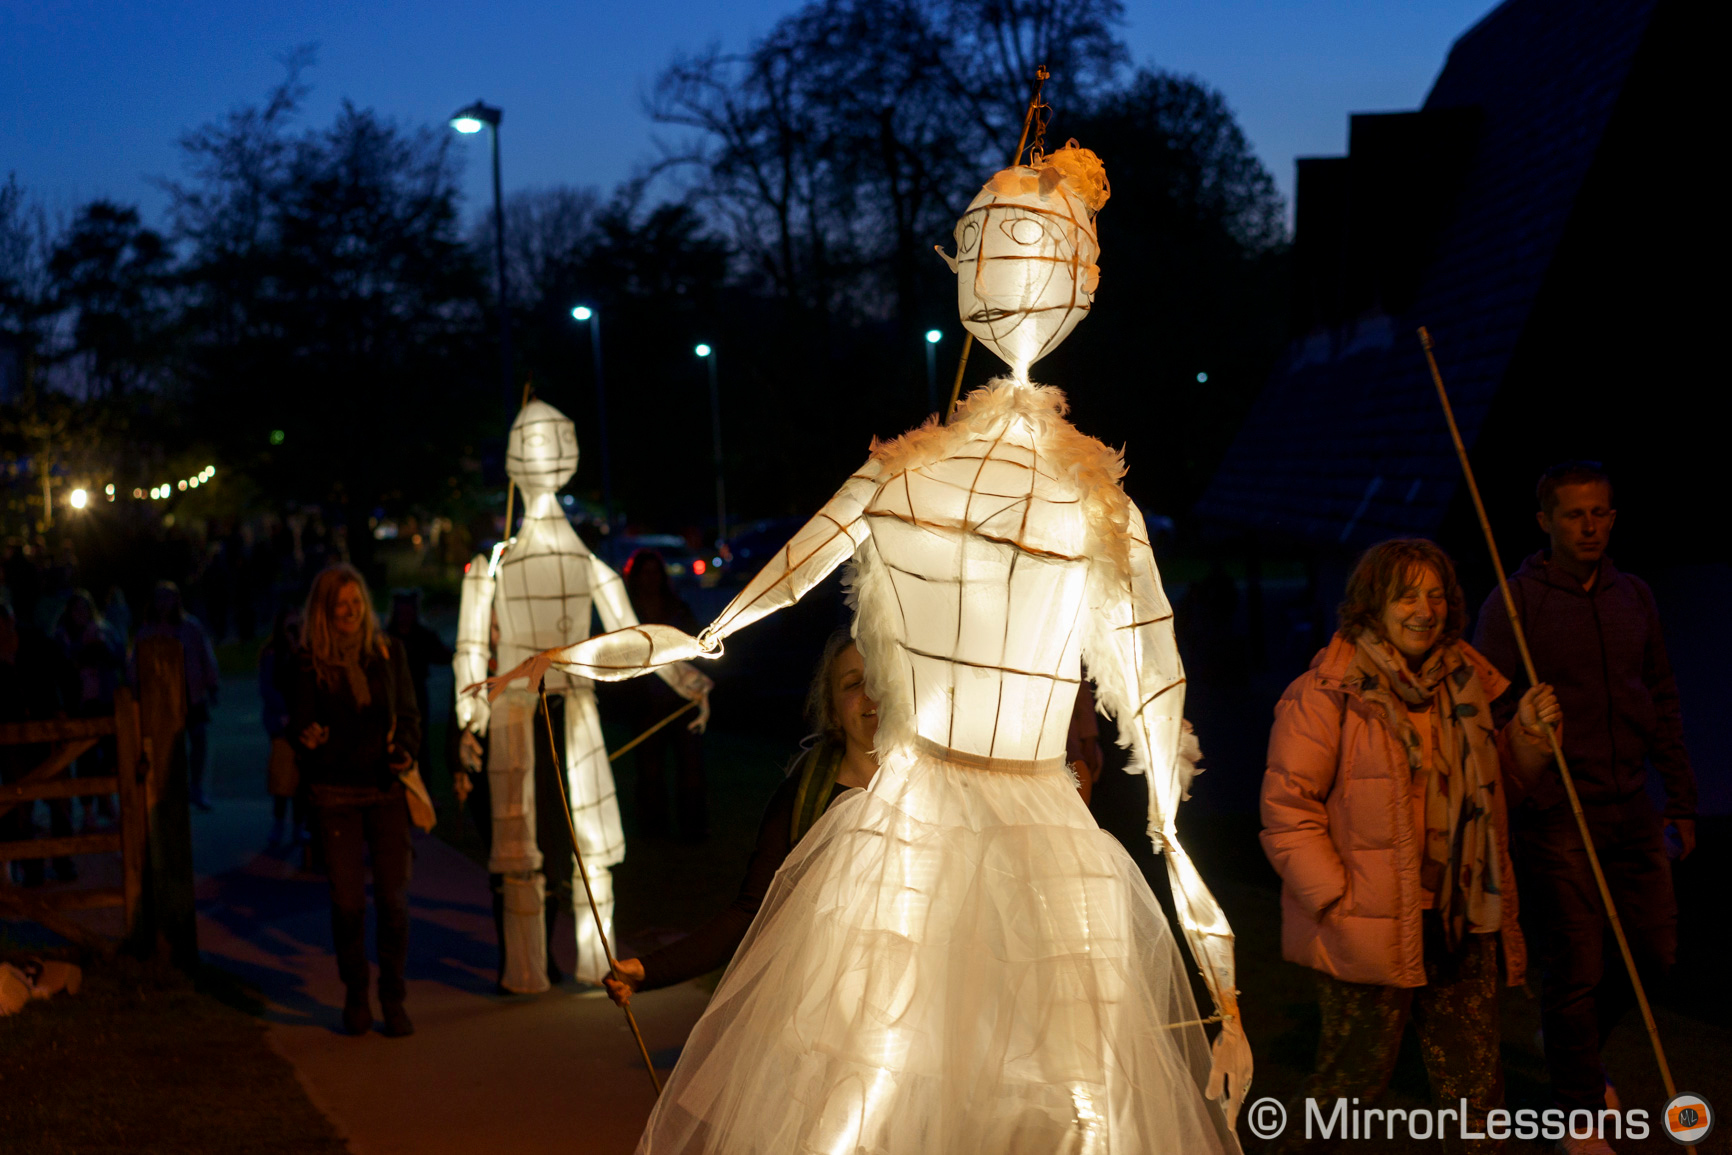
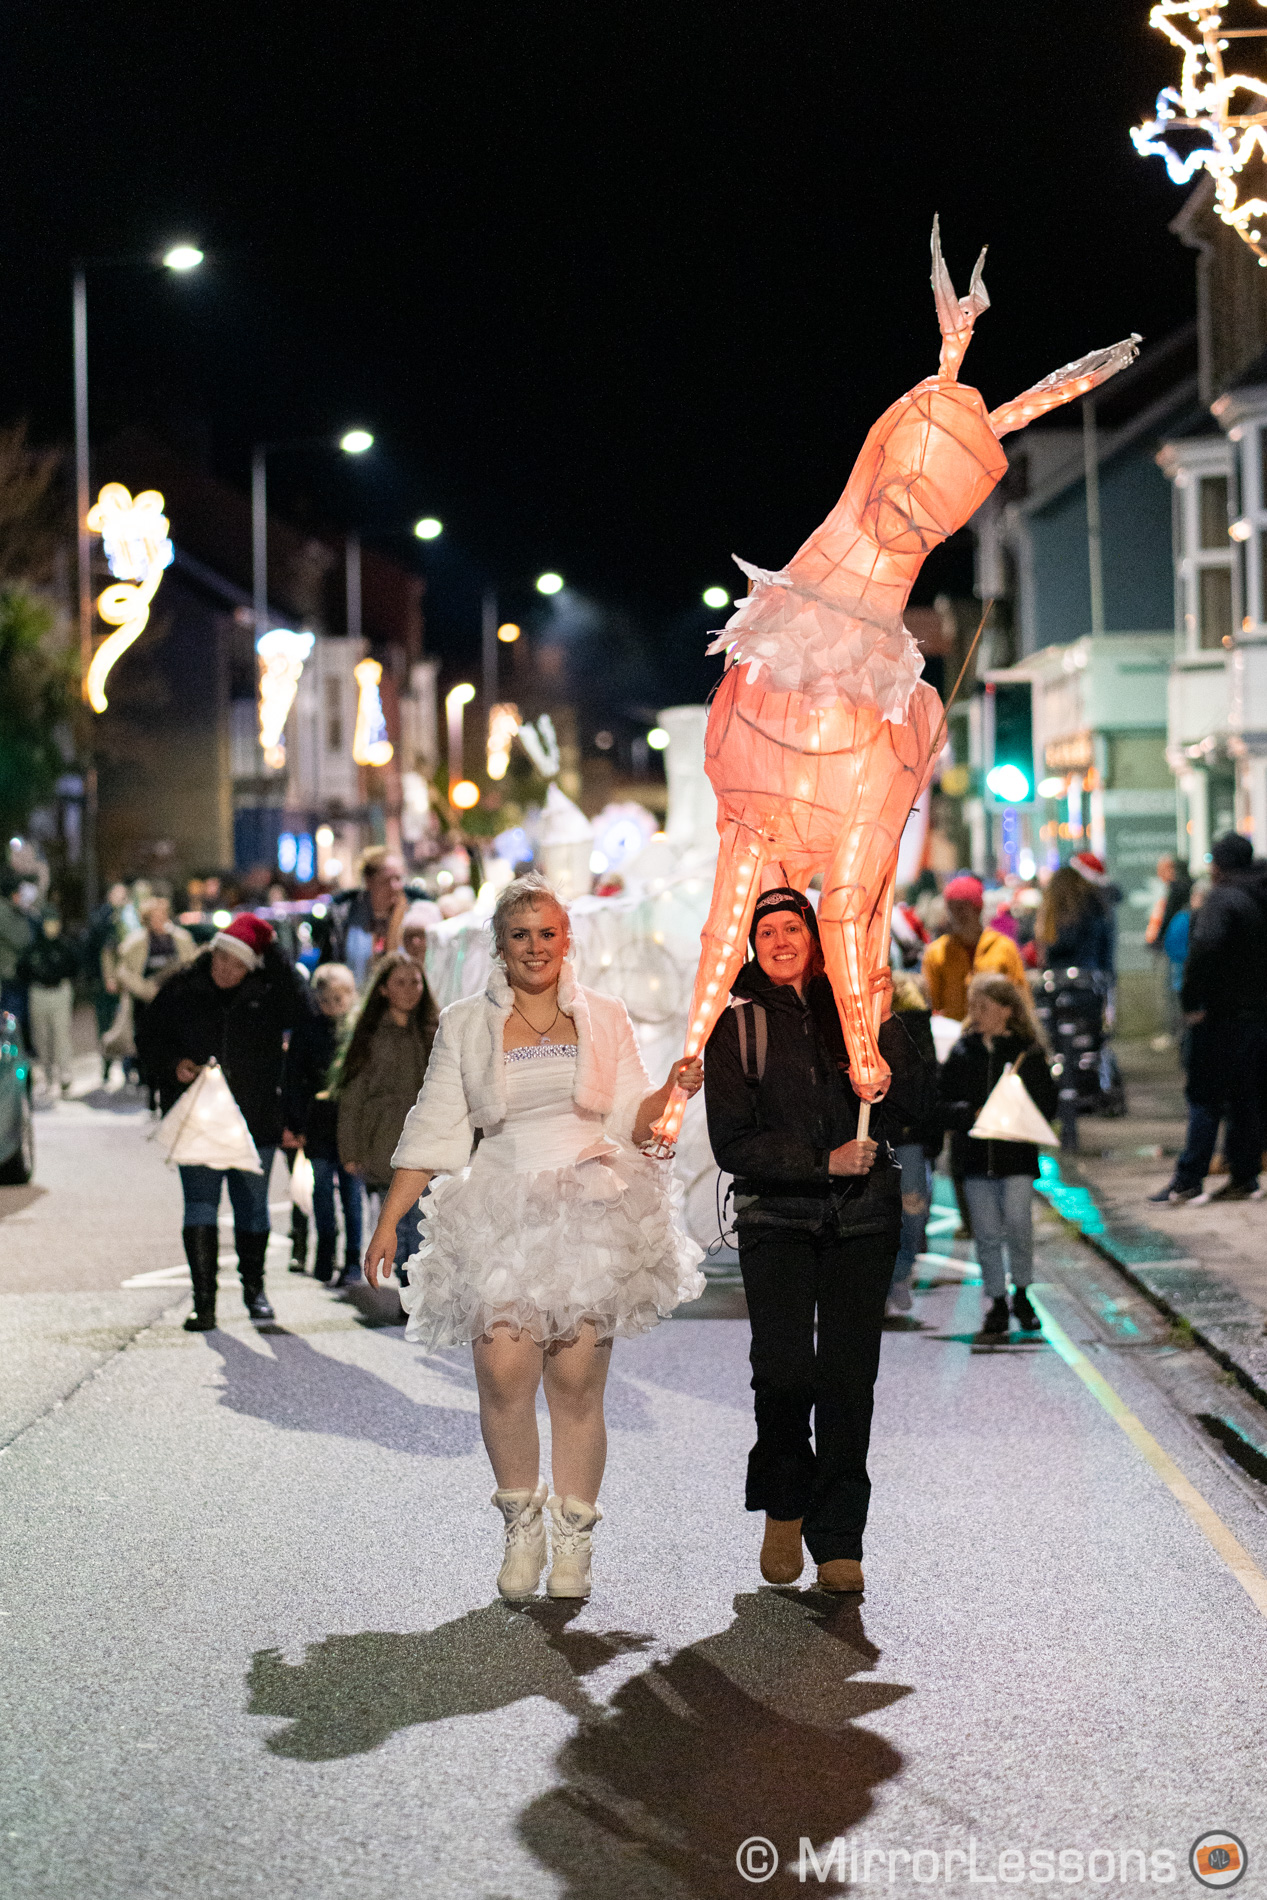
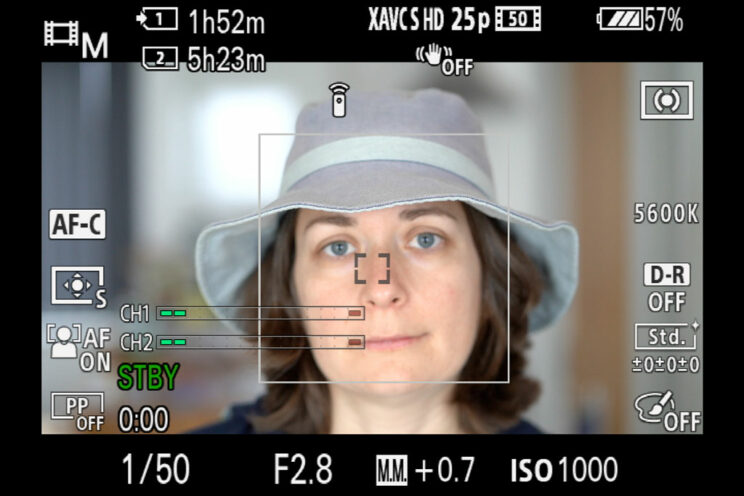
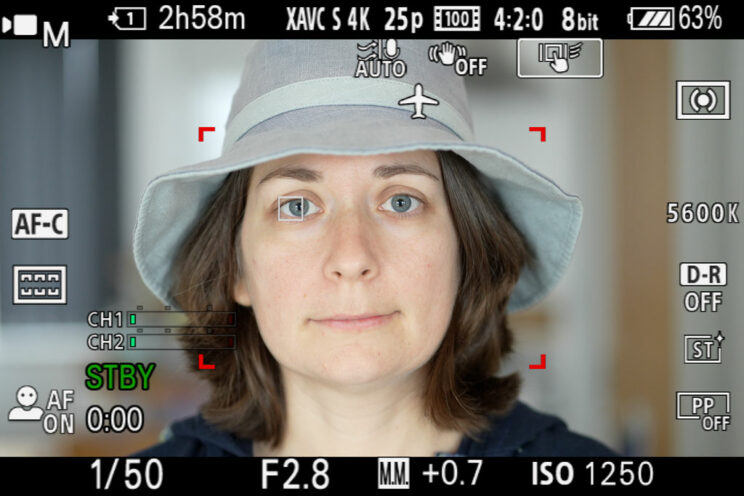
As stated earlier, the A7 III doesn’t have Eye AF for video, only face detection.
With a person walking towards the camera, it often loses focus for a few seconds, and when he or she walks backwards. The mark IV model is more accurate and consistent.
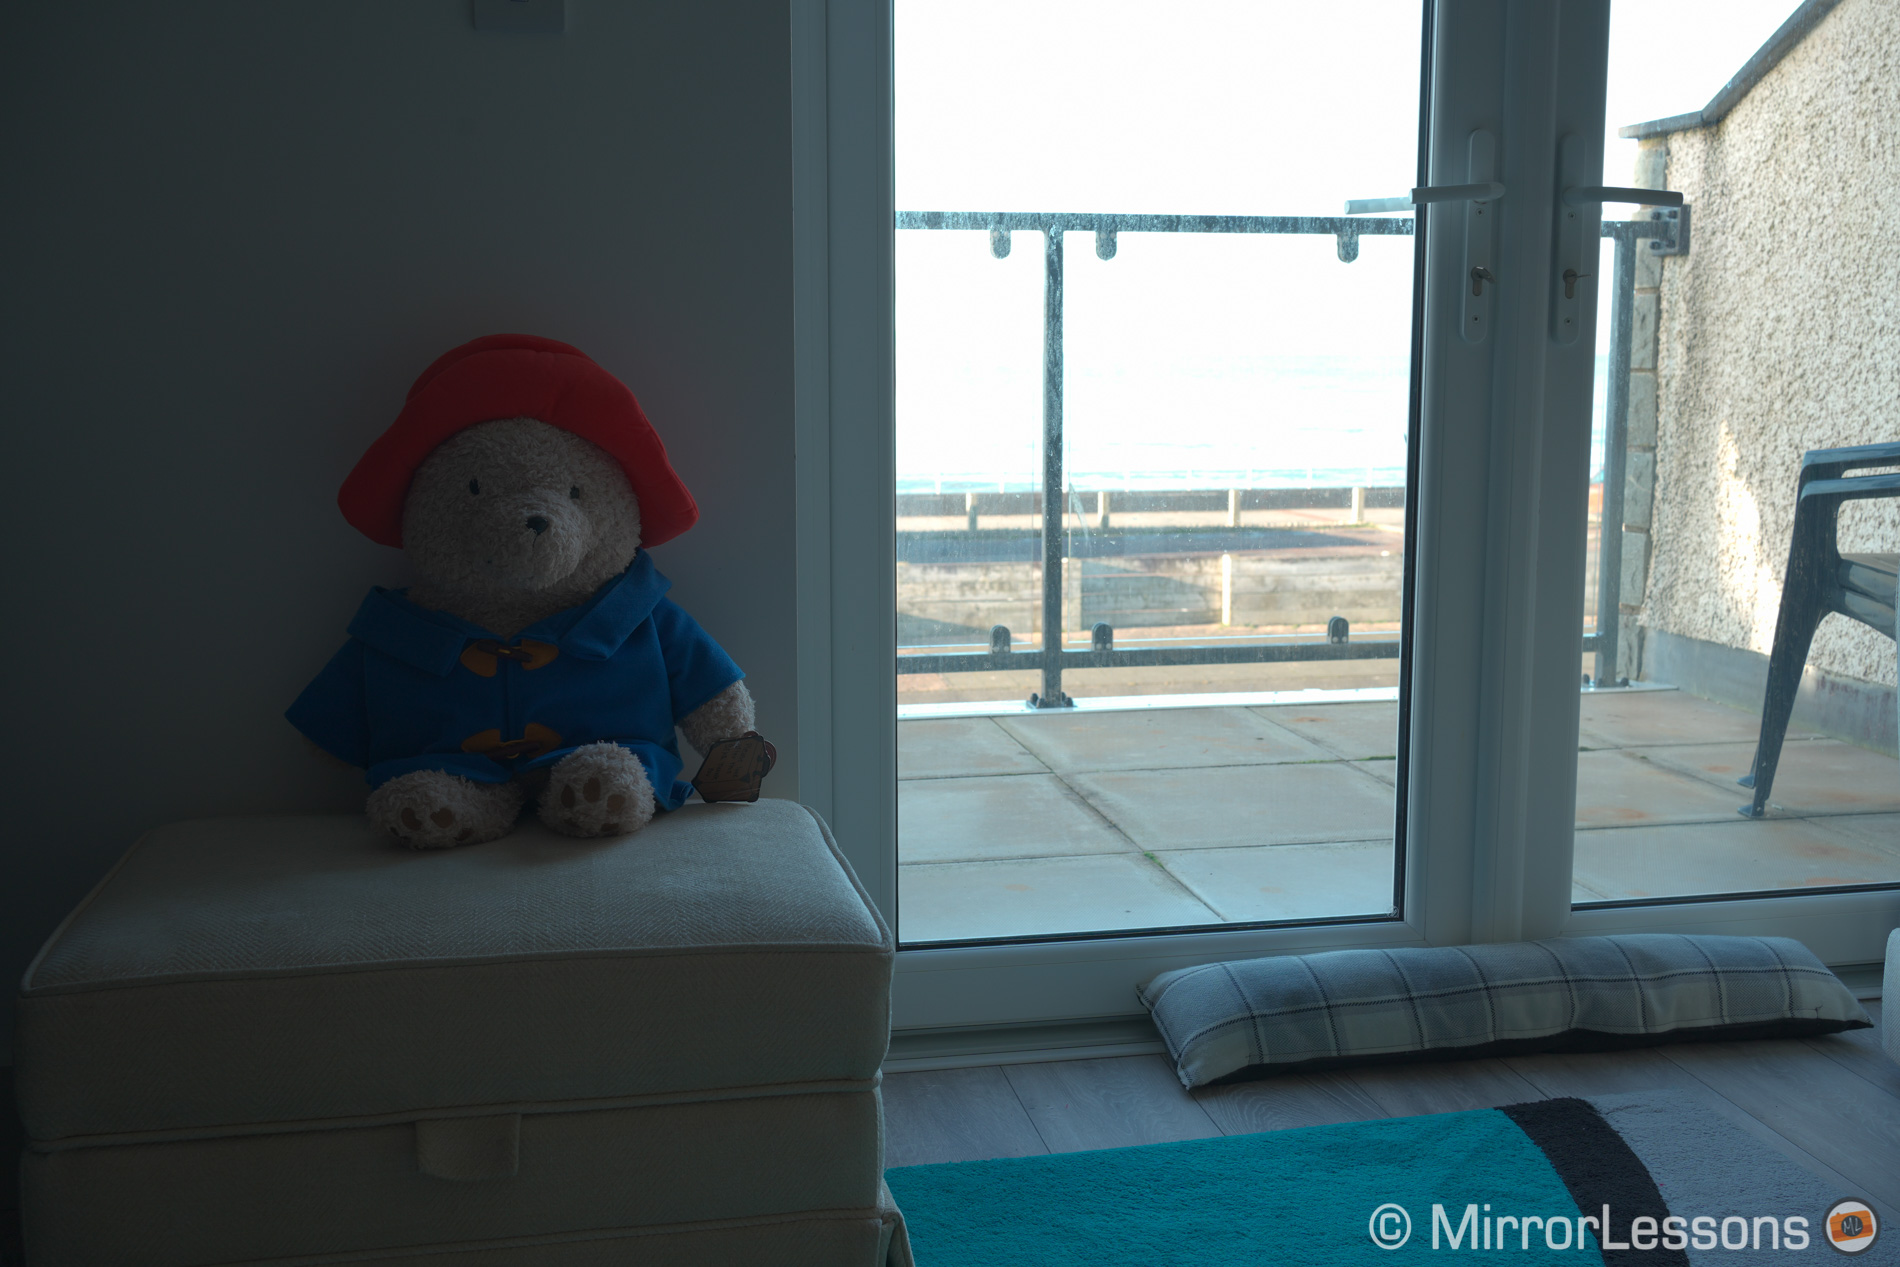
Another limitation is when a person wears a hat: the A7 III will easily focus on the brim of the hat and leave the face out of focus. You need to disable face detection and use a small AF point instead. With the A7 IV, this problem doesn’t exist.


Another improvement on the new camera is additional controls for autofocus during video recording.
There is the AF Transition Speed that works in 7 steps to make focus changes fast or slow, whereas AF Subject Shift Sensitivity determines how quick focus should move from one subject to another. It works on 5 levels.
They replace the AF Drive Speed and AF Track Sensitivity settings you find on the A7 III which have fewer steps to control the performance (3 levels and 2 levels respectively).
These settings can be useful for various applications, one of which is to make nice and smooth focus transitions between two points in your composition. The A7 IV gives you a higher degree of customisation to find the speed that you want, and the beginning and end are smoother. With the A7 III for example, the Slow setting is too slow, especially near the end of the transition.
Another thing I noticed is that at close focus distances, when not touching anything on the camera, nor having anything moving in the scene, the A7 III tends to move the lens elements back and forth rather than leaving focus fixed in one position. This doesn’t happen with the A7 IV. You can watch some examples of this in our video review in chapter 4.
Then we have Focus Map, which gives you a graphic visualisation of the depth of field, highlighting in cool colours what’s behind the DoF and in warm colours what’s in front of it. The areas where colours remain normal are within the depth of field.

It’s an interesting solution for manual focus. It can be a bit confusing at first, especially if you use a fast aperture, but once you get used to it, it becomes a good alternative to Peaking, and I actually find it more reliable. It’s not as precise as Focus Magnification, but not far off either, even when using a fast aperture and shallow depth of field.
Last but not least, the A7 IV has a new option called AF assist, which allows you to use the focus ring to make manual changes while working in continuous autofocus mode. This can be useful when using large focus areas such as Wide or Zone, where the camera might pick the wrong area to focus on. If that is the case, you can correct focus manually, and once you’ve finished, the camera will keep focus on the area you corrected manually.
3. Shutter, Drive Speed and Buffer
The two products feature a mechanical, an electronic first curtain and a fully electronic shutter mode. They can take pictures up to 1/8000s. Activating the electronic shutter doesn’t raise the speed further as it happens on other models.
The shutter sound is quieter on the mark IV model which makes the camera a bit more discreet when using the mechanical mode.
Continuous Shooting
Both cameras have a maximum continuous shooting speed of 10fps, and they can maintain autofocus and exposure tracking at that speed.
The fact that the A7 IV can maintain the same speed as the A7 III despite the higher megapixels sounds good, but there are a few limitations to be aware of.
Early tests by DPreview and Gordon Laing mention that 10fps can be achieved with JPGs or Lossy compressed RAW only. If you select Lossless Compressed or Uncompressed, the speed drops to about 6fps. Gordon also said that you need the CFexpress card to achieve 10fps with compressed RAW, otherwise the speed drops to around 8fps.
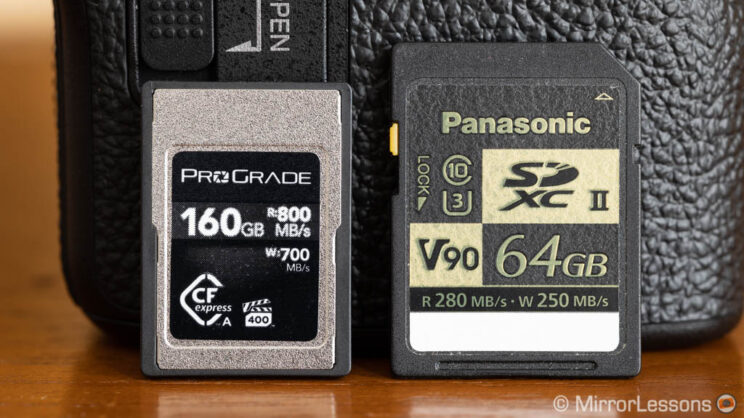
I did my own test and I agree with these early findings, although I did manage to record about 10fps with the SD card and Compressed RAW selected. In the table below, you can find a summary of the maximum speeds available with each file type. The cards used for the test were:
- Prograde CFexpress Type A 160GB
- Panasonic SDXC II V90 64GB
| File Type | A7 III SD UHS-II | A7 IV SD UHS-II | A7 IV CFexpress |
|---|---|---|---|
| Uncompressed RAW | 10fps | 6fps | 6fps |
| Lossless Compressed RAW | – | 6fps | 6fps |
| Compressed RAW | 10fps | 10fps | 10fps |
| JPG X-Fine | 10fps | 10fps | 10fps |
In short, the A7 IV does have 10fps capabilities as long as you stick with Compressed RAW or JPG. The A7 III on the other hand can achieve 10fps with compressed or uncompressed RAW.
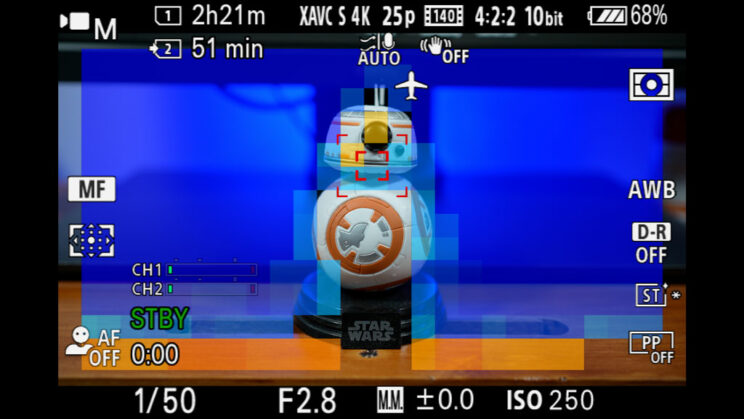
At 10fps, both cameras show you the last image taken in rapid succession. This means you have an uninterrupted view (no blackouts) but what you see is not live, it is the images being recorded on the SD card, meaning there is a delay to be taken into account. Up to 8fps, you have live view with blackouts.
Electronic Shutter
The electronic shutter doesn’t offer any advantage concerning the live view mode or the continuous shooting speed (unlike the A9 or A1 series), which remains the same maximum of 10fps.
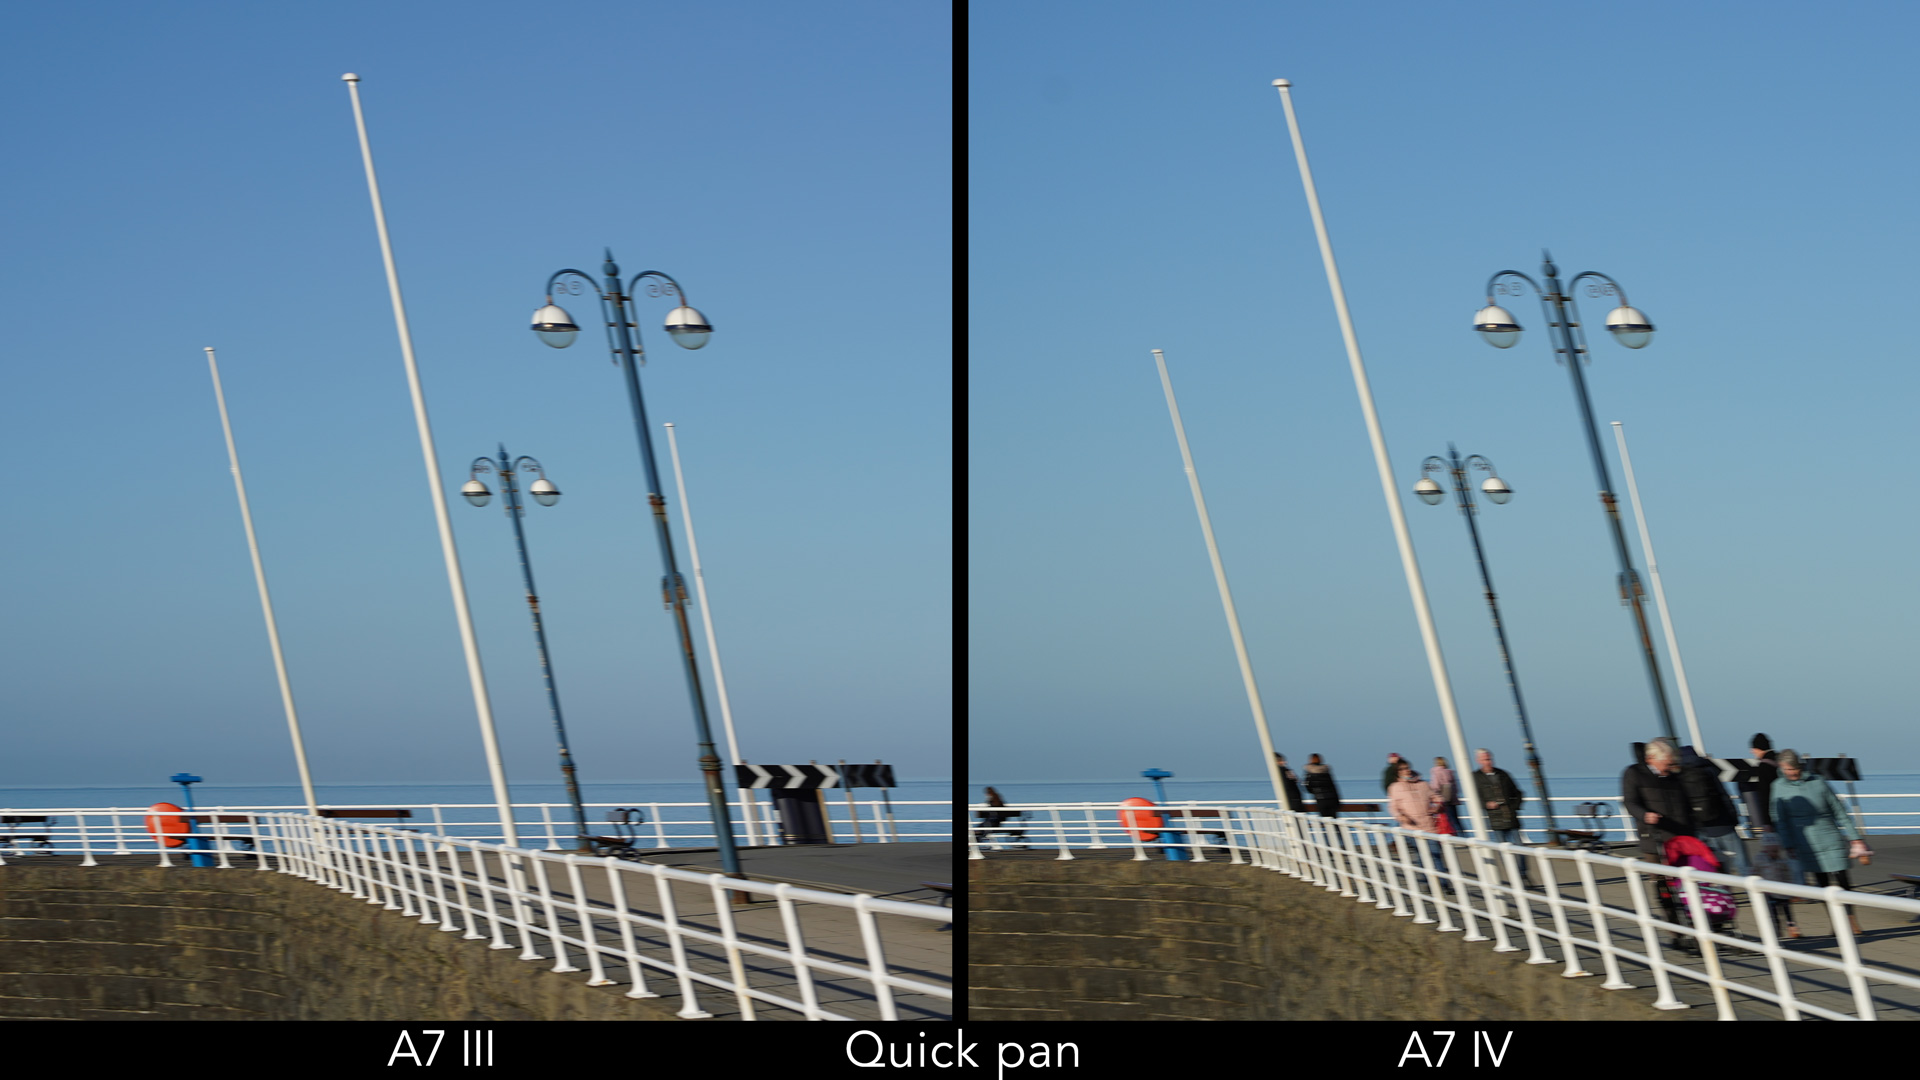
If you’re interested in using the electronic shutter (to take pictures in silent mode for example), you need to remember caveats such as distortion when panning quickly for example (rolling shutter effect). Here, the mark III model defends itself well by distorting a bit less in comparison to its successor, as you can see below.

Another problem of using the electronic shutter can be banding, which occurs under certain types of artificial light sources (fluorescent, LED) and can result in darker horizontal stripes in your image.
To tackle this, Sony has included on the A7 IV a function called Variable Shutter. It allows you to adjust the shutter speed to a higher degree of precision than the default 1/3 step, and see in real time the impact it has regarding flickering on the monitor. It works for stills and video.
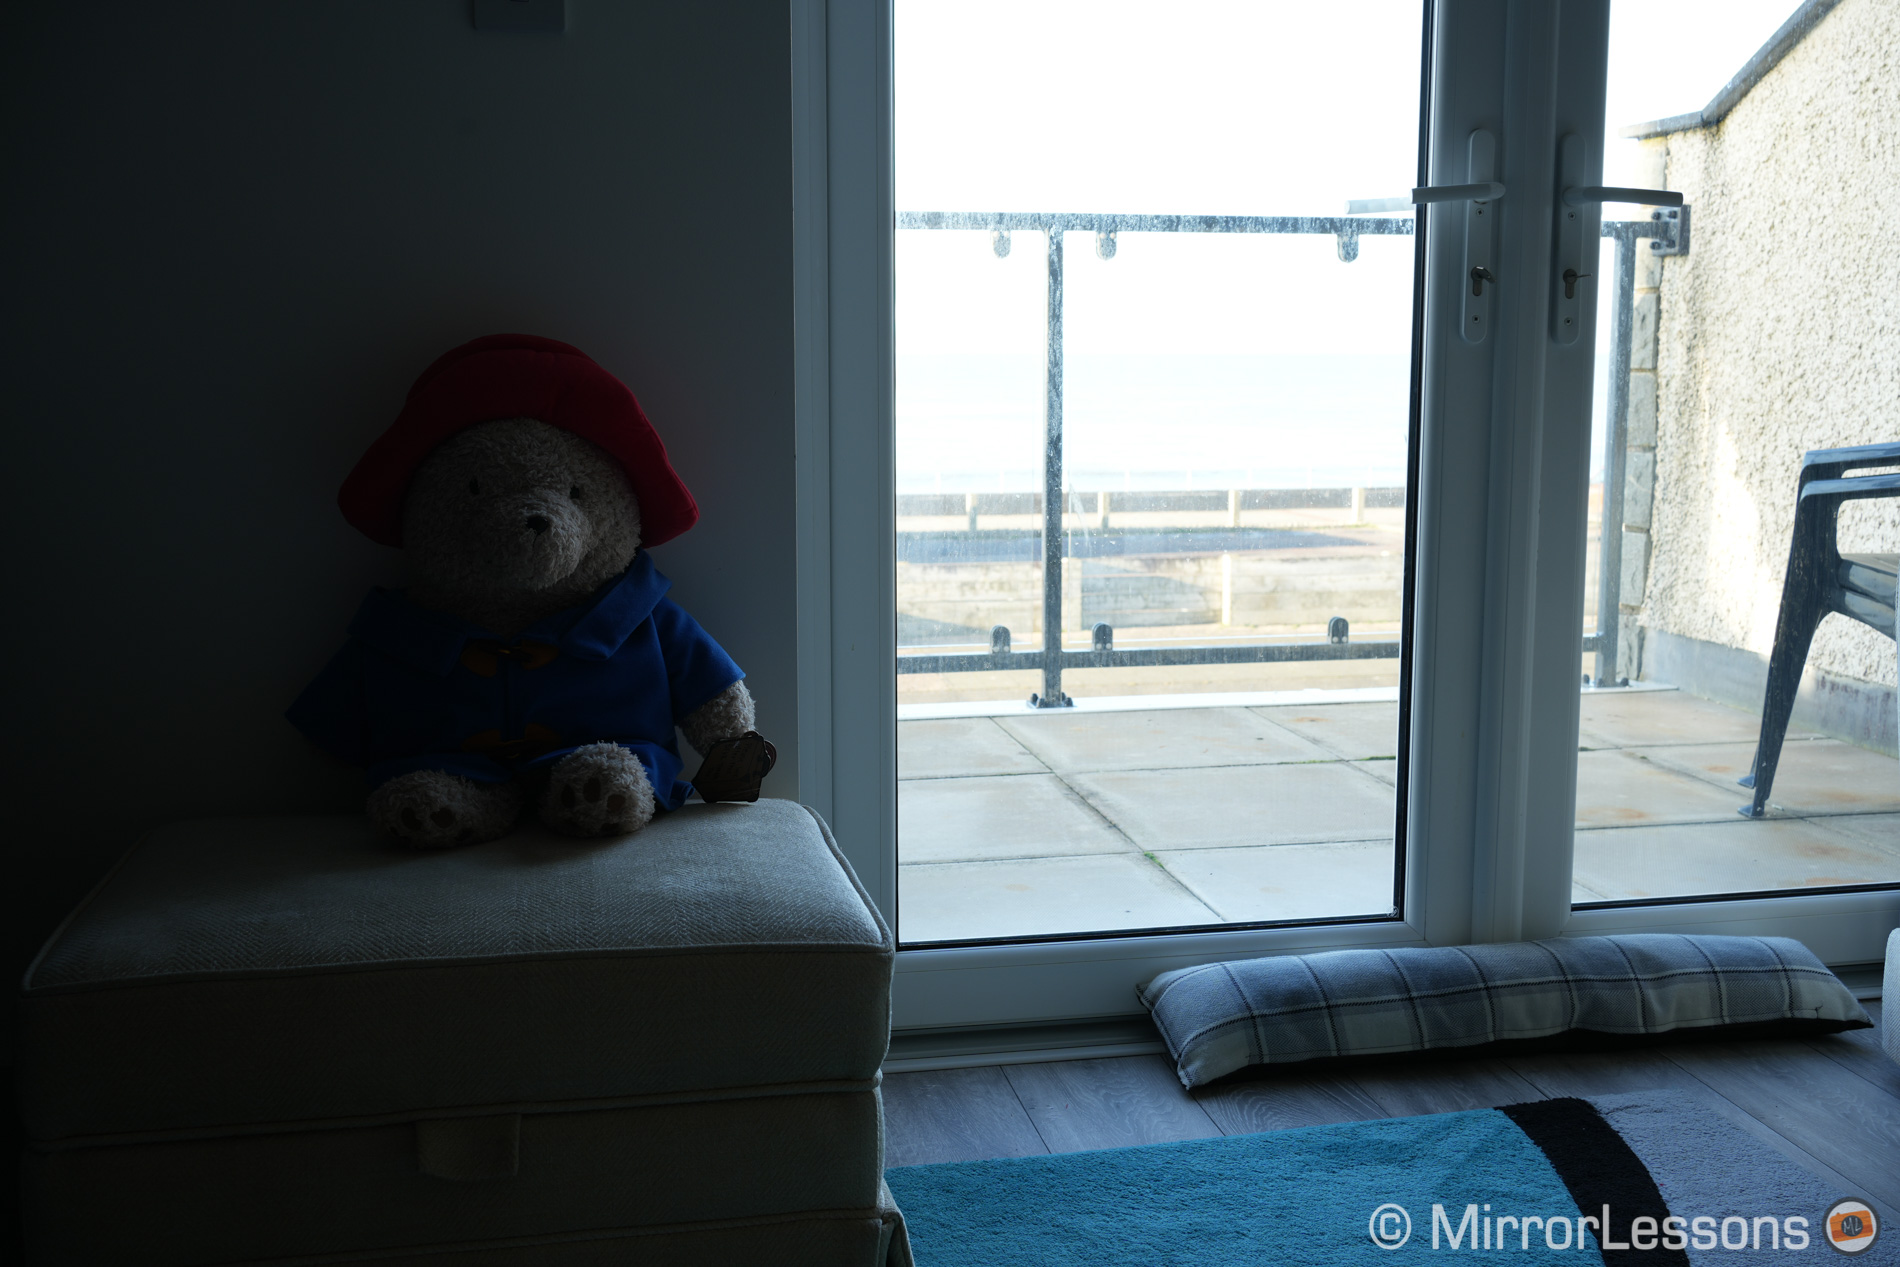
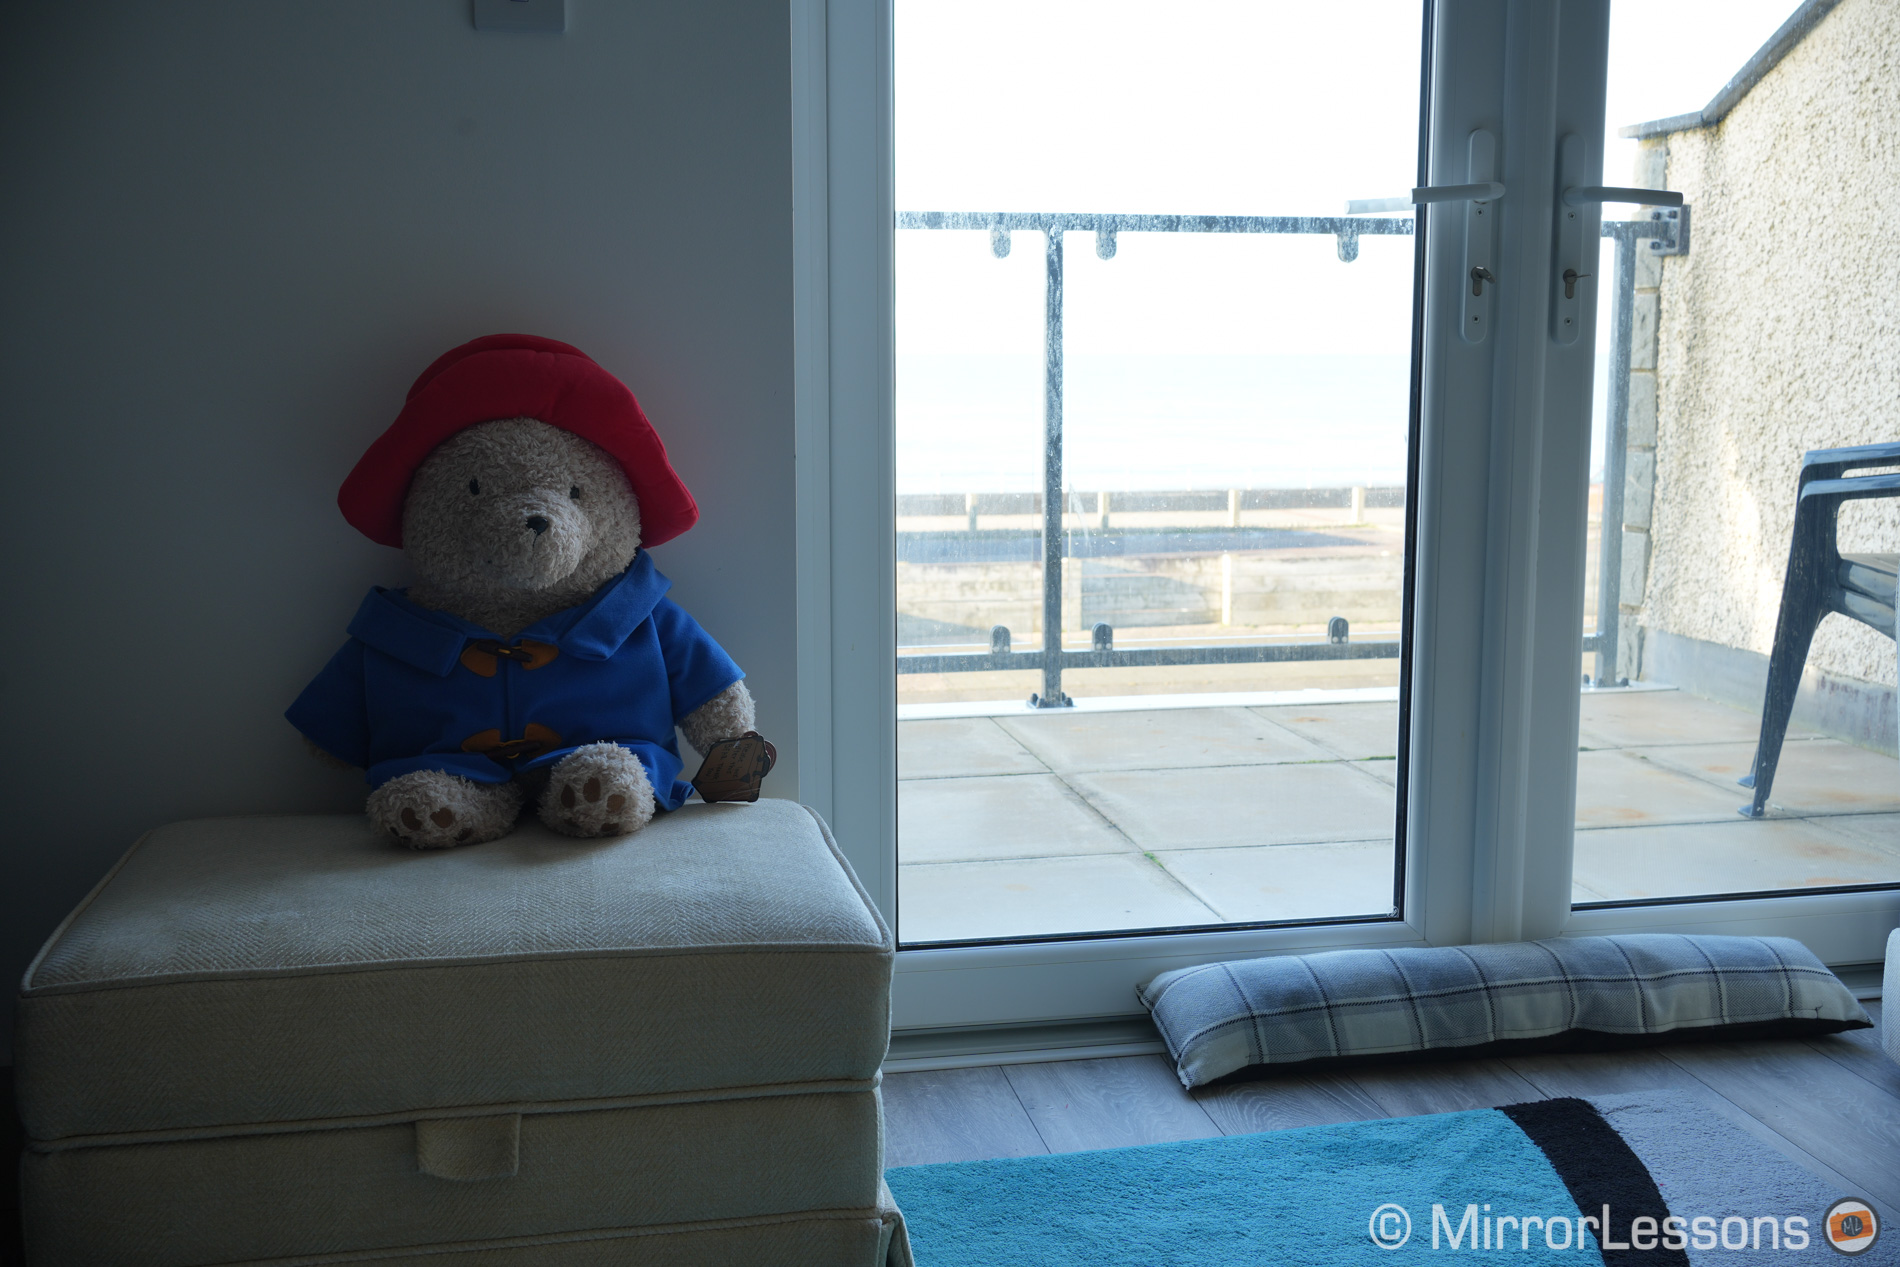
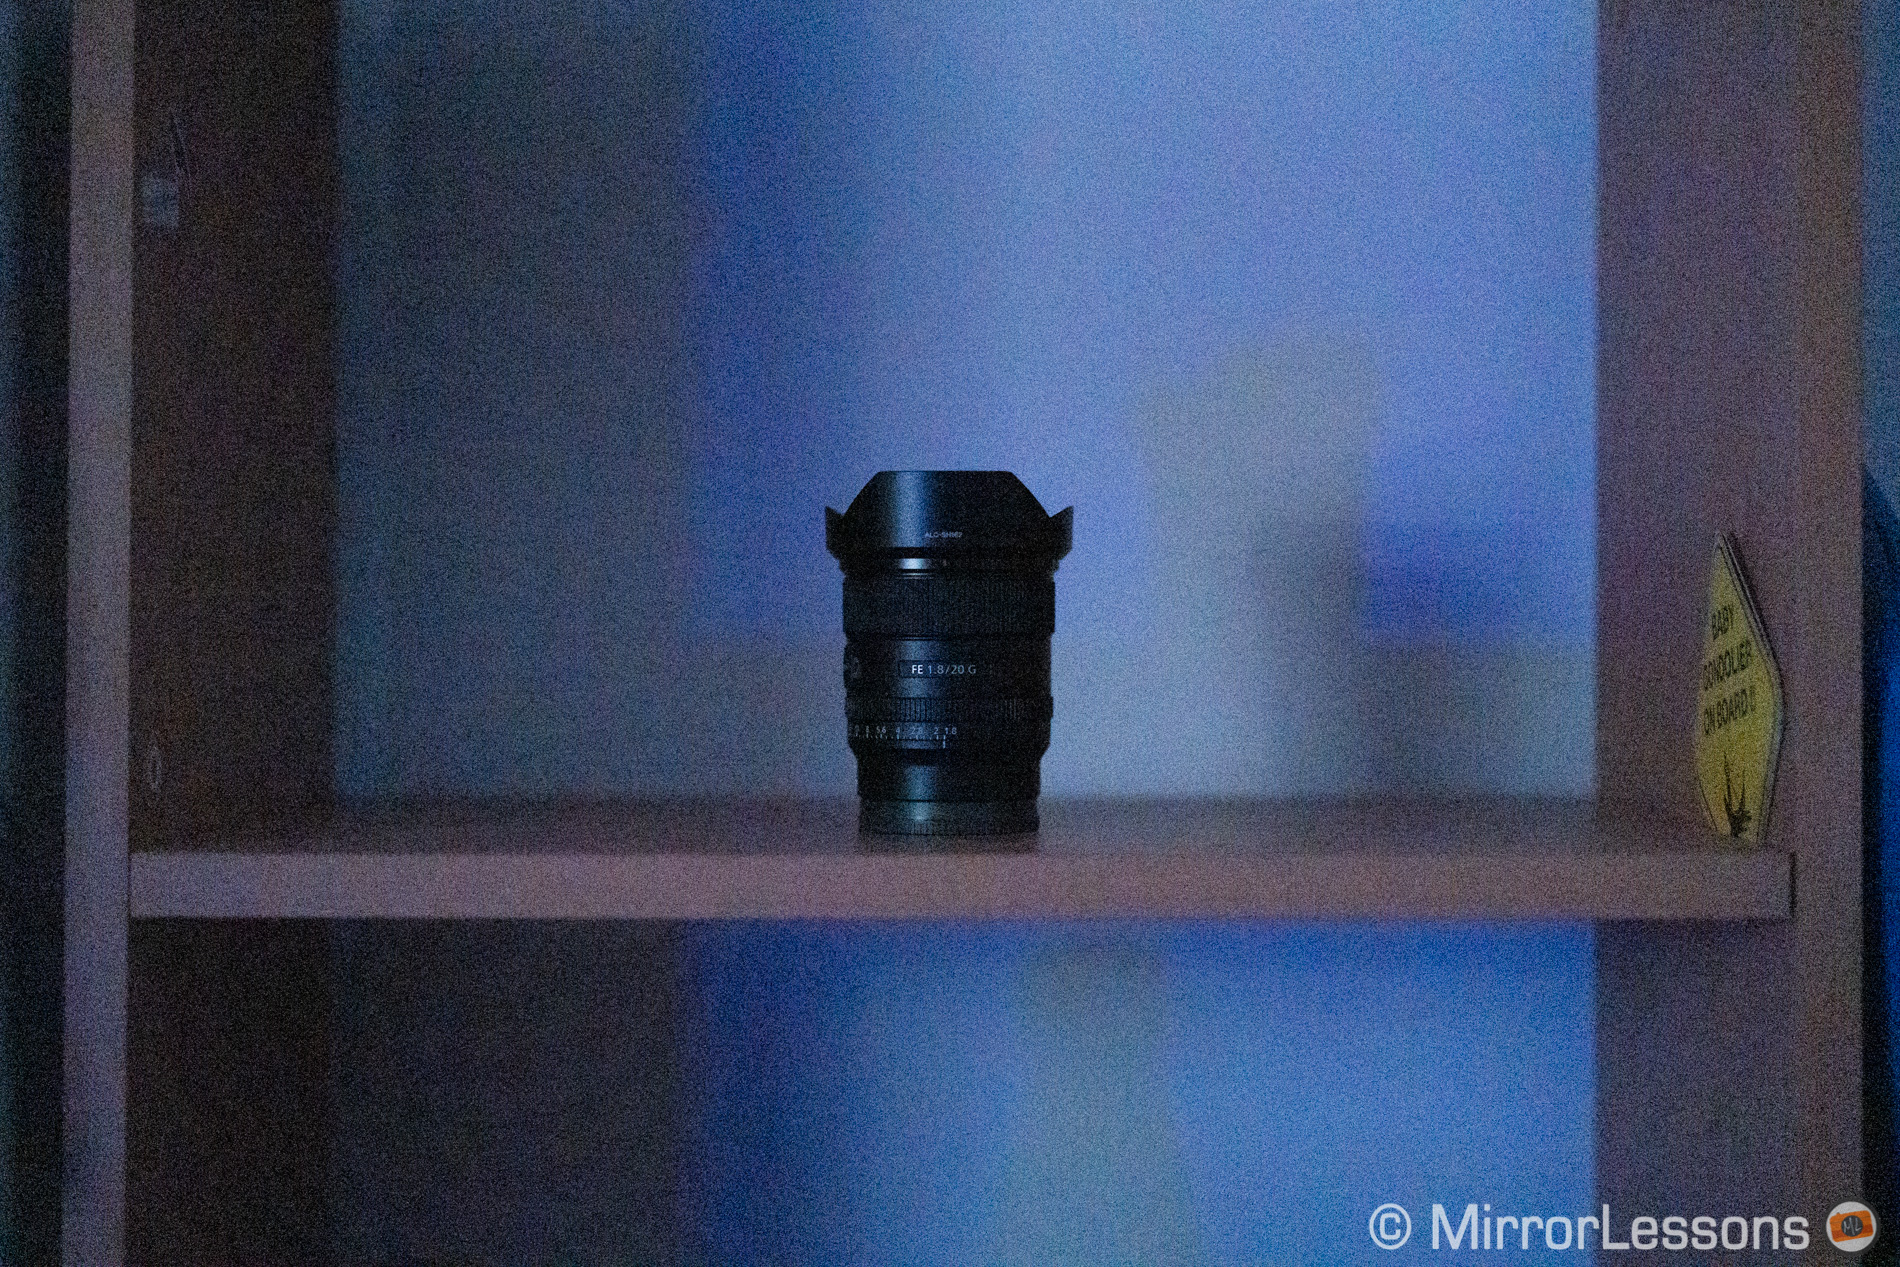
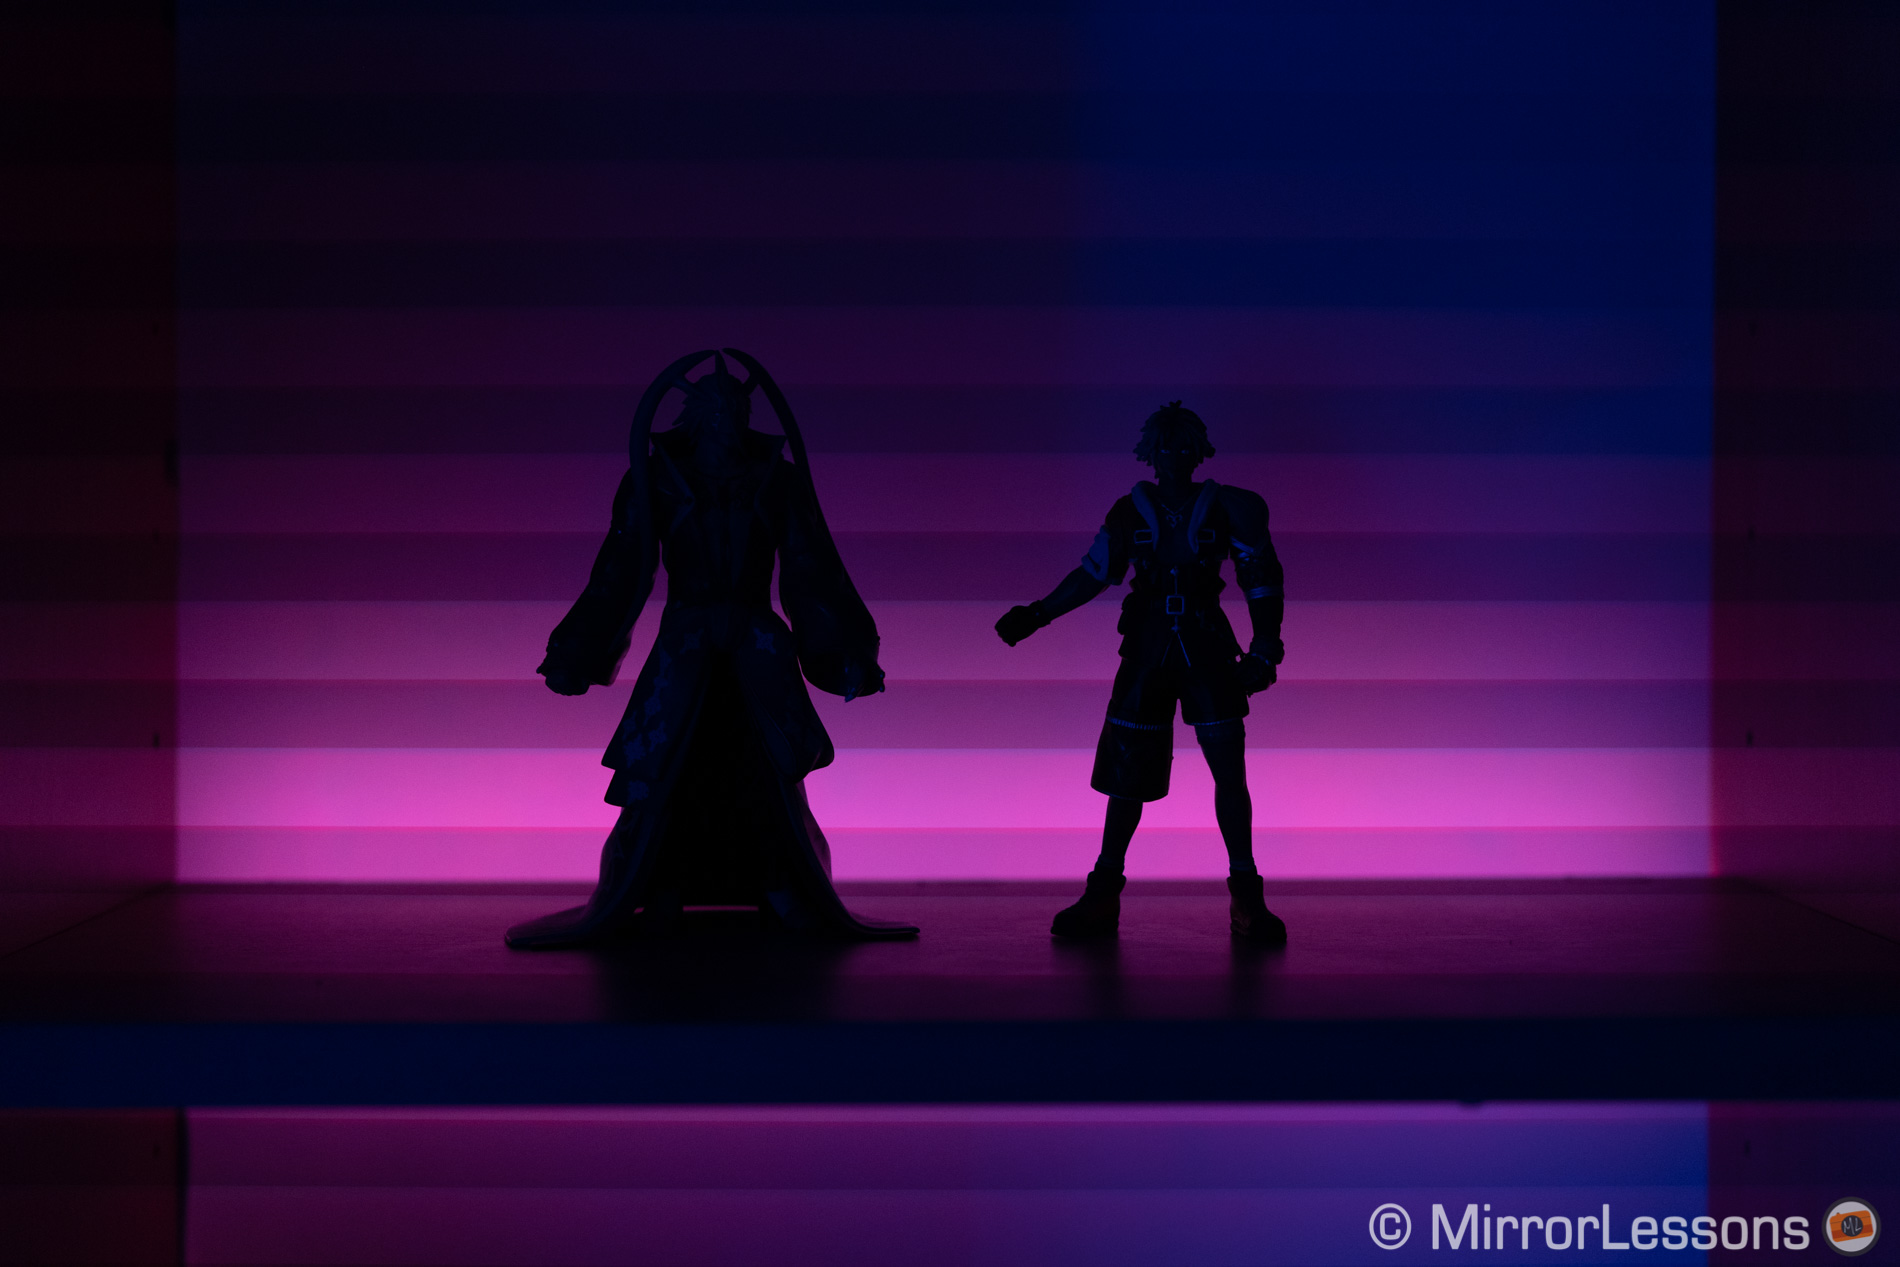
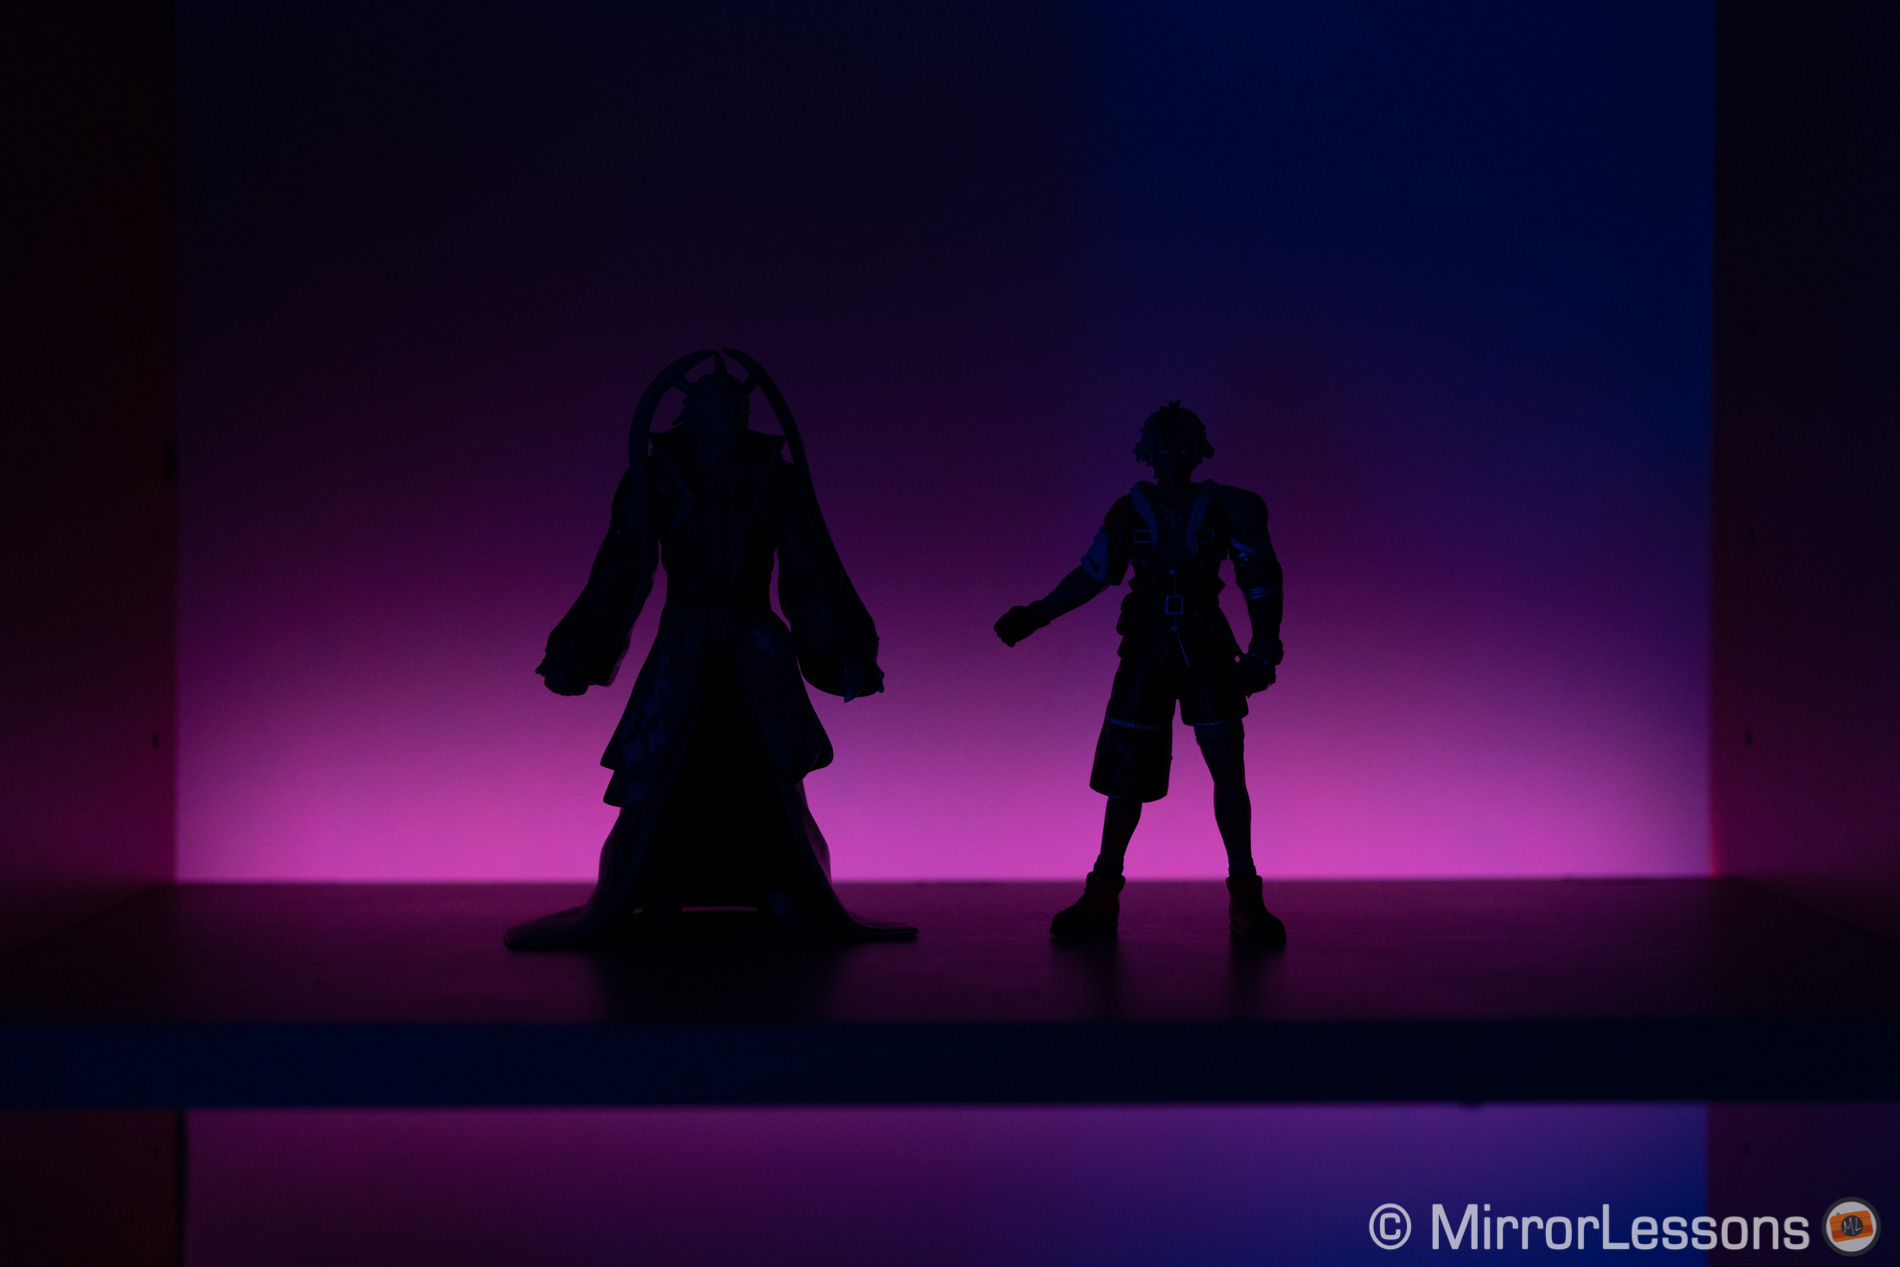
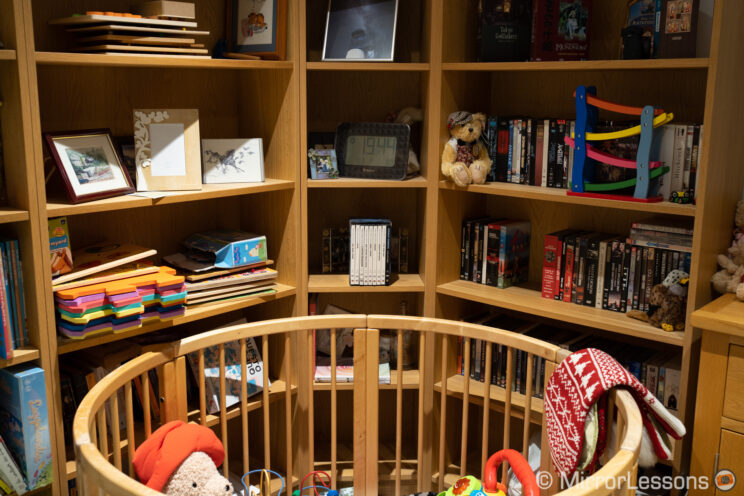
You can see an example below with the following two images. There is an inexpensive LED strip behind the shelf, and when I lower its brightness, flickering appears on the screen. The first shot is taken without the variable shutter and has visible banding. I tried different shutter speeds (normal 1/3 steps) and couldn’t get rid of the problem. The second image has no banding after adjusting the shutter speed precisely to 1/64.2s with the function enabled.
I didn’t find the chance to test this in a variety of situations, so I can’t confirm if it works every time. There might be moments where it is difficult to find the correct frequency of the light source and set the appropriate shutter speed. Sometimes, banding can be very thin and you’ll only see it if you zoom 100% on the image. My advice is always to take a few test shots when using the electronic shutter, if possible. If you find banding, the Variable Shutter function will increase your chance of getting rid of it.
Note that the Variable Shutter is different from the Anti-Flicker mode that you also find on the A7 III. Anti-Flicker only works for still photos (no video), and the mechanical shutter (no electronic mode). It is designed to adjust the continuous shooting speed to match the 100Hz or 120Hz frequencies. With the variable shutter, you can detect frequencies in between those values or even higher.
A final note about the electronic shutter on the the A7 IV is the extra setting to control silent shooting (such as the possibility of leaving it on or disabling additional functions of the camera that emit sound).
Buffer
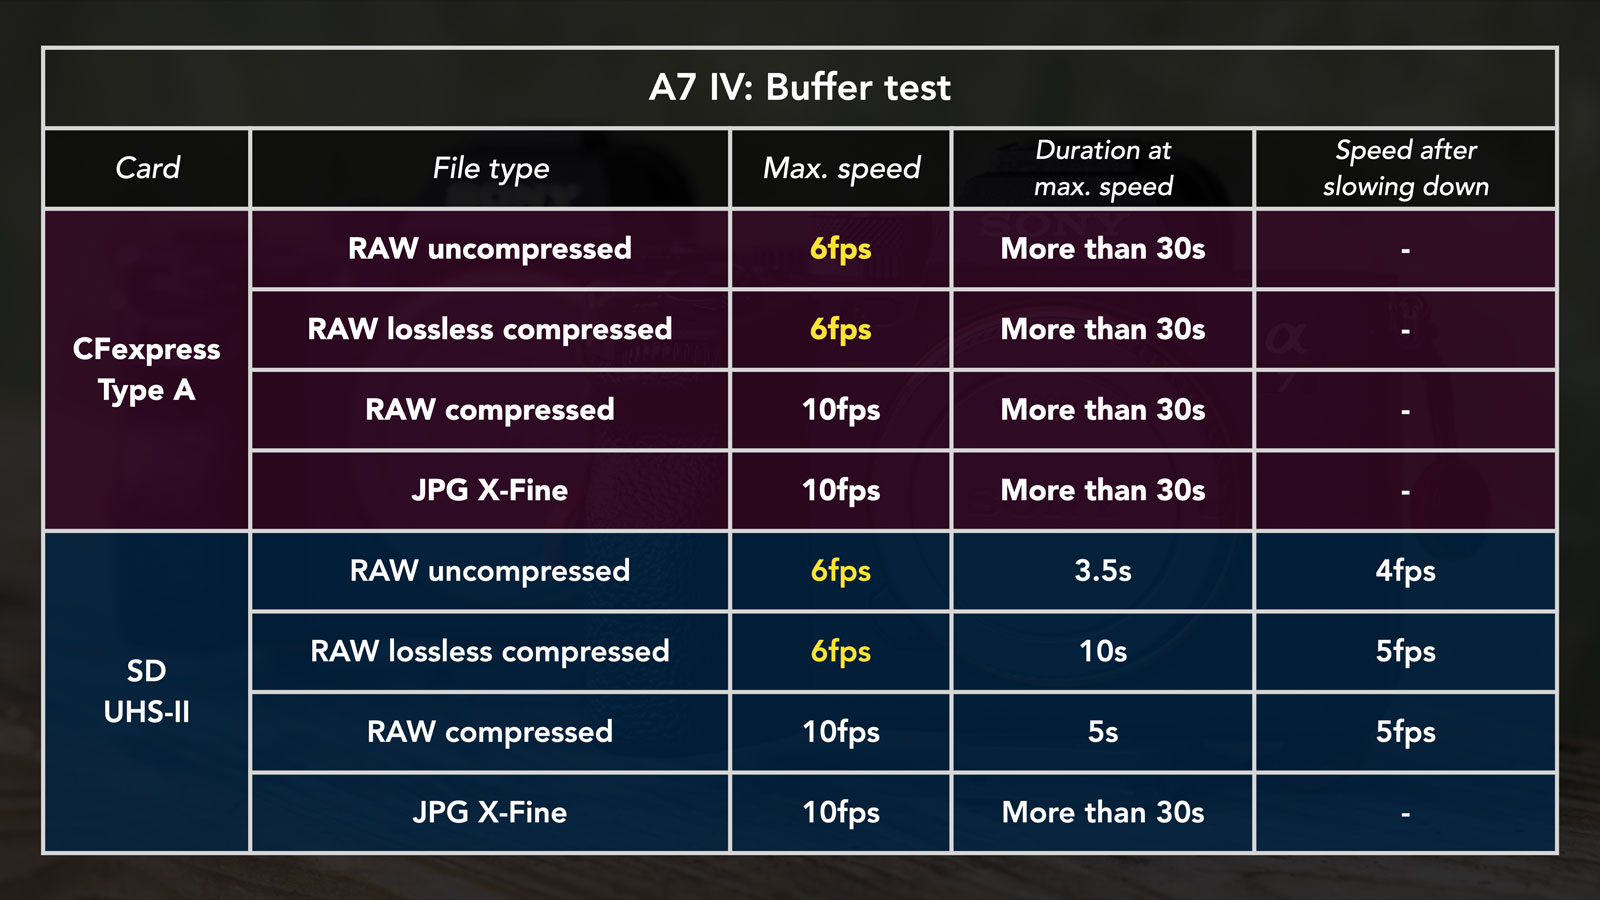
Sony states that the A7 IV has a large buffer that allows you to save more than 1,000 JPG, lossless compressed or compressed RAW, or more than 800 uncompressed RAW files. Small catch: this is valid when using a CFexpress card.
By comparison, the A7 III can do 182 JPGs, 89 compressed RAW or 40 uncompressed RAW images, using a UHS-II SD card.
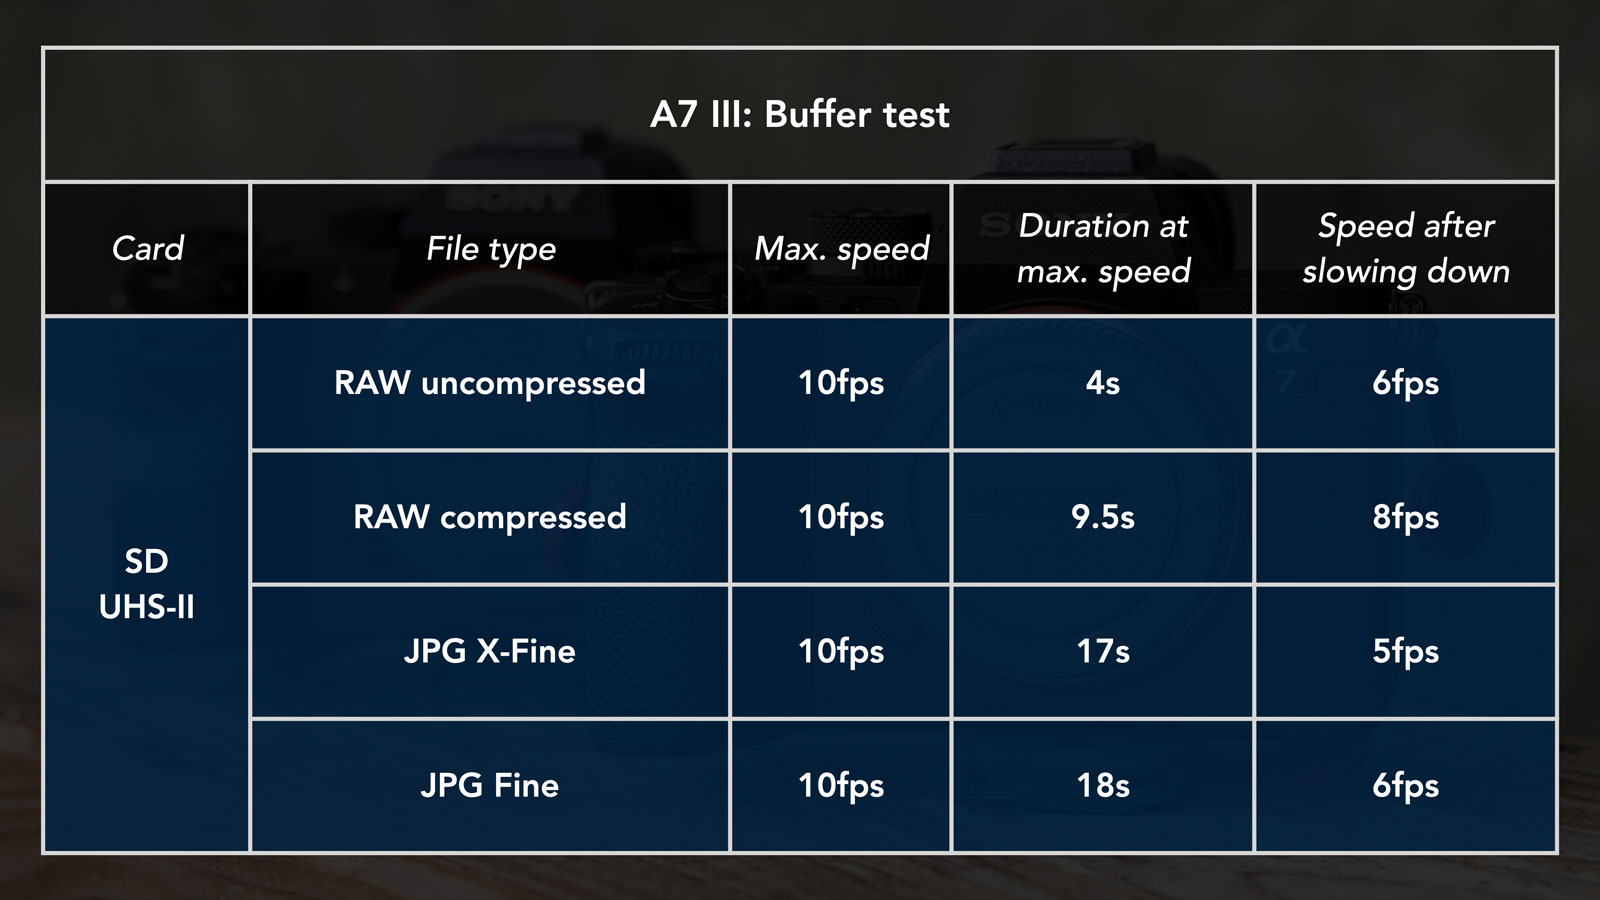
I tested an uninterrupted burst of 30s to see if and when the frame rate will slow down, and by how much. With the CFexpress card, the A7 IV maintained full speed for the whole time. Given Sony’s official figure, I guess I could have continued for another minute. With the SD card however, the mark IV model slowed down with all except the JPG file.
The A7 III struggles to go past 10s at full speed with RAW, and even with JPG the speed slows down after about 17 seconds. This results are close enough to the official figures.
4. Video Quality and Settings
There are a lot of interesting improvements on the new camera when it comes to video.
Part 2 of of our video review (which is all about the movie capabilities of these two cameras) is available to watch below. Keep reading for a written version of our feedback.
Frame Rate and Resolution
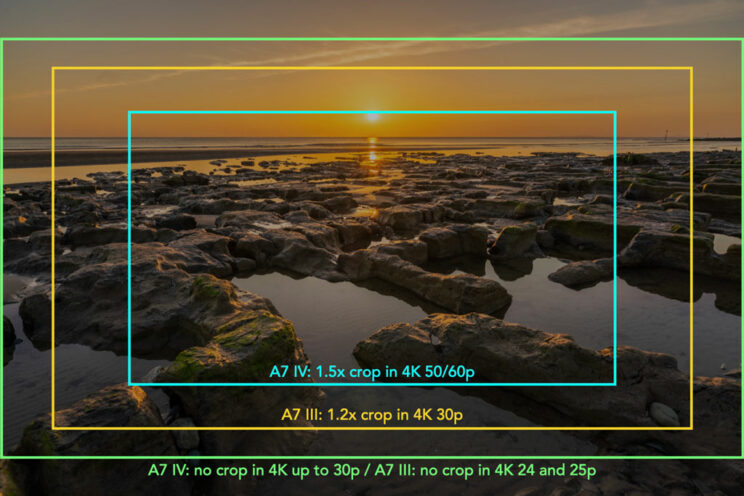
First, there is no longer a crop with the A7 IV when recording 4K up to 30p. The A7 III uses the entire width of the sensor at 24p and 25p, but applies a 1.2x crop when working at 30p.
What you won’t find on the A7 III is the possibility to record 4K at 50p and 60p. There is a catch however: to do so on the A7 IV, you have to work in Super35 mode (APS-C crop, which is 1.5x).

Both cameras record in full frame mode with full pixel readout and no pixel binning. Because the A7 IV has more sensor resolution, it over-samples from a 7K area versus 6K on the A7 III. In short, the mark IV model uses more pixels to create the 4K footage, which should result in a bit more sharpness and detail rendering in comparison to the mark 3 model (which is already very sharp in my opinion).
That said, after performing my tests (more than once), it is actually the A7 III that appears more sharp when using the default settings, and when increasing sharpness / detail in the Creative Style / Picture Profiles.
What I think Sony did was rewrite the processing and make the A7 IV footage a bit less sharp overall, perhaps to compensate for the increased resolution. You can increase sharpness in camera to the maximum without making it overly sharp, whereas with the A7 III, I wouldn’t go all the way up because it becomes unrealistic.
Alternatively, a small amount of sharpening in a video editing software is enough to give the A7 IV footage very crisp details without any artefacts. (0.8 on Final Cut Pro X was enough)
The same conclusion applies to the Super35 / APS-C crop, whereas in Full HD, the A7 III displays more aliasing than the A7 IV.
In Full HD, the A7 III and A7 IV maintain the same capabilities with a maximum of 120fps and the choice of recording with sound, or conforming the slow motion / fast motion result in camera (S&Q mode).
Colour Depth and Bitrate
The A7 III can only work in 8-bit (4:2:0 internal up to 100Mbps, 4:2:2 external).
The A7 IV inherits most of the capabilities found on the A7S III. This means:
- 10-bit 4:2:2 internal
- 10-bit 4:2:2 external (via HDMI and compatible recorder)
- XAVC HS codec option (H.265)
- All-Intra compression option (H.264) with a maximum of 600Mbps
The difference between 8-bit and 10-bit is not easy to detect at first, but if you have a scene with different shades of a specific colour (blue for example), the 10-bit version is likely to display a smoother transition between the brighter and darker areas, whereas the 8-bit version will produce rough cuts between each shade because it doesn’t have enough colour information. This is especially true after an intense colour grade in post.
Recording Limitation
The A7 III has the 30 minute / clip recording limitation, unlike the A7 IV. With the latter, Sony claims you can record more than 1 hour of uninterrupted 4K 60p footage in 10-bit 4:2:2.
In my tests (room temperature: 21˚C), I managed more than two hours without the overheating warning appearing on the display.

Profiles and ISO
Like for still photos, the Creative Look replaces the old Creative Style found on the A7 III. Because Look is designed for stills and video, it has more dynamic range and clips highlights less easily than the Style.
The A7 IV has a green tint dominance in comparison to the A7 III, but I find it less visible than for stills. The same conclusion goes for skin tones, which have more red / magenta on the mark III model.
The Soft Skin Effect is available for video too on the A7 IV. The Low setting is acceptable, but Medium and High are too aggressive for my tastes. You clearly see the effect and the face doesn’t look natural.
For those who want more advanced parameters, the Picture Profiles are available on both cameras and include S-Log2, S-Log3 and HLG curves. The A7 IV also gets the S-Cinetone gamma and colour mode. The latter is an interesting addition and provides a cinematic colour palette. The default setting lacks saturation but you can increase that while shooting or in post.
Both cameras deliver similar results when it comes to dynamic range with the HLG setting. When recording with S-Log2 and S-Log3, the A7 IV has slightly darker shadows, but also preserves highlights better.
When using the Log curve, the minimum ISO available is 800 on the A7 III. On the mark IV model, you can go down to 200 but anything below 800 is an extended range, so you lose dynamic range as a result.
Concerning the ISO performance, both cameras can go up to a maximum of 102,400. The A7 IV shows more noise, especially from ISO 12,800.
Rolling Shutter
Distortion created by the rolling shutter when moving with the cameras is similar in 4K and full frame mode: it becomes very visible when panning quickly. In 4K Super35 and in 1080p Full Frame mode, the undesirable effect is much more contained and the A7 IV performs a bit better overall.
The Variable Shutter function is available for video too on the A7 IV and helps to reduce flickering and banding.
Additional settings
Finally, there are additional settings designed for video that you won’t find on the A7 III, including:
- Breathing compensation: it reduces the small change in angle of view (breathing effect) caused when focusing from the foreground to the background, a common characteristic of photography lenses (the field of view is cropped a little as a result). Note that not all lenses are compatible. You can find the list on the Sony website. It works really well.
- Shockless WB: makes the changes in white balance slower during movie recording. There are four settings to control the level of smoothness: Off, 1 (fast), 2, 3 (slow). Note that this function is ineffective when WB is set to Auto, or when changing the kelvin values manually.
- Flexible Exposure Mode: when enabled in video mode, three custom keys (default are C2, C1 and C4) allow you to switch between auto and manual exposure for the three main settings (aperture, shutter speed and ISO), which is what you find on professional cinema cameras. This becomes an alternative to the classic PASM modes.
- Shot Mark: you can use a custom key to add markers to your video during recording or playback, and access them later in the video editing software (Sony Catalyst Browse and Prepare, they were not recognised in Final Cut Pro X).
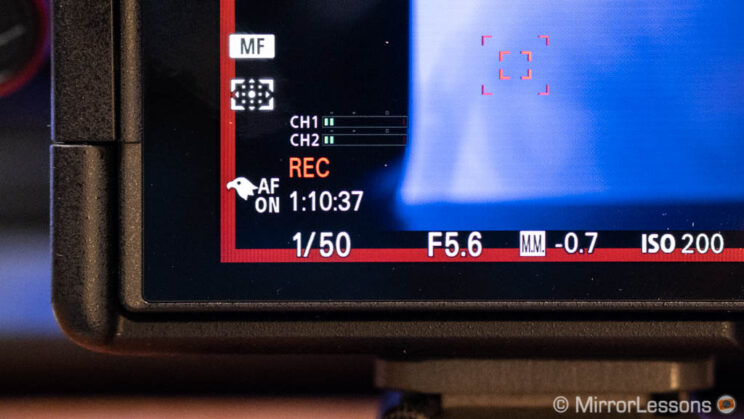
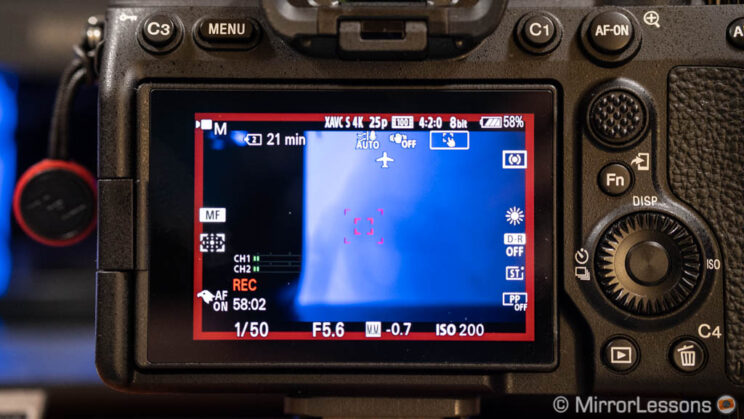
- Emphasized REC Display: enables a red frame on the screen to indicate the camera is recording.

5. Image stabilisation
Both cameras feature in-body image stabilisation (5-axis).
The A7 III has a rating of 5 stops of compensation, whereas the A7 IV has 5.5 stops (CIPA). On paper, this looks like a minor improvement. In reality, the new camera has an advantage when taking pictures hand-held between 1/4s and 1/15s.
Stabilisation For Still Photos
As usual, I took 10 pictures in a row at various shutter speed, using the same lens, to see which camera would give me the better keeper rate, and at which speed. The table below summarises my findings.

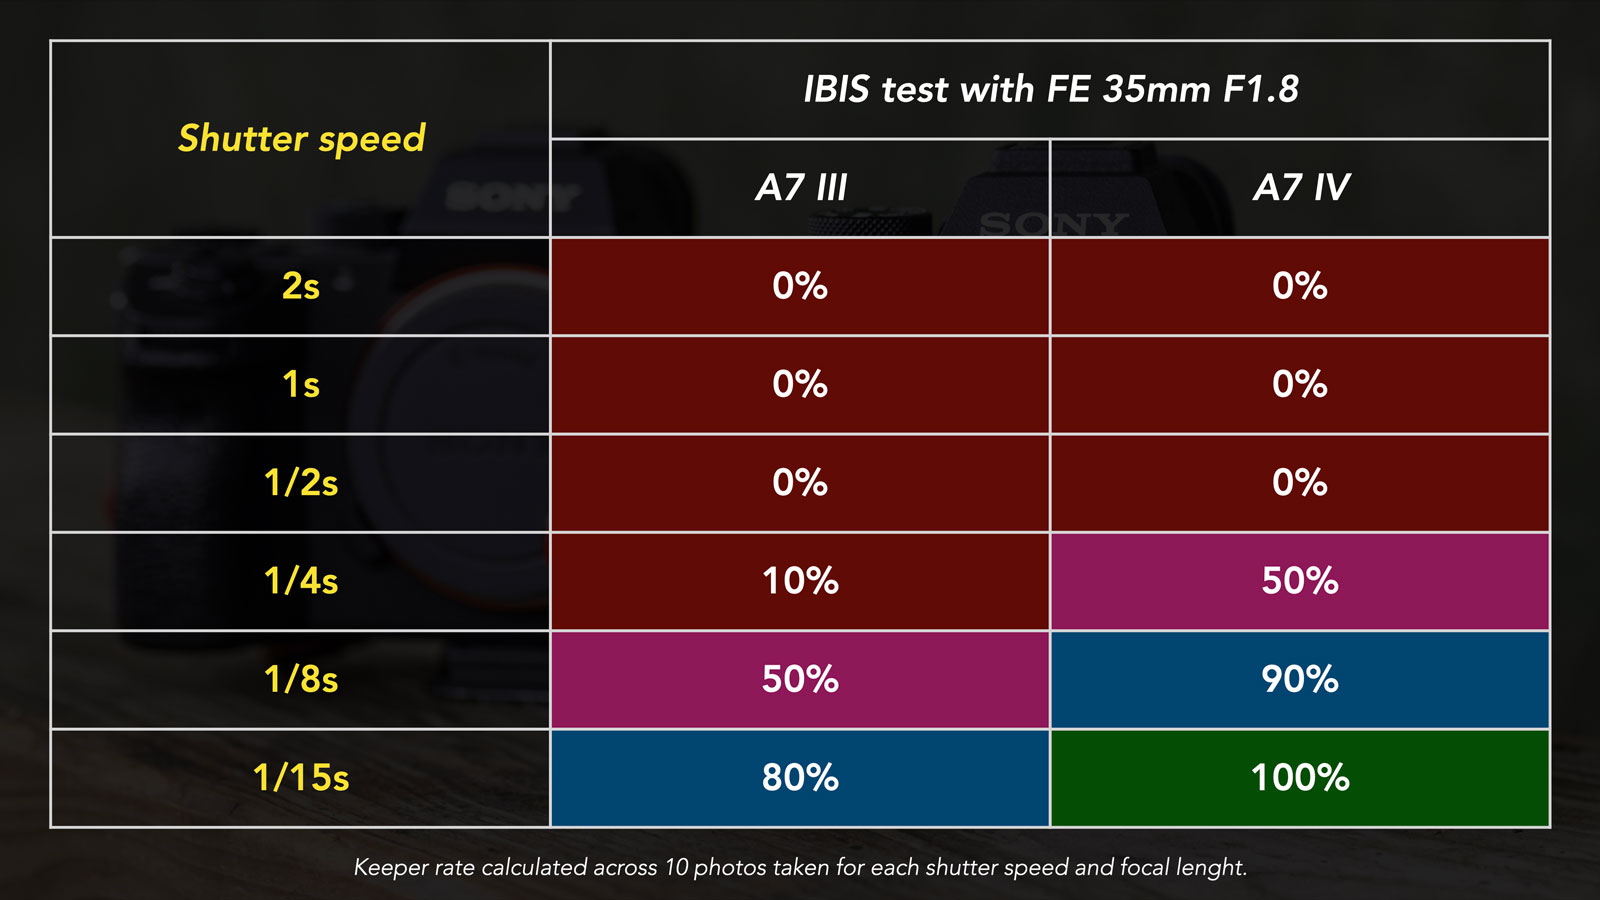
What is curious is that the A7 III keeper rate easily changes depending on the lens used. For example, with the 55mm F1.8, the performance is much closer to the mark IV model from 1/4s. This lack of consistency is something I have witnessed several times with many A7 cameras.
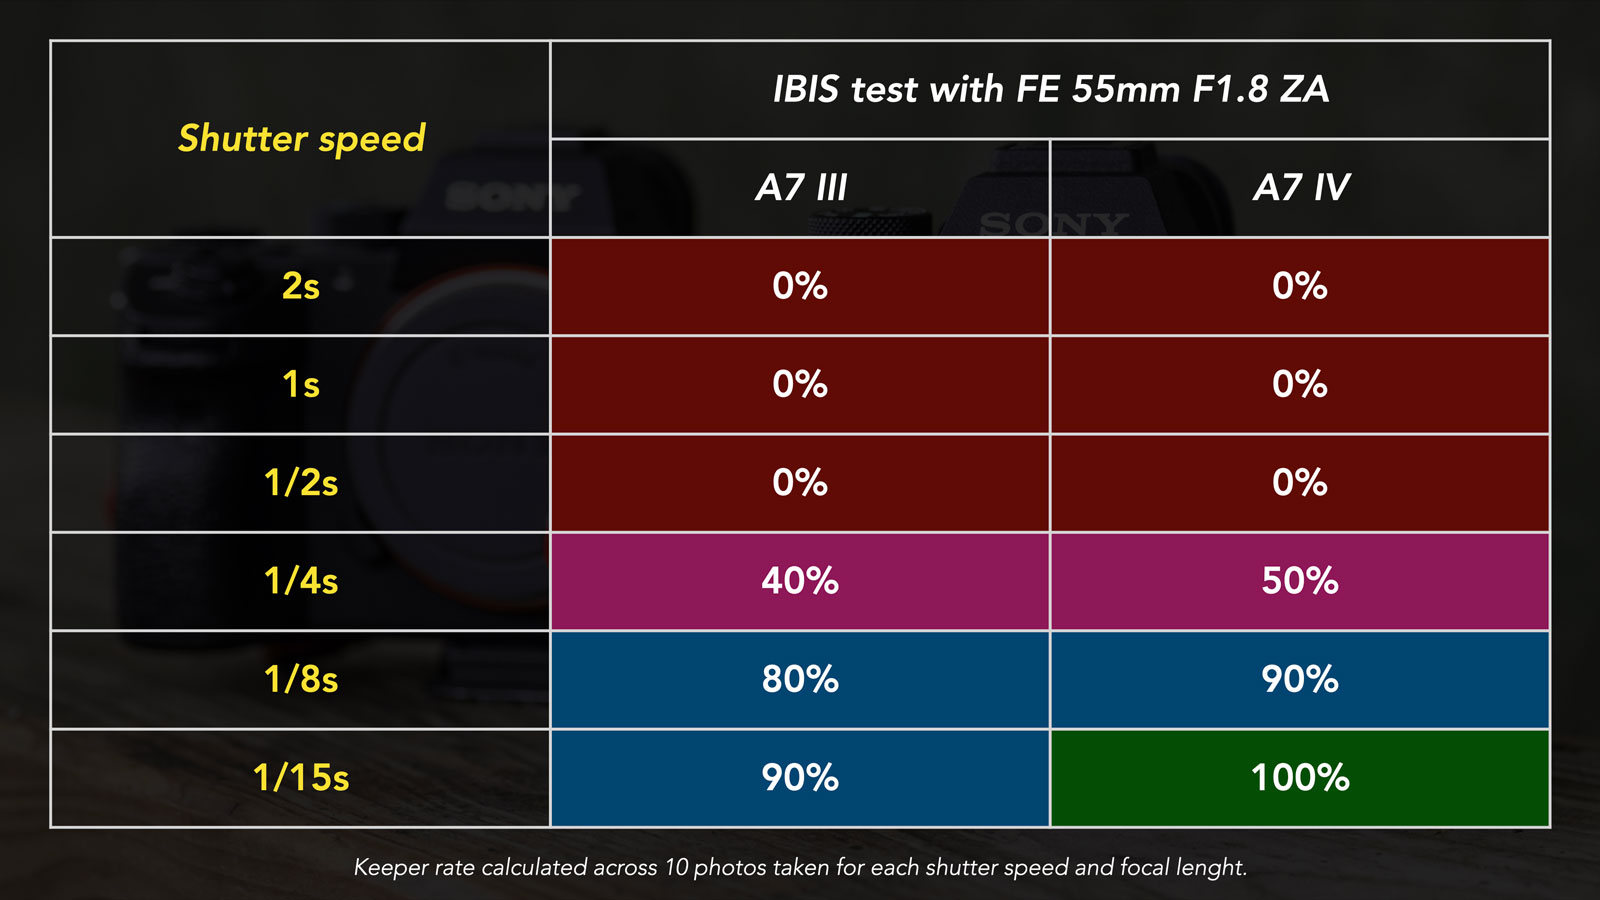
There are many more lenses I could have tried, most importantly one with optical stabilisation to see how the two systems work (3 axis are used on the sensor – roll, x, and y – and combined with pitch and yaw on the lens). Unfortunately I didn’t have any with me this time, but previous tests with the A7 III suggest that the lens’ OSS helps a little, and make shooting at half a second difficult but possible.
The bottom line remains what it has always been with Sony and IBIS. Stay above 1/10s for a good keeper rate. It’s not outstanding performance, but still better than nothing. But the fact remains that IBIS is one aspect of Sony full frame cameras that hasn’t really improved since the arrival of the A7 II in 2014.
Stabilisation for Video
The IBIS mechanism works for video too, and both cameras deliver similar performance overall. The footage is decently stable but fails to compensate for all your hand movements when recording a fixed shot with a short telephoto (85mm).
When walking, both cameras can’t cope with footsteps and panning movements. There is a lot of jerking and the result is unpleasant.
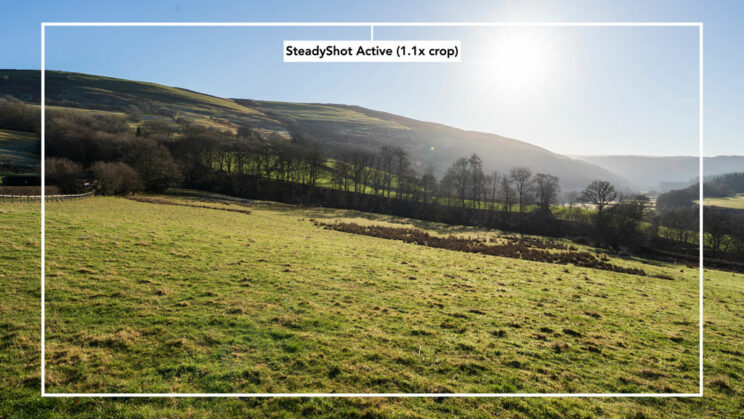
The A7 IV has two extra options. The first is the Active mode, which uses data from the camera’s gyro sensor to be more effective. It is intended to make the footage more stable, reducing the wobbling effect that is more relevant with wide angle lenses. The field of view is cropped slightly as a result (about 1.1x).

With a fixed shot, the performance improves in comparison to using IBIS only. When walking, you can appreciate the benefit of using the Active mode but it is not perfect with annoying jerks appearing every now and then.
The second possibility with the A7 IV is to leave IBIS off, and stabilise the footage in post using the Sony Catalyst software that can read data from the camera’s gyro sensor.
For fixed shots, Catalyst doesn’t make a big difference and in fact, I prefer the active mode, or the stabiliser function of a video editing software. For example, Final Cut Pro X has a tripod mode setting that works magic with this kind of image.
However, when walking with the camera, the benefits of using Catalyst become very apparent: it stabilises better than the in-camera Active mode and is the best result I got out of all the options available on the A7 IV. It also did a better job than FCPX with fewer warp artefacts.
One downside with Catalyst is that you lose a bit of sharpness on the image, something that doesn’t happen with the Active mode on the camera, or when stabilising in Final Cut.
Examples can be found in my video review embedded in Chapter 4.
6. Design and ease of use
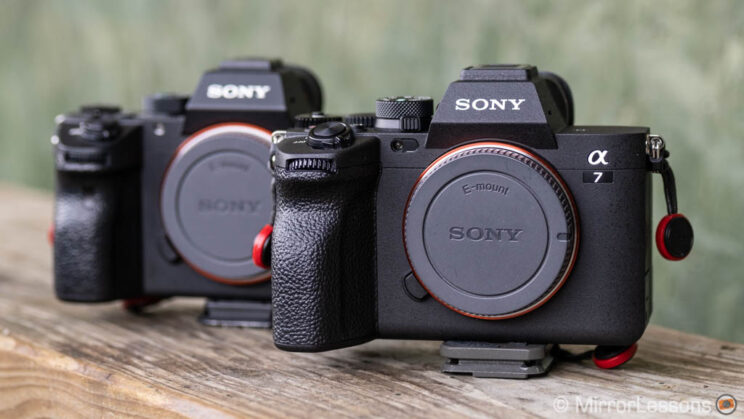
The A7 IV has the same design upgrade seen on the A7S III, which is very similar to the A9 II and A7R IV. It’s the fourth generation and my favourite so far.
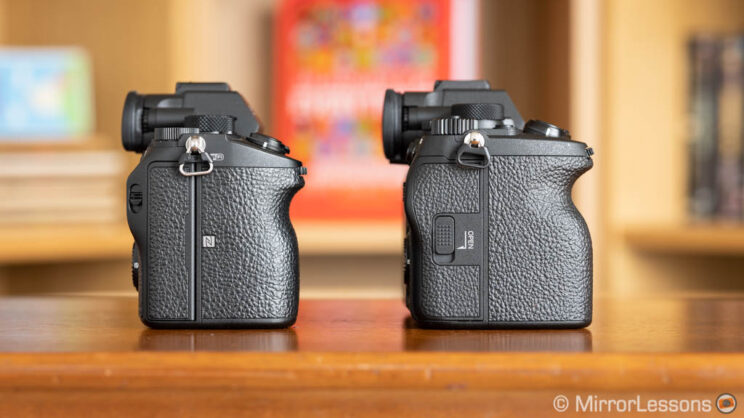
Size and Grip
The A7 IV is a bit larger in comparison to the A7 III, and is a bit thicker because it features a heat dissipation structure (the same as the A7S III), which allows it to record 4K video for long periods of time without overheating.
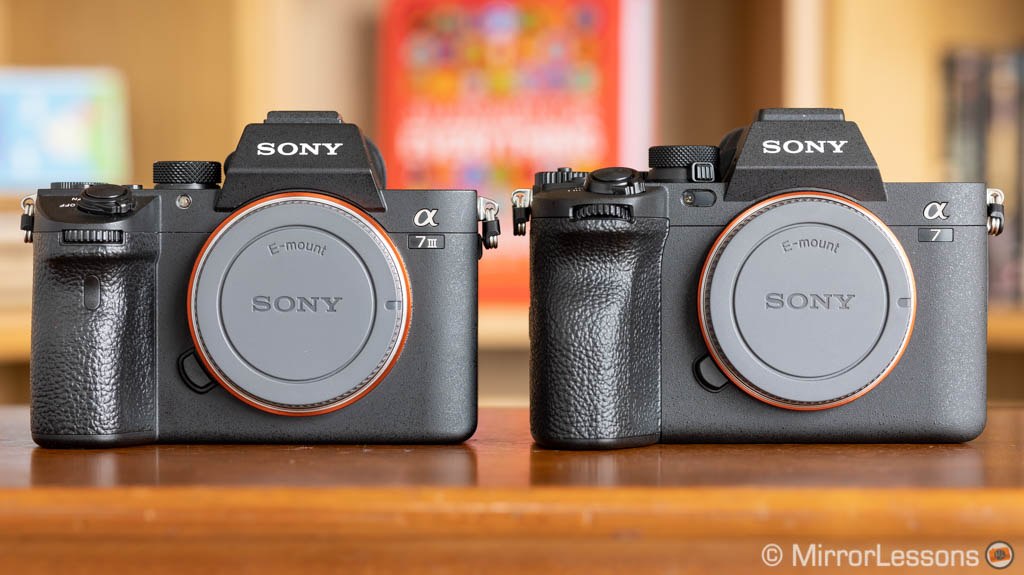

Both the A7 III and A7 IV are dust and moisture resistant and their weight is almost identical:
- A7 III: 126.9 x 95.6 x 73.7mm, 650g
- A7 IV: 131.3 x 96.4 x 79.8 mm, 658g
The new camera has a larger and taller front grip that allows your fingers to rest more comfortably. The indentation is more pronounced and makes the grip more firm. I find it easier to use the camera with heavy lenses like the FE 200-600mm G, where my hands get less tired than using the same lens on the mark III model. It’s not a perfect grip, but I welcome the improvement nonetheless.

Button and Dials
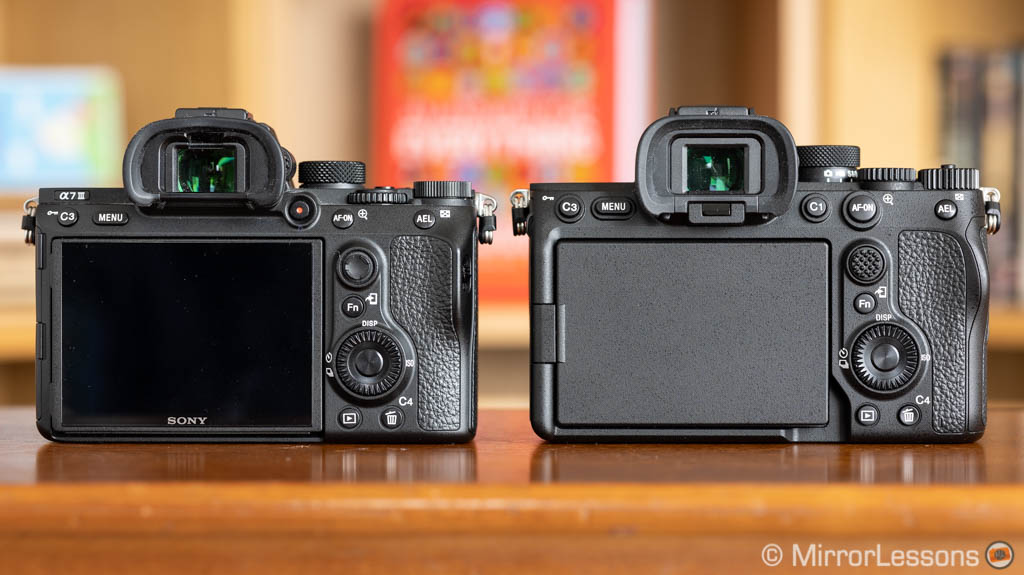
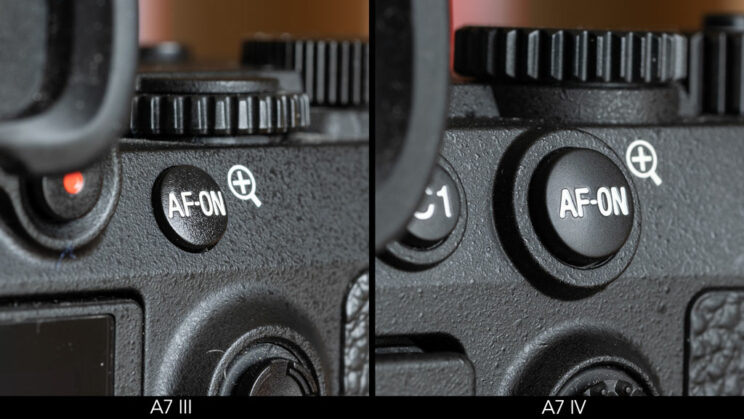
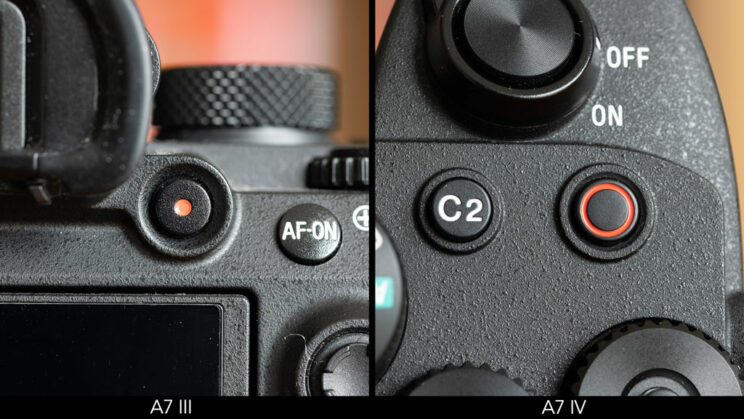
The various buttons provide better tactile feedback on the A7 IV thanks to the added thickness, and some of them like AF-ON are larger, making it easy to recognise by touch while composing with the viewfinder.

The video recording button is positioned on top of the A7 IV, as opposed to the rear near the EVF, on the A7 III. However both buttons are customisable so you can change which one triggers movie recording.

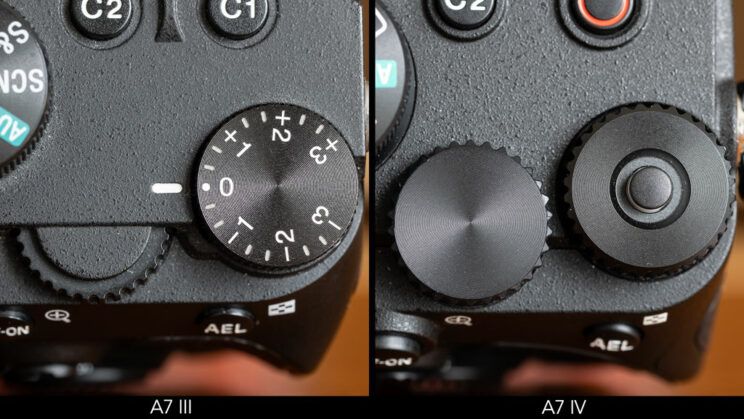
The various dials as well the rear command wheel are more pleasant to turn and a bit more precise on the new model. The rear dial is positioned outside of the main frame which means there is more surface to grab onto.
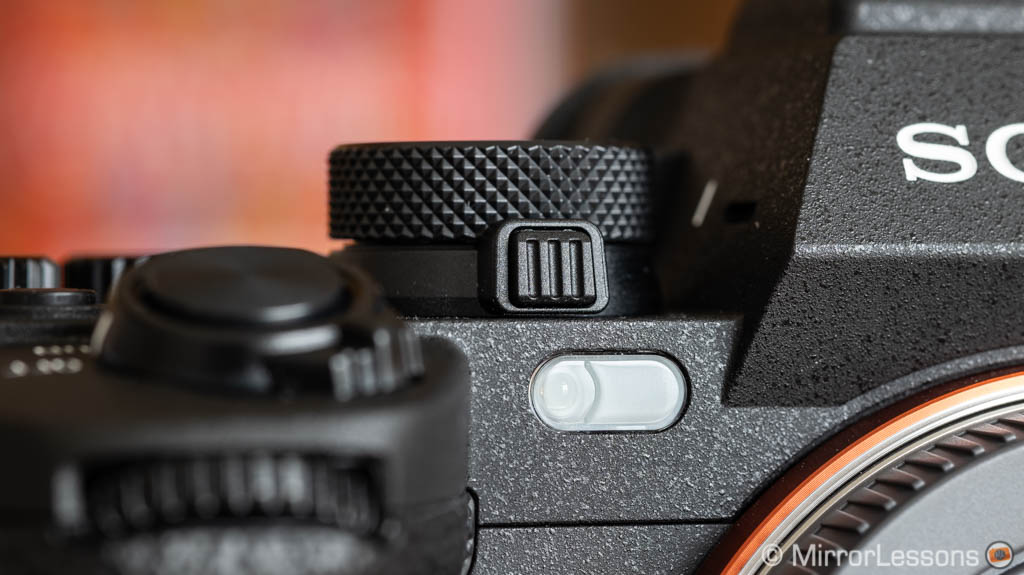
For the first time on an A7 camera, the exposure compensation dial can be customised, and it comes with a lock button to prevent unwanted changes while working. These two characteristics are absent from the A7 III, which has a normal exposure compensation dial with white markings on top.

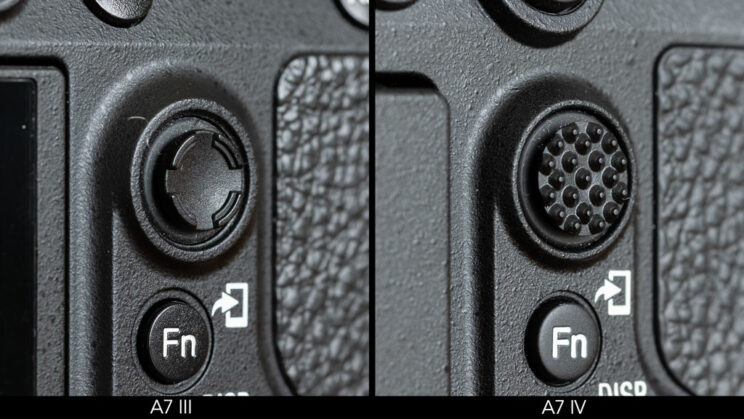
Both cameras feature an AF Joystick. The one on the A7 IV has a different texture and loses the concave shape, which I find more pleasant to use. Reactivity and precision are more or less the same.

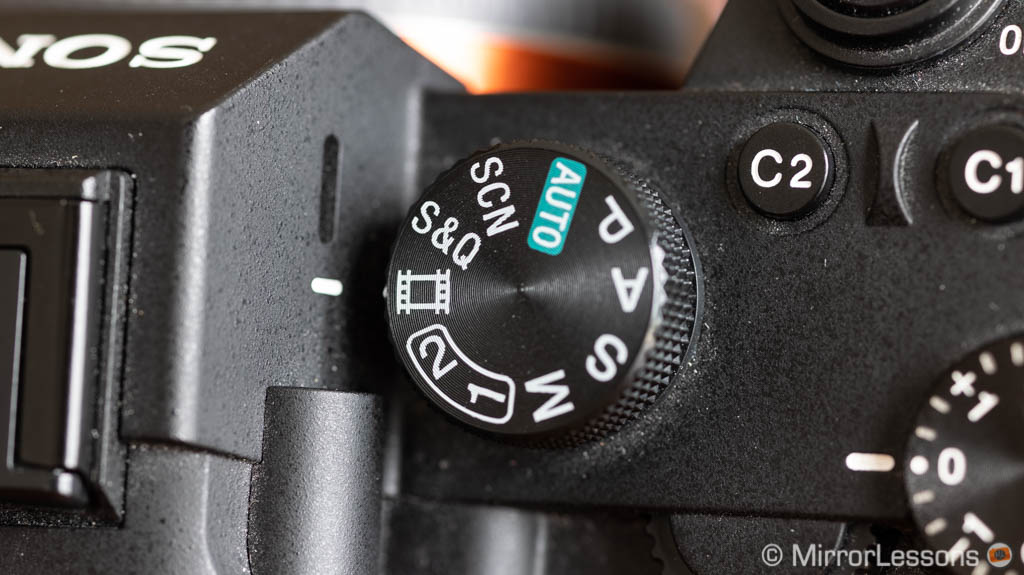
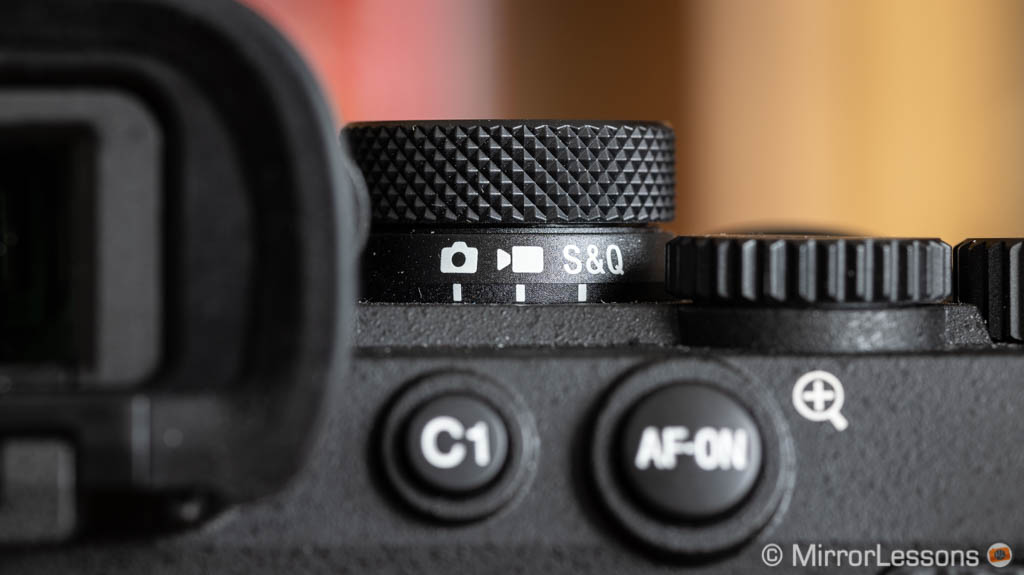
Another addition on the new camera is a secondary dial found underneath the main P/S/A/M dial, which allows you to switch between photo and video mode.
On the A7 III, all the shooting modes, including video, are found on the top dial so if for example, you want to record video in Aperture priority mode (A), you have to first set the main dial to video, then go in the menu (or Fn menu) to choose the A exposure mode.
On the A7 IV, you can switch from photo to video (or S&Q) with the secondary dial, and choose any of the PSAM modes with the main dial, rather than digging in the menu. It is a quicker and more straightforward solution. The secondary switch includes an unlock button.
Menu and Customisation
Both cameras have 12 custom buttons that can be configured independently for stills and video. You will also find the memory recall options. (The new model has three on the main dial versus 2 on the A7 III)
The A7 IV has a few extra options when it comes to customisation:
- you can configure the dials separately between manual mode and the other shooting modes
- you can change the function of a dial temporarily with the help of My Dial Settings and a custom key
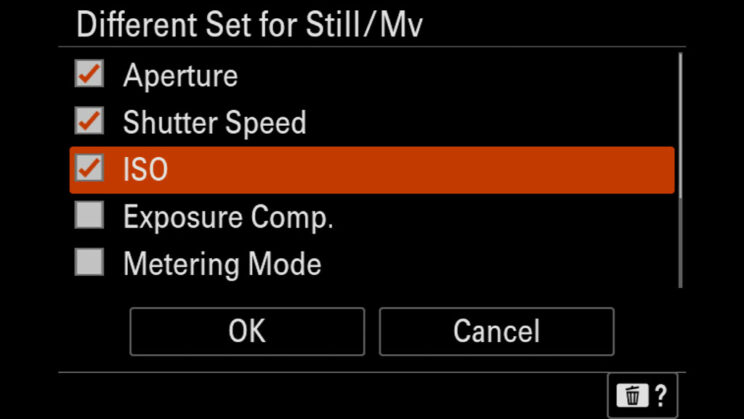
Another thing on the A7 IV is that you can change basic settings independently when you are in photo or video mode. This means, for example, that if you change the setting from F2.8 to F5.6 in video mode, the same change won’t appear when you go back to still mode (where it will still be 2.8). This possibility can be applied to aperture, shutter speed, ISO, exposure compensation, metering, White Balance, Picture Profiles and Focus mode.

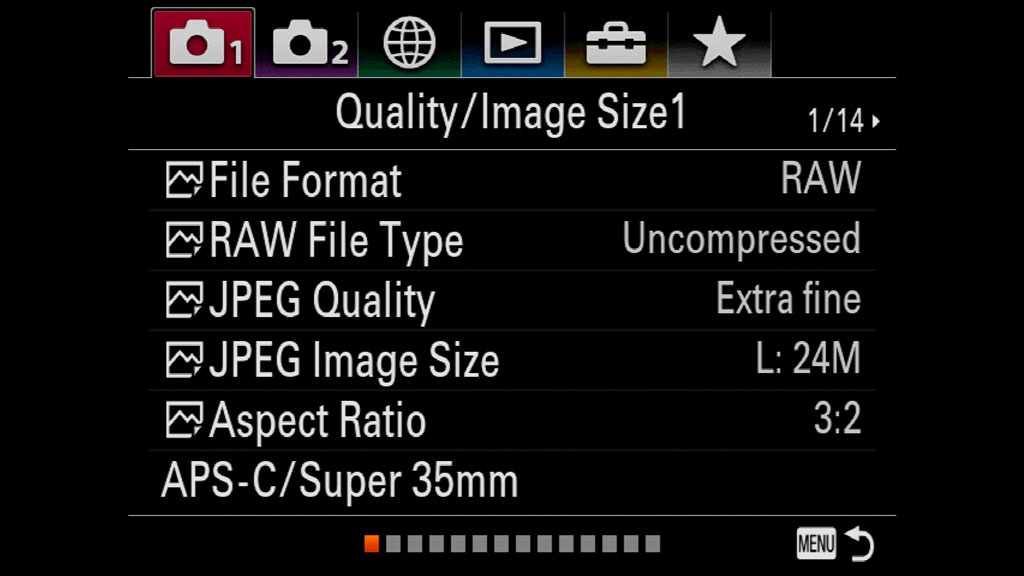
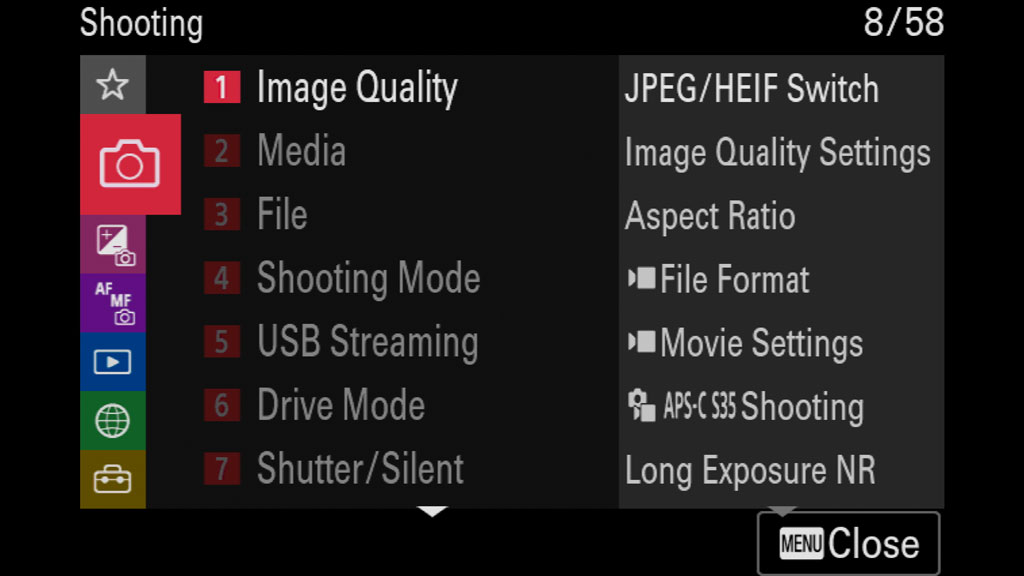
The A7 IV inherits the latest menu design, which is much better organised than the old menu found on the A7 III, and is compatible with the touch screen. The settings and functions in the menu change accordingly when you go from photo to video mode, and vice versa. The Fn menu can be configured separately for video. Both cameras have the My Menu option, but the A7 IV offers an extra page (6 instead of 5) meaning you can save more settings.
Interface and Battery
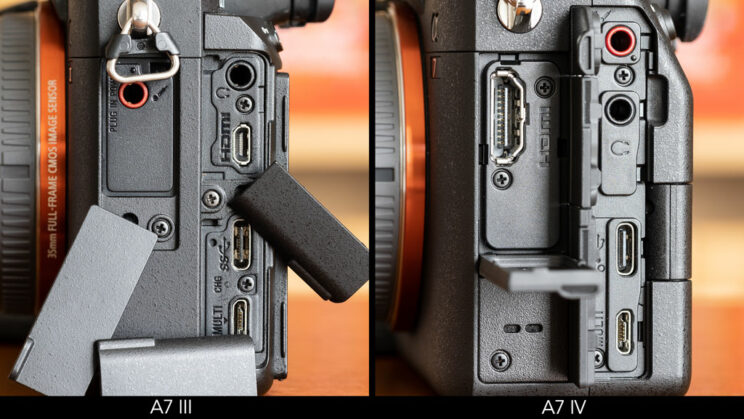
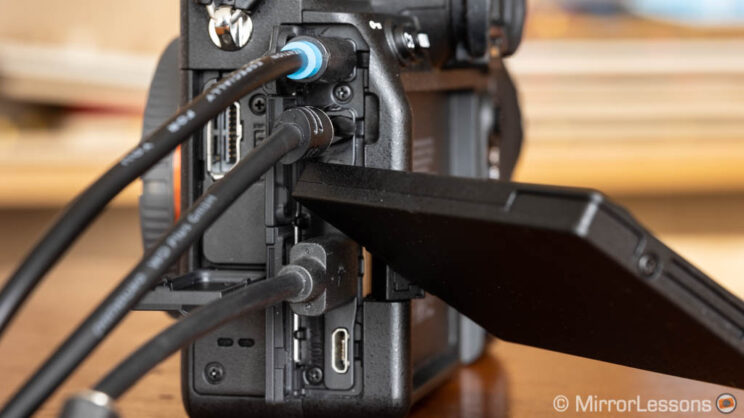
The A7 IV is compatible with the digital audio interface (via the multi-function shoe) which allows recording at 24-bit with 4 channels when using compatible microphones. It also has a full sized HDMI port (vs Micro size on the A7 III).
Both products have a 3.5mm microphone input, 3.5mm headphone output and a USB C port. Concerning the latter, the one on the mark 4 model is 3.2 Gen2 and works at 10Gbps (versus 5Gbps on the mark 3). Also, the A7 IV can work with a wired LAN connection if you buy an optional LAN to USB C adapter.

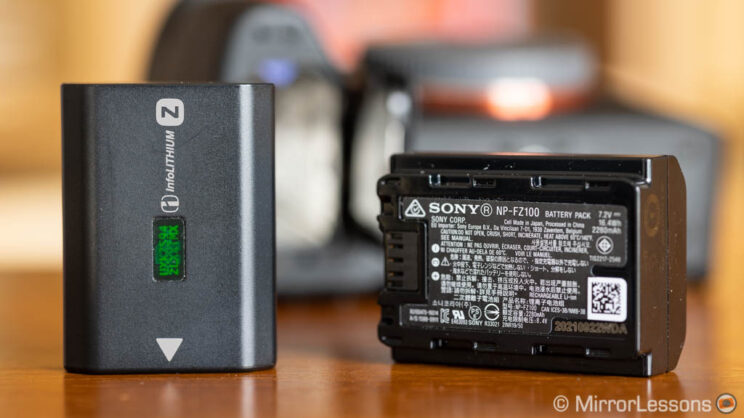
Finally, the battery is the same for the two cameras (NP-FZ100) but the A7 III retains a better rating (CIPA): 710 frames versus 610 on the mark IV model (when using the LCD screen). Both cameras accept USB charging and power delivery.
In my experience, the battery on the A7 IV drains 10-15% more quickly than the A7 III.
For video, I can record a total of 130 minutes of 4K footage with a single charge on the A7 III, whereas the A7 IV battery died after 115 minutes.

7. Viewfinder and LCD screen
The resolution of the electronic viewfinder goes up to 3.69M dots on the new camera, which is a good step forward from the 2.36M panel found in the A7 III, but is not impressive either now that several products offer 5M or even 9M dot EVFs.
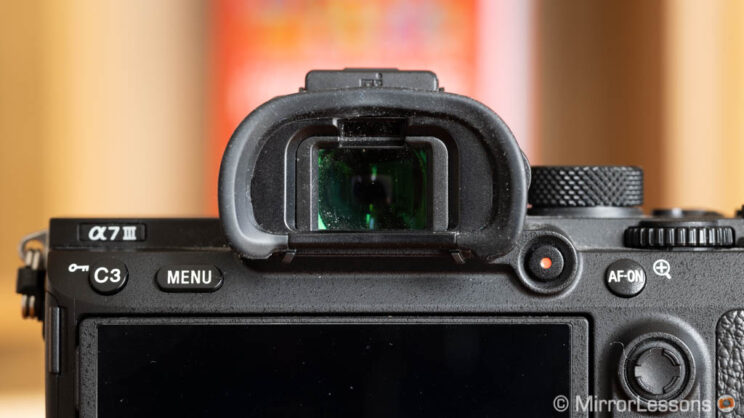

The size of the OLED panel remains the same (0.5-in), and so does the magnification (0.78x) and the eye-point length (23mm). On the A7 IV however, you can boost the refresh rate to 120Hz, whereas on the older camera it doesn’t go beyond 60Hz.

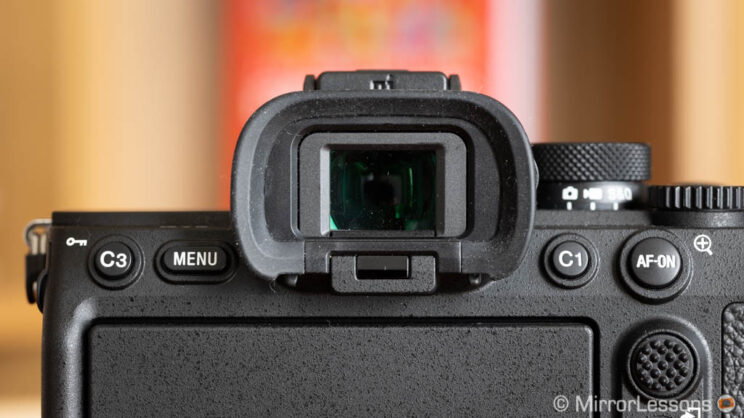
Overall, I find the viewfinder on the A7 IV a good upgrade, the extra resolution and frame rate are welcome and the eye-point is long enough to compose with ease while wearing glasses.
The A7 III has a LCD screen that can tilt up and down, whereas the A7 IV has a vari-angle mechanism that allows you to flip it to the side and rotate it 180˚. The resolution hasn’t changed much however (0.92M and 1.04M dots respectively).
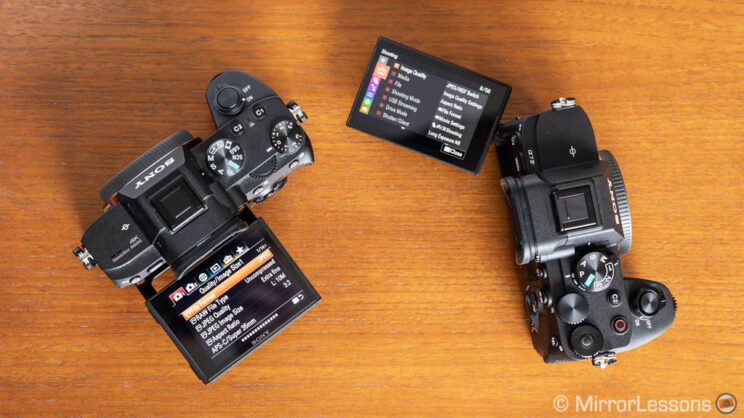

Whether you prefer the titling only mechanism or the multi-angle one, the nice thing about the A7 IV is that you can (finally) use touch sensitivity to control the menu system, or change settings in the Fn menu. On the A7 III, you can only move the AF point or double tap to activate magnification.


You can also instruct the A7 IV to go into stand-by mode when the monitor is closed, and wake-up when it is open again (Power Save by Monitor setting).
One annoying thing is that the terminal covers and the cables connected to the headphone or USB ports easily get in the way of the LCD screen if you rotate it when flipped 180˚. The covers can’t be removed (or I couldn’t find a way to do it without damaging them).

Concerning the live view, in addition to the standard things like previewing the Exposure and Image settings, the A7 IV has the option to preview the exposure from the flash, which is useful for studio work.
When working in video mode, focus magnification has better resolution on the A7 IV, and is actually usable, as opposed to the A7 III.
Finally, you can set a limit for the frame rate so that it doesn’t become too slow when working in low light (the image might be darker as a result).
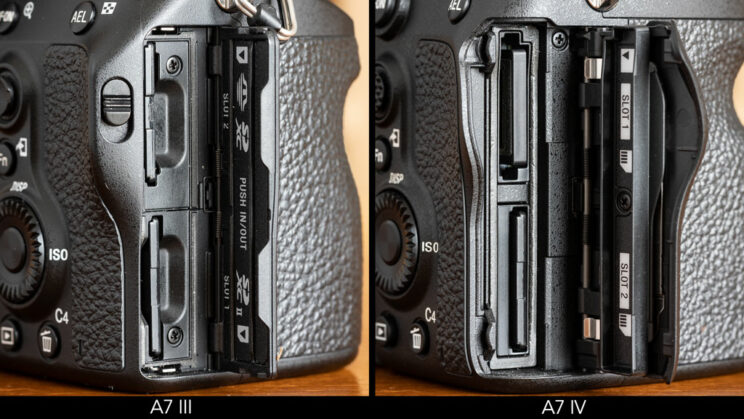
8. Memory cards
Both cameras feature two memory card slots that accept SD cards. On the A7 III, slot nb.1 is UHS-II compatible, whereas slot nb.2 is UHS-1 only.
On the A7 IV, both slots can work with the faster UHS-II SD cards and, what’s more, slot nb.1 also accepts the CFexpress Type A card, which provides faster writing and reading speed, and gives you a larger buffer memory, as explained previously.

As of now, there aren’t a lot of CFexpress ‘A’ cards on the market and they are rather expensive. To give you an example, the Prograde 160GB that I got can be found for around $360 (the Sony is more expensive), whereas a Sandisk Extreme Pro 128GB is less than $200.
Is the CFexpress card worth the money? It depends. There are only a limited combination of settings, or situations that can benefit from it. One advantage is to keep the maximum speed of 10fps for a longer time, which can be useful in sports events for example. But the only time the camera will require such a card is when you want to record 4K 60p at the maximum quality / bitrate with the S&Q mode to get a 2x slow motion clip in camera. For anything else, a fast SD card is more than enough.

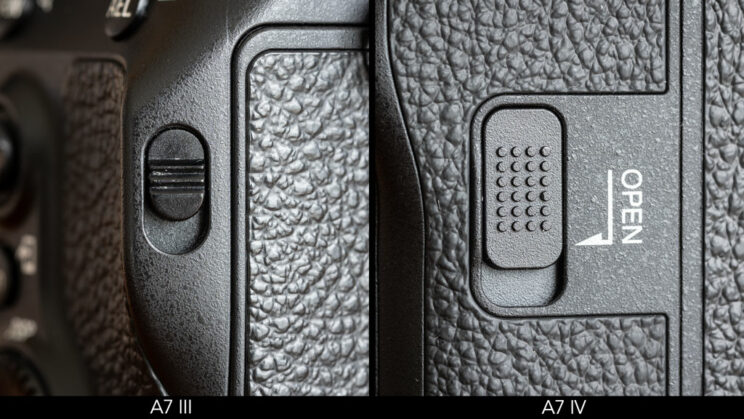
Finally, the memory card cover and opening mechanism is different: on the A7 III you just pull down a small switch and it opens automatically, whereas on the A7 IV you have to move down the larger switch and slide the cover backwards to open it, which makes the whole mechanism feel a bit stronger and more secure on the new camera.

9. Extra features and Feedback
The A7 IV has extra settings and features you won’t find on its predecessor.
- Anti-dust Function: it allows you to keep the shutter curtains closed when the camera is powered off, to protect the sensor from dust when changing lenses for example. This is a copy and paste idea from the Canon EOS R. Keep in mind that these curtains are delicate, and some believe they can be damaged more easily than the sensor itself.

- Aspect Ratio: in addition to 3:2 and 16:9, you can select 4:3 and 1:1
- Zoom: you can set a specific speed for the zoom function (digital zoom or power zoom lens) when using a remote or a custom key
- Peaking: one extra colour available (blue, in addition to yellow, red and white) when focusing manually.
- Exif: you can include your camera’s serial number
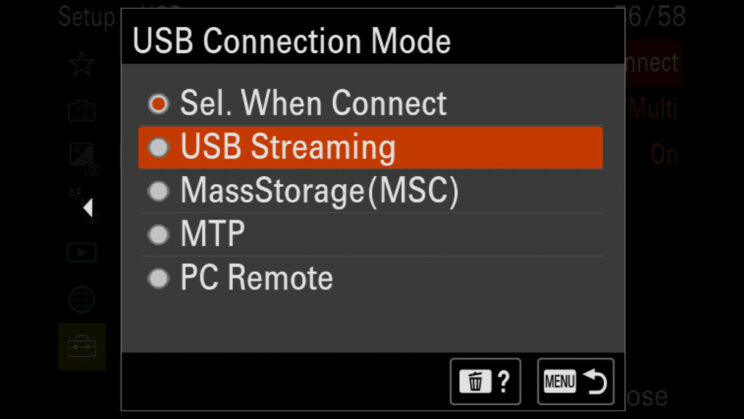
- USB Streaming: you can use the camera as a webcam with the USB C connection, after selecting the streaming option in the menu. No extra software or plugin required (unlike the A7 III). It works up to 4K 15p, or 1080p 60p, and you can record simultaneously on the memory card. I used it for a Microsoft Team meeting and it works exactly as intended.

- Wireless LAN: it works at 5Ghz, as opposed to 2.4Ghz on the A7 III.
- NFC: the option is gone on the new camera.
- RAW transfer: you can send RAW files to your smartphone (in addition to JPGs).
- FTP transfer while shooting: you can connect the camera to a server via wifi, wired LAN (with USB C adapter) or a USB tethered smartphone, and send images and video files while working. For the A7 III, only the wifi option is possible.
- Remote control: the Sony RMT-DSLR2 doesn’t work on the A7 IV, the IR receiver is gone, so you need the RMT-P1BT that works with Bluetooth.
As for the things they have in common, we have:
- Intervalometer (for timelapse)
- AE, WB and DRO Bracketing
- Metering with five different options (multi, centre weight, Spot Std, Spot Large, Entire Screen Average and Highlight). Both cameras meter in the same way.
- Wi-Fi and Bluetooth
10. Price
The A7 III can be found for $2000, £1700 or €1900.
The A7 IV is more expensive at $2500, £2400 or €2800.
Note: prices are for the body only and as of February 2022.
Video Review
Below you can watch the full comparison for photography in video format. Don’t forget to subscribe to our YouTube channel!
Conclusion
The A7 III is a camera I know very well. I bought it as soon as it came out in 2018, initially for review purpose on this website, and I’ve compared it to many other cameras. Overtime, it also became a tool I used for personal and occasional paid work.
It is also interesting to analyse the period in which these products arrived.
In 2018, Sony still had to prove it was a worthy contender against the likes of Canon and Nikon, and the A7 III (along with the A7R III and A9) did just that. It wasn’t just a relevant upgrade concerning quality and performance – it also included things that would help photographers take Sony more seriously, like dual card slots, an AF joystick and a better battery life. The A7 III ticked all those boxes and I think that’s why it can be perceived as more “revolutionary” than its successor.
The A7 IV arrived in 2021 when Sony had nothing left to prove when it comes to quality, performance and market sales. It is a major player on the interchangeable-lens camera market. So the successor is about refinement, keeping the series up to speed with the natural evolution of technology, and keeping it competitive with rival brands.
But while the mark IV model might seem less exciting at first, testing it for more than a month convinced me that it is, indeed, an excellent upgrade.
You get better ergonomics, more customisation, an improved EVF and better touch capabilities. There is more sensor resolution and dynamic range, without sacrificing much at high ISOs. Tracking AF is more reliable, and Eye AF works with Birds too. You can record video with more colour depth, as well as a higher bitrate and frame rate. There are more advanced settings to control every aspect of your photo or movie. Last but not least, there are many subtle but useful improvements, such as being able to change the colour of the AF area, which make the user experience more satisfying.

Not everything is worth the upgrade, for sure. There is no real benefit in terms of continuous shooting speed or the electronic shutter performance. The in-body image stabilisation offers some advantages for video recording. The fact that the price is higher than the A7 III was at launch doesn’t help either.
As always, whether or not the new model is worth buying instead of the previous one is up to you to decide, based on your photographic needs. Personally, I’m going to keep the IV and sell the III.
Reminder: the links below are affiliate links. If you decided to buy something after clicking the link, we will receive a small commission.
Check price of the Sony A7 III on
Amazon | Amazon UK | B&H Photo | eBay
Check price of the Sony A7 IV on
Amazon | Amazon UK | B&H Photo | eBay